About Apps
The ![]() Apps page lets you access the app library of a project.
Apps page lets you access the app library of a project.
- What is an app?
-
An app is a Docker image that can be mounted inside projects using one of the integrated technologies. Persistent storage spaces can be assigned to an app to keep data in a defined volume path when the app is stopped.
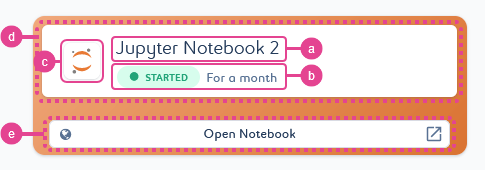
Apps are displayed as cards. They show some basic information, such as the name (a), current status (b), and technology (c) of the app.
|
Overview Page
The ![]() Overview page provides general information on your app.
Overview page provides general information on your app.
By default, the page opens when you click the app name of the desired card in the project’s app library.

The first part of the page (1) gives general information on the app, such as the last instance details, version used, name, and description. It also allows you to manage the app settings and upgrade your app to create a new version of it.
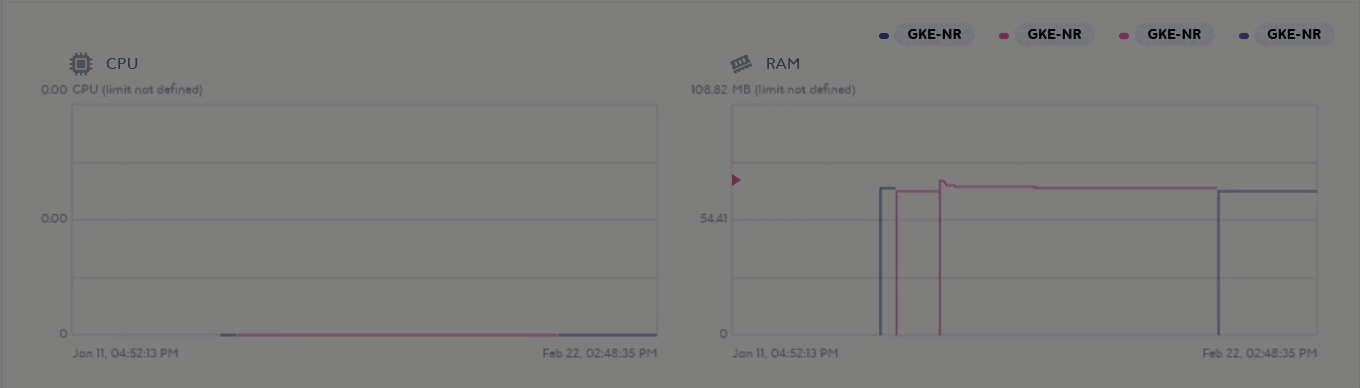
The second part of the page (2) gives information on app runtime and consumption through a timeline and various graphs. You can use the timeline to see your app’s up and down times and the graphs to check your app consumption.
|
|
Monitoring the RAM consumption of your app can help you anticipate potential memory issues. Indeed, an app that consumes more than the available RAM limit goes into an You can define a RAM limit for your app in its settings. If you have not defined a RAM limit, the app will run according to the overall RAM capacity of the node. In both cases, adjust the RAM limit for your node or app to ensure successful execution. For more information on monitoring your platform resources, see About the Monitoring Module. |
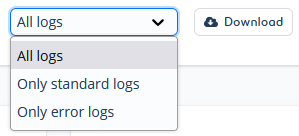
The third part of the page (3) gives information on the app logs. You can choose to view and download All logs, Only standard logs or Only error logs.
The fourth part of the page (4) gives information on the exposed ports, persistent storage spaces, and the technology used.
History Page
The ![]() History page gives information about the change history of your app, so you can keep track of the changes that have been made.
History page gives information about the change history of your app, so you can keep track of the changes that have been made.
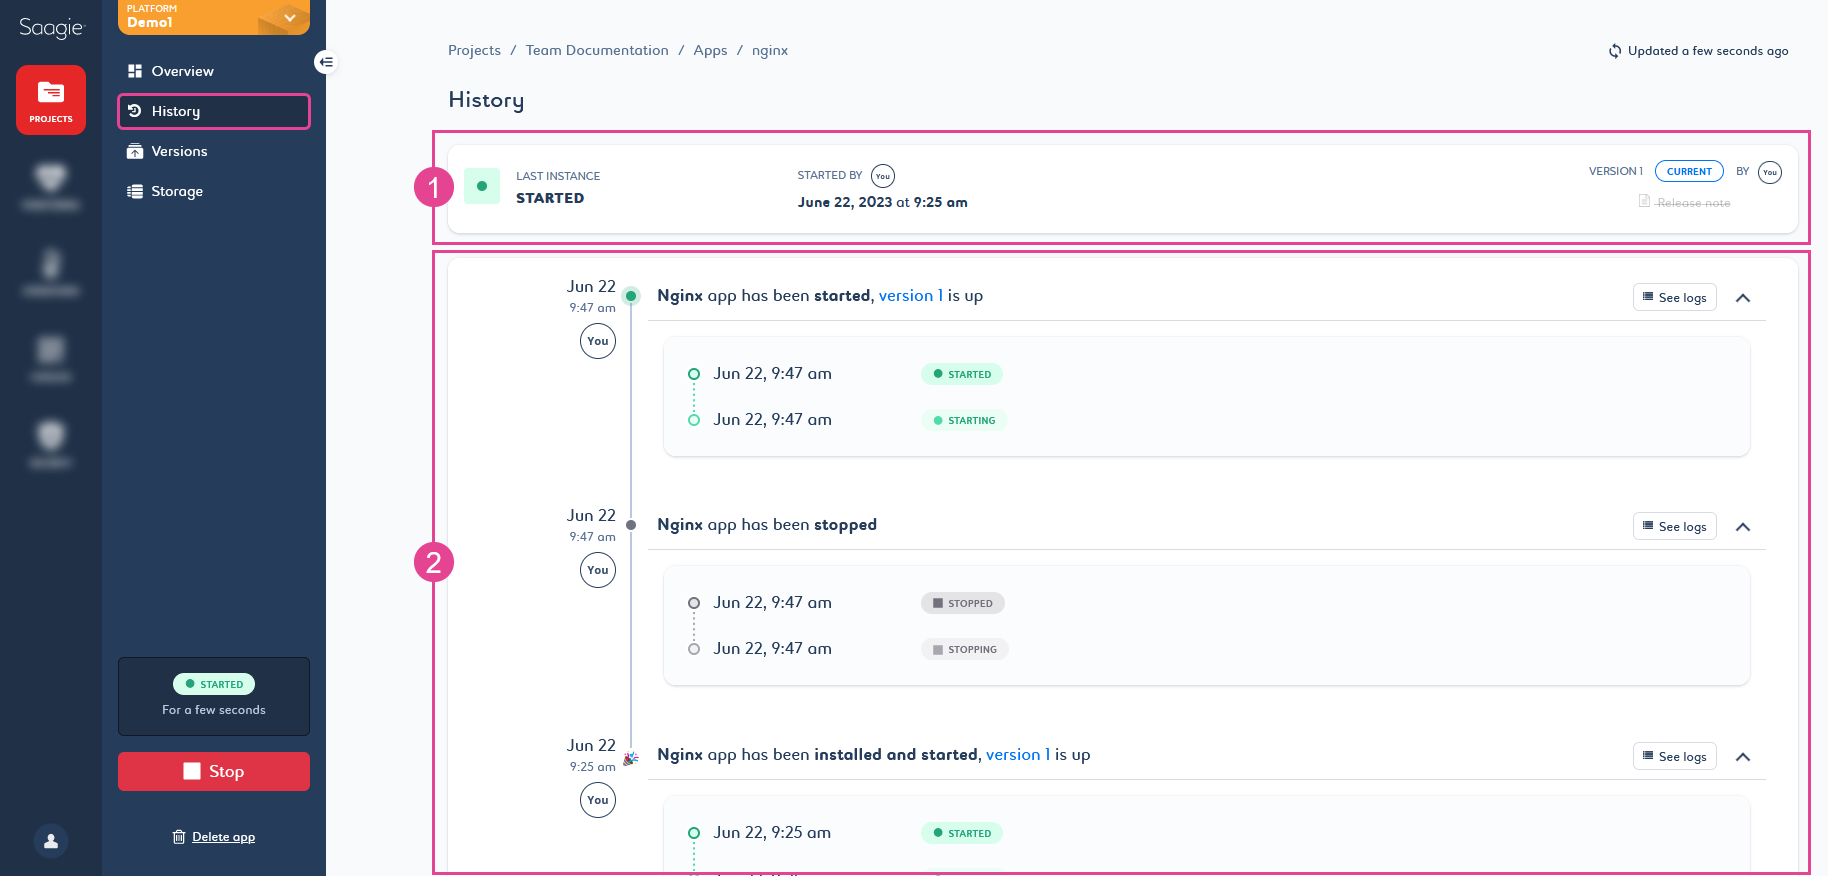
The first part of the page (1) gives general information on the app, such as its current status, creation date, version, release note, and runtime details.
The second part of the page (2) gives a timeline of the app activities. You can see the different stages your app has gone through and who initiated actions, such as launching, stopping, or upgrading the app. You can also view and download the logs for each step by clicking See logs (3). A pop-up window opens to display the logs for the selected action. You can then choose to display All logs, Only standard logs or Only error logs.
Versions Page
The ![]() Versions page gives information on the version of your app. It also keeps track of all previous versions.
Versions page gives information on the version of your app. It also keeps track of all previous versions.
- What is a version?
-
A version is a single iteration of a job, pipeline, or app. Each new upgrade is stored as a version, so you can roll back to previous iterations and keep track of the changes that have been made.
Each time you upgrade an app, you create a new version of it. This version is automatically defined as the Current ![]() version.
version.
All versions are saved and remain accessible. They are listed on the right side of the page (1), and you can see the information of a version by selecting it in the list.
You can switch back and forth between versions by selecting a version from the list and clicking Rollback to this version (2). The selected version then becomes the new Current ![]() version.
version.
You can define a version as major to highlight the most stable app version. Select a version from the list and click Set as major version (3). The version appears with the Major version label and sparks in front of its line. Click Unset as a major version to remove the label from a version.
By default, the page opens on the version of the app in use, tagged with the Current ![]() badge.
badge.
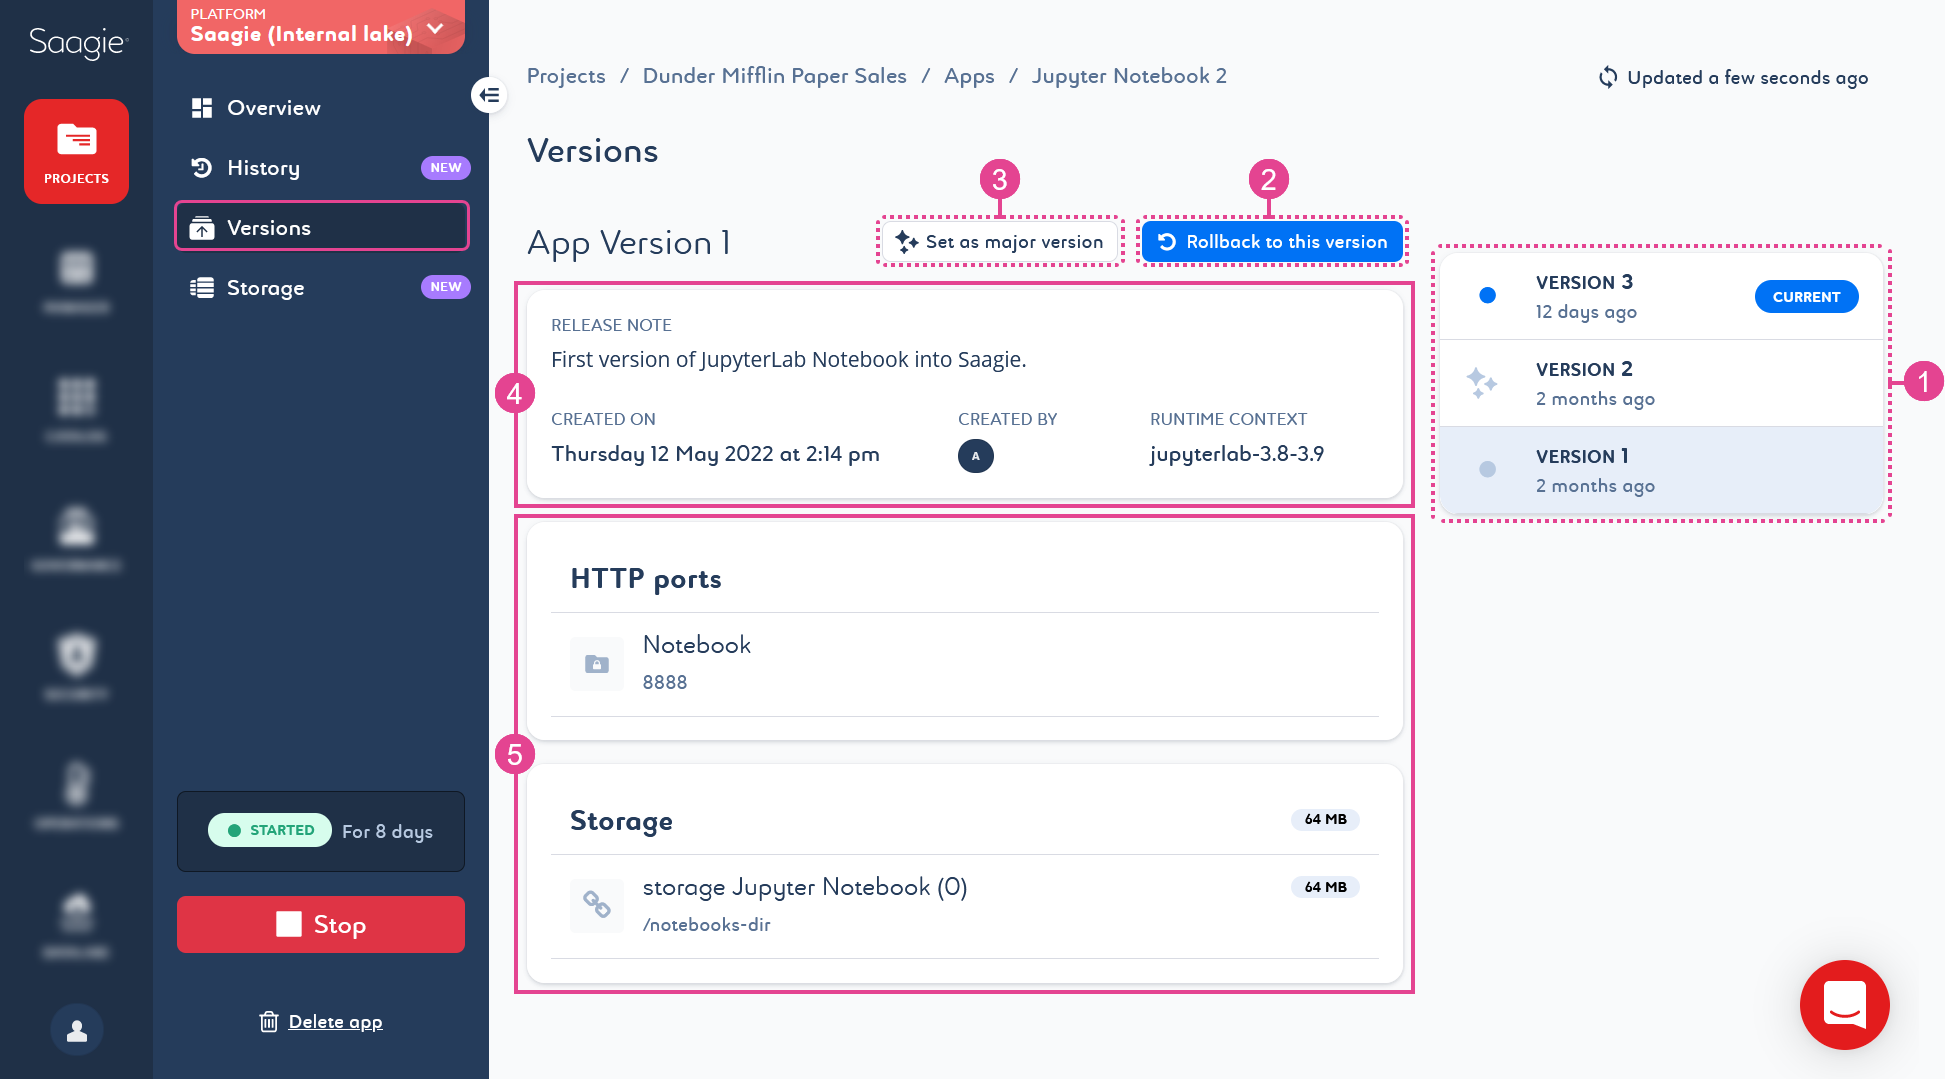
The first part of the page (4) gives general information about the version, such as the release note, creation date, and creator. It also gives information on the execution context if it is an app from the Saagie catalog, or on the Docker image if it is a custom app.
The second part of the page (5) gives information on exposed ports and persistent storage spaces, if one is attached to the app.
Storage Page
The ![]() Storage page gives information on the storage space(s) allocated to your app. It allows you to manage storage spaces independently of the app.
Storage page gives information on the storage space(s) allocated to your app. It allows you to manage storage spaces independently of the app.
- What is a storage space?
-
A storage space is persistent. It can be assigned to an app to keep data in a defined volume path.
When installing an app from the Saagie catalog, a storage space is created and attached by default to the app.
When installing a custom app, a storage space is allocated to the app during the installation steps. You can choose to attach existing storage spaces to your app, or you can create it on the fly.
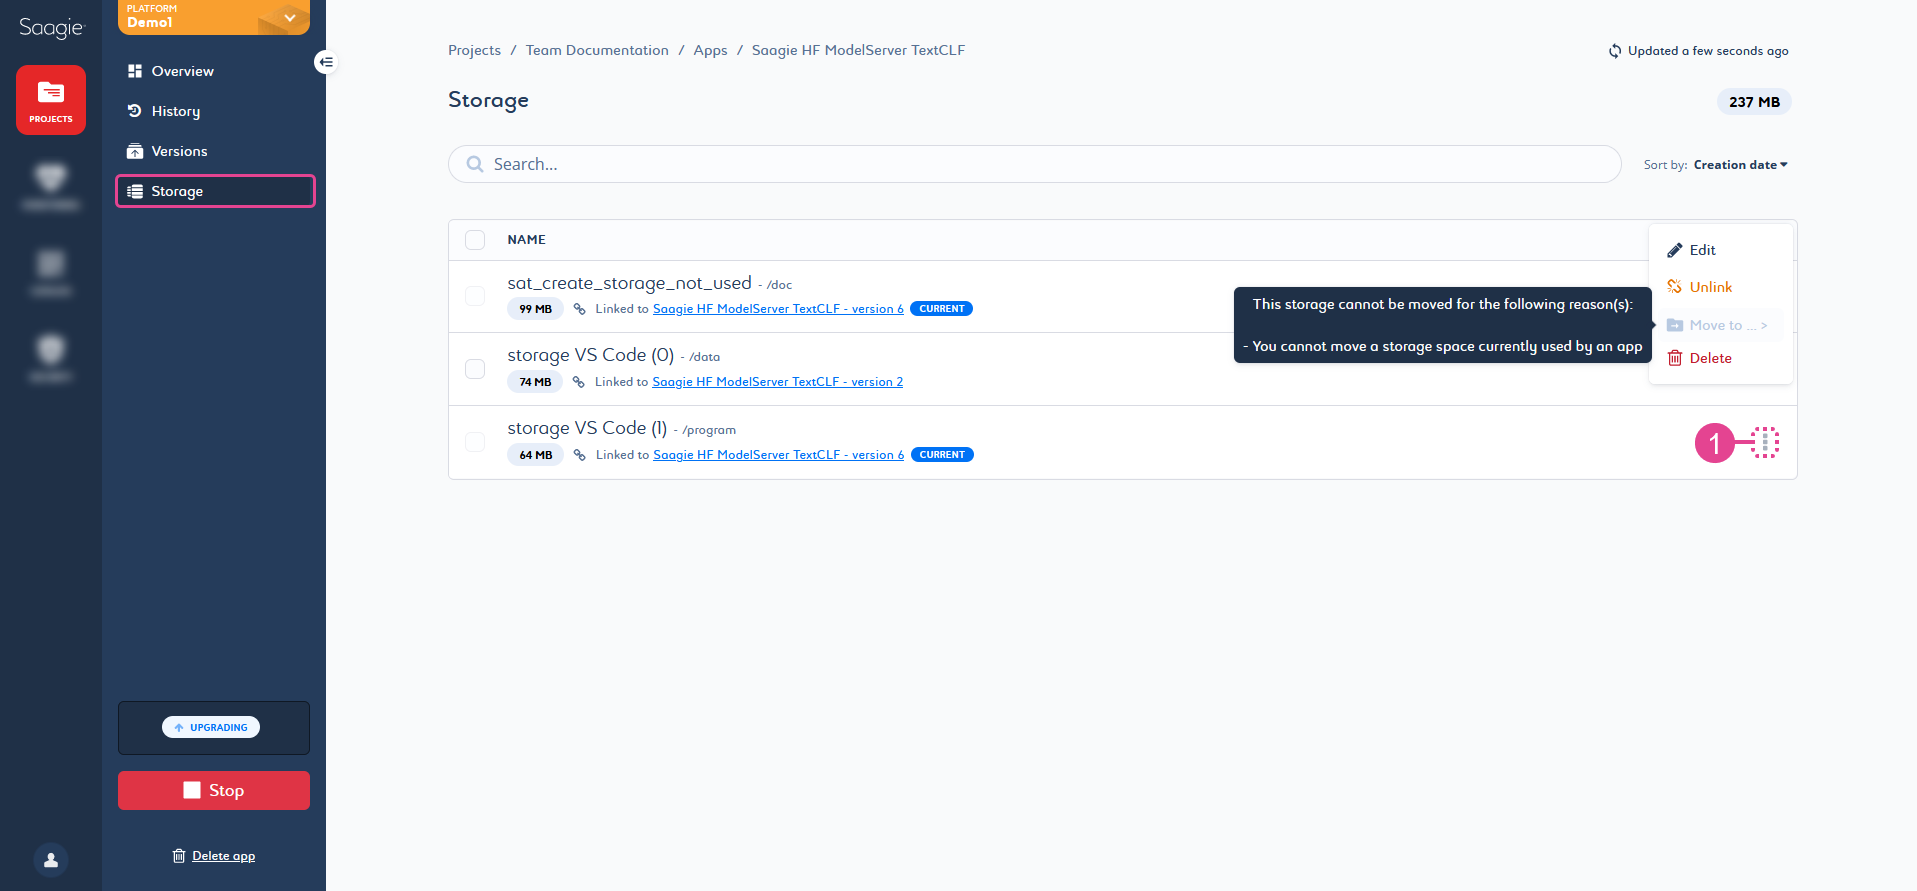
Storage spaces can be edited, unlinked, duplicated, moved, and deleted by clicking the kebab menu ![]() (1). Note that you cannot unlink, move, or delete a storage space attached to a version of an app that is in use and tagged as
(1). Note that you cannot unlink, move, or delete a storage space attached to a version of an app that is in use and tagged as Current ![]() .
.
New storage spaces can be allocated by upgrading your app, which will create a new version of the app linked to the added storage space. You can also allocate a new storage space by creating it from the project ![]() Storage page. This page allows you to access and manage all storage spaces of the project.
Storage page. This page allows you to access and manage all storage spaces of the project.
|
If you want to roll back to a version of an app that was using an unlinked, moved, or deleted storage space, you will have to reattach it to a storage space. To do this, click the desired app version from its |
Environment Variables Page
The ![]() Environment Variables page gives you access to the environment variables of the app.
Environment Variables page gives you access to the environment variables of the app.
Environment variables are listed with some basic information, such as the name and description. Its application level is also indicated with the App ![]() label.
label.
At the app level, the ![]() Environment Variables page gives you access to the environment variables defined for the selected app but also to the project and global environment variables. However, you can only create and edit environment variables for the app.
Environment Variables page gives you access to the environment variables defined for the selected app but also to the project and global environment variables. However, you can only create and edit environment variables for the app.
Click the environment variable to view its information. A panel opens. You can edit its information from this panel.
You can create up to 200 environment variables per app. When you reach this limit, the create button becomes unavailable, preventing you from creating new environment variables.
Environment variable can be defined as passwords. Select the option is password if your value is a password and must be hidden.
Environment variables are unique within a scope, but an inferior level can override a higher level. For more information, see Overriding Environment Variables.
To access this page click ![]() Projects
Projects ![]() All Projects My Project
All Projects My Project ![]() Apps My App
Apps My App ![]() Environment Variables.
Environment Variables.
|
Environment variables can be created at the platform, project, pipeline, and app level, allowing you to have values dedicated to a specific scope without impacting the others. Therefore, you will find an Environment Variables page for each scope.
|