Managing Apps
Installing Apps
| Apps of the Saagie catalog can be found in the official Saagie repository. Custom apps, however, are not located in a repository. They are based on a Docker image. You can add and manage custom apps using our Software Development Kit (SDK). |
-
Click
 Projects from the primary navigation menu.
By default, the All Projects page opens with the list of existing projects. -
Click a project in the list to open it.
By default, the Jobs page opens with the list of existing jobs.
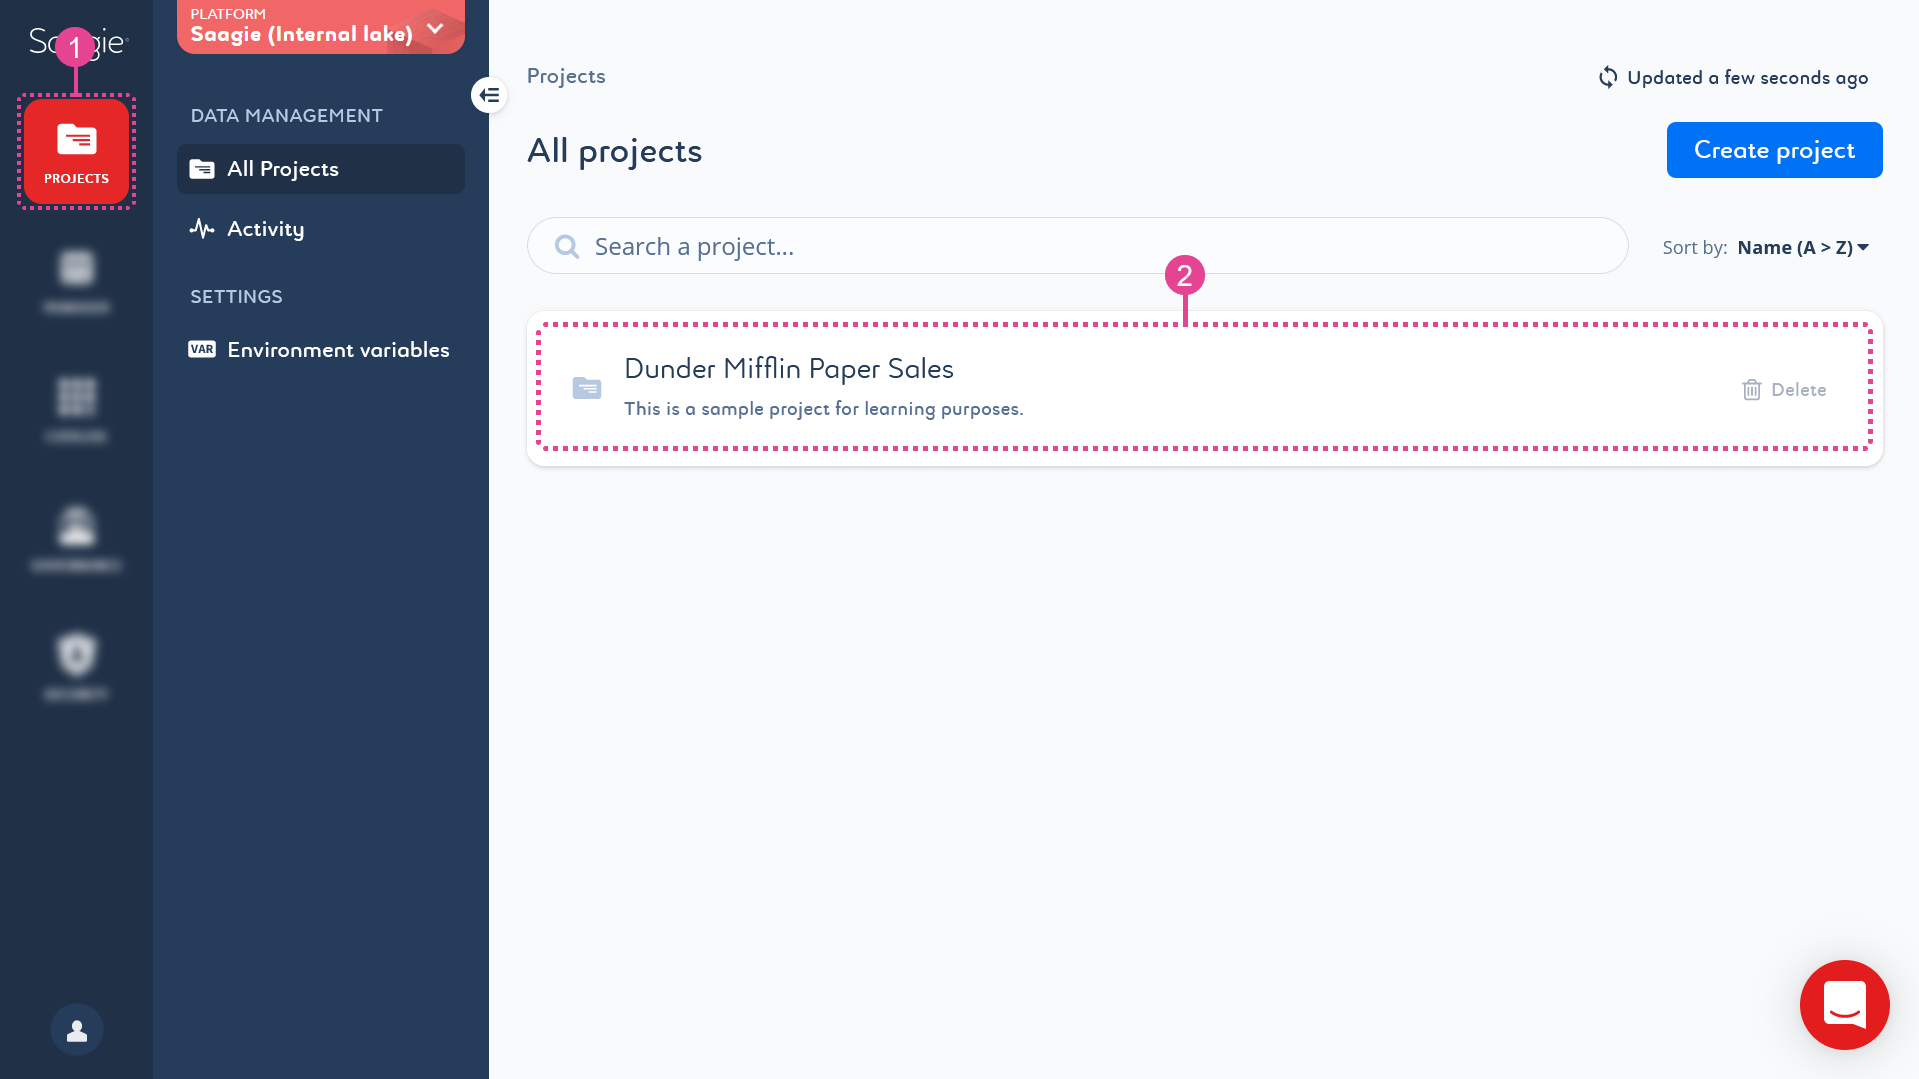
-
Click
 Apps from the secondary navigation menu to open the project’s app library.
 -
Click Install an app to install a new app.
The Install an app from the catalog page opens.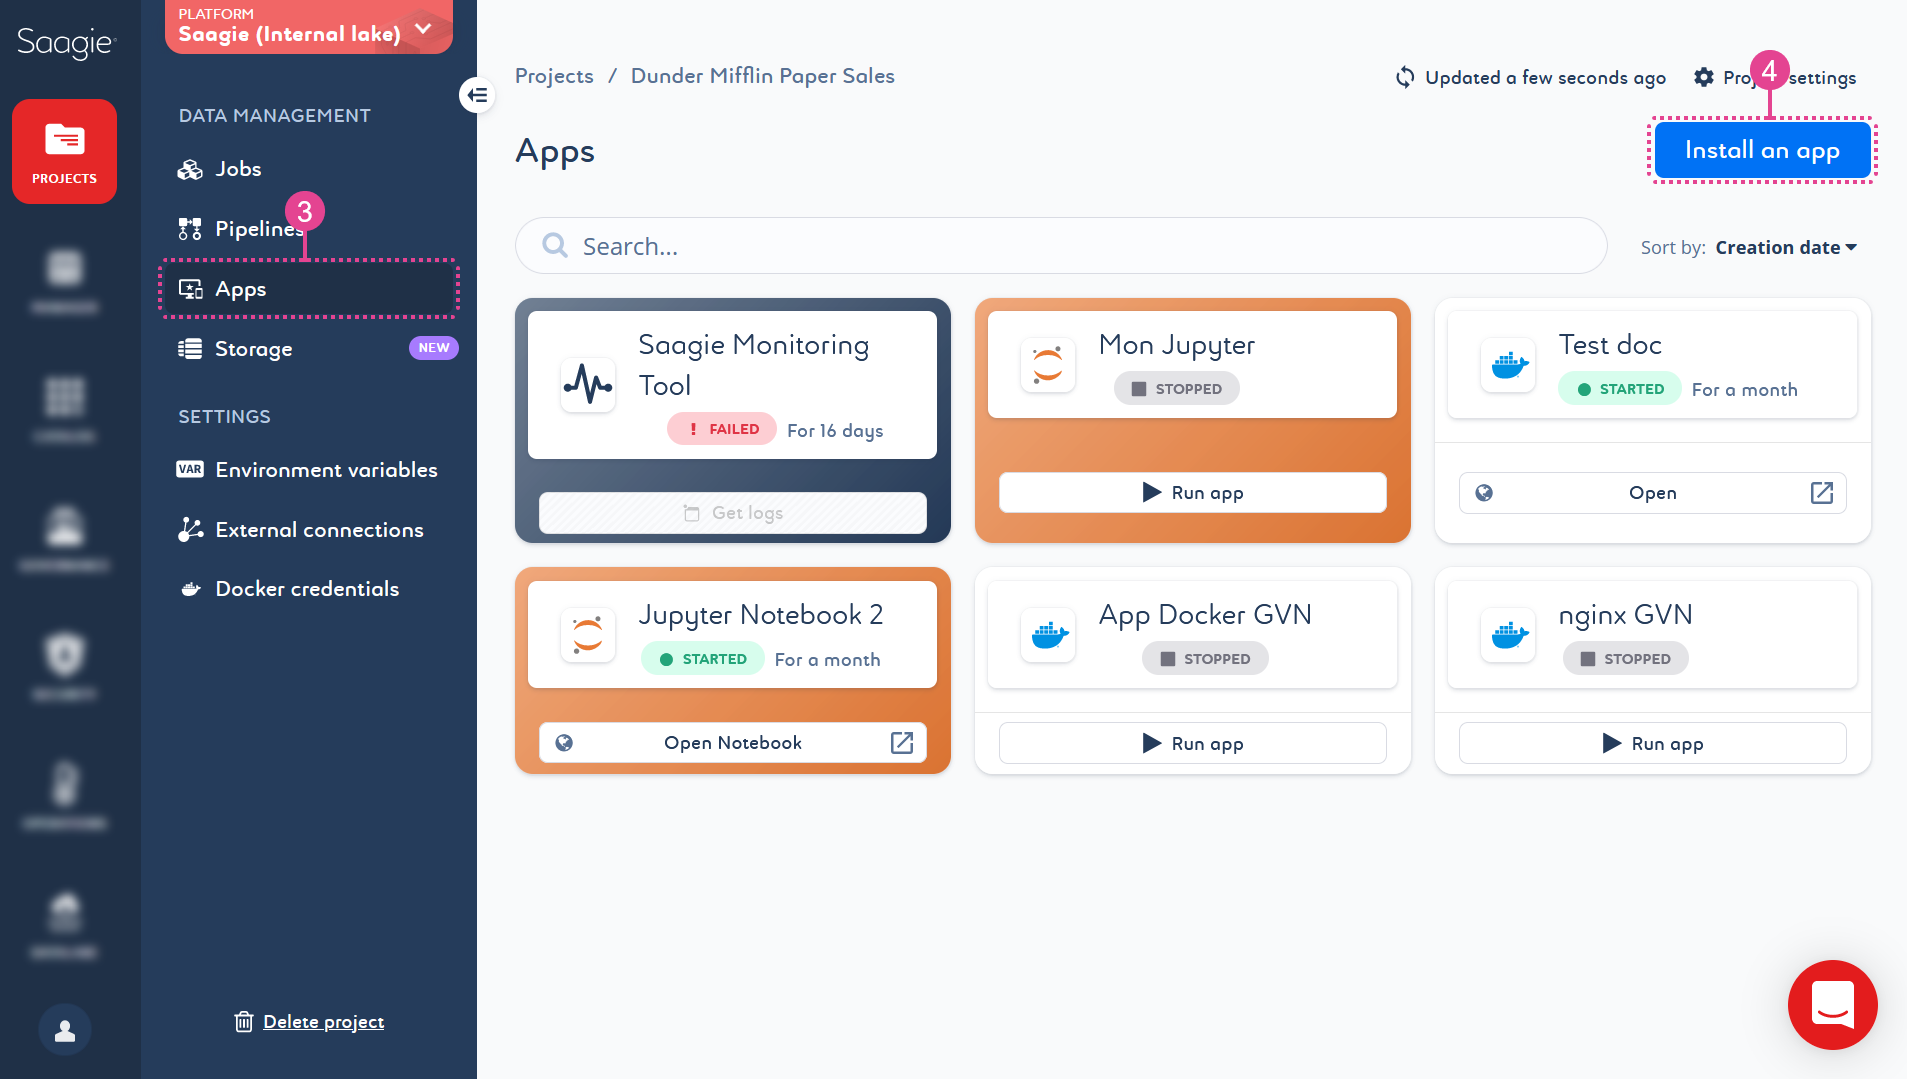
-
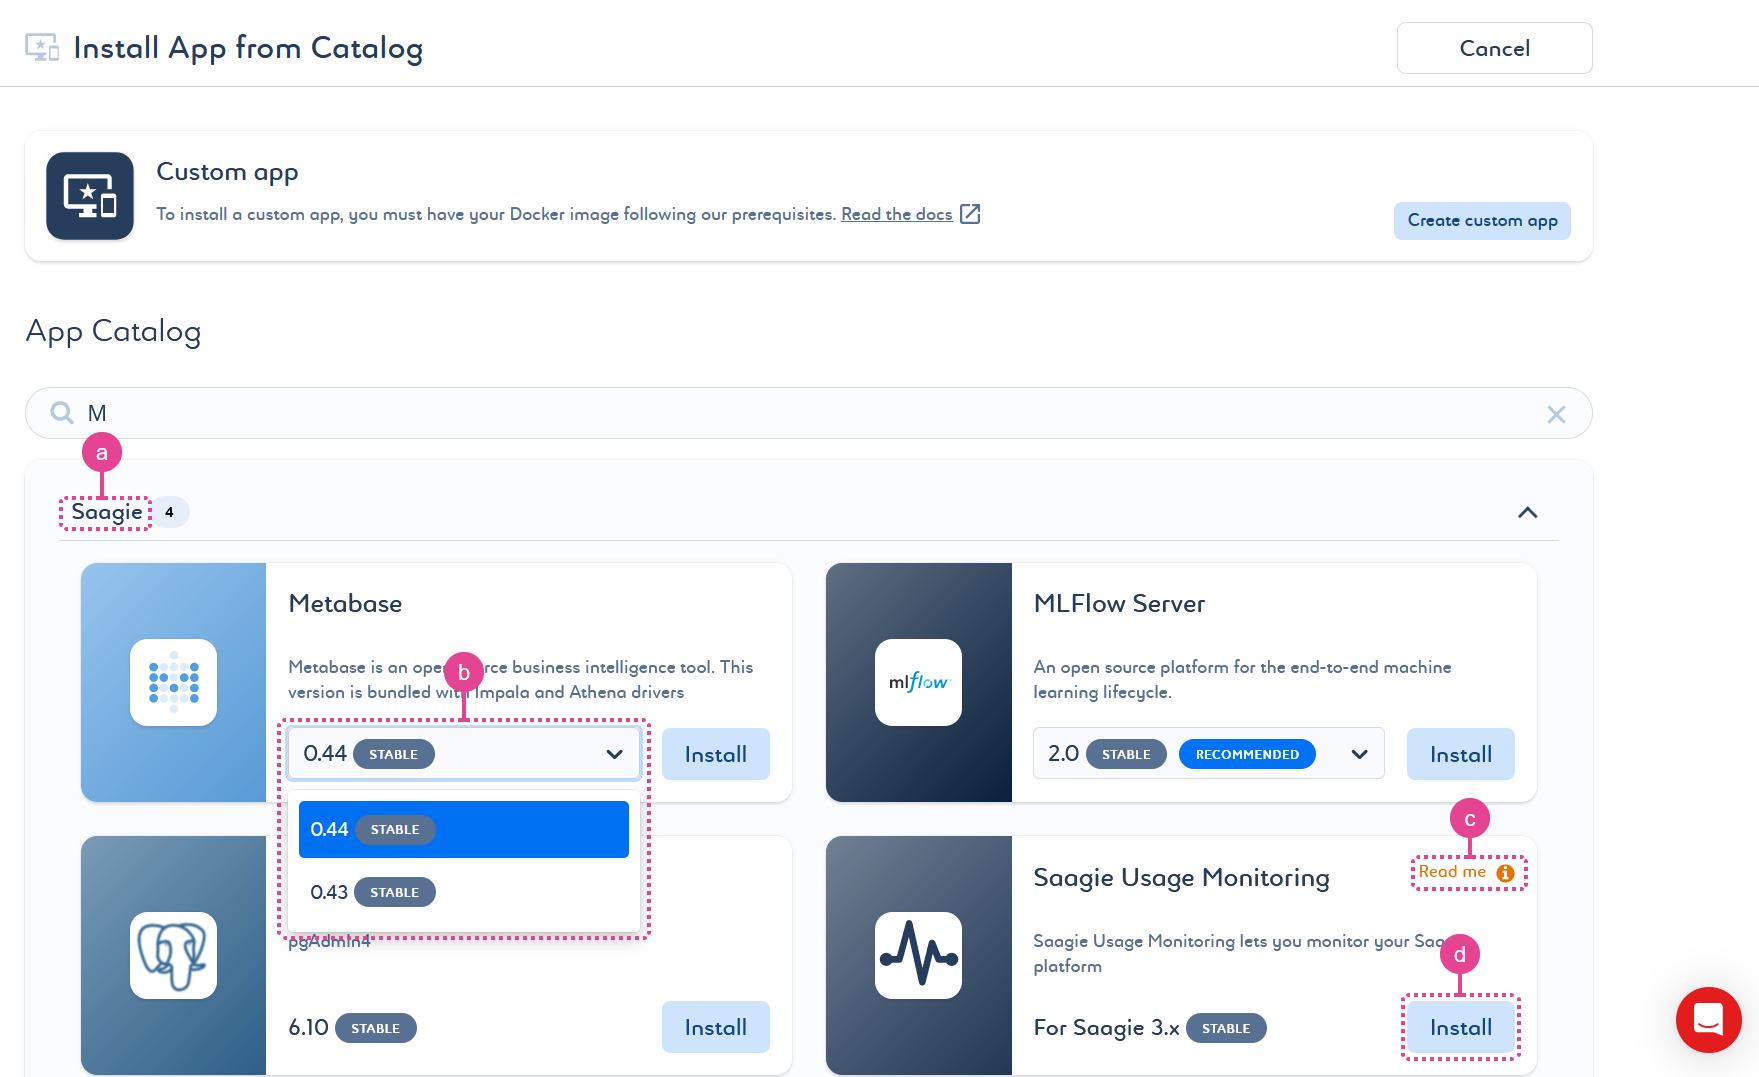
You can choose between:
-
Locate the correct repository.
-
OPTIONAL: Select a context from the list if the app has several available.
-
OPTIONAL: Some apps require additional configuration to work. Click Read me
 to display and read the README help file directly in Saagie before installing your app. It will also be available afterwards on the
  Environment Variables page of the app.
 -
Click Install on the app card to install it.
Your app’s
 Overview page opens, and a message appears telling you that your app has been created.
Your app is ready to go!
-
Click Create custom app.
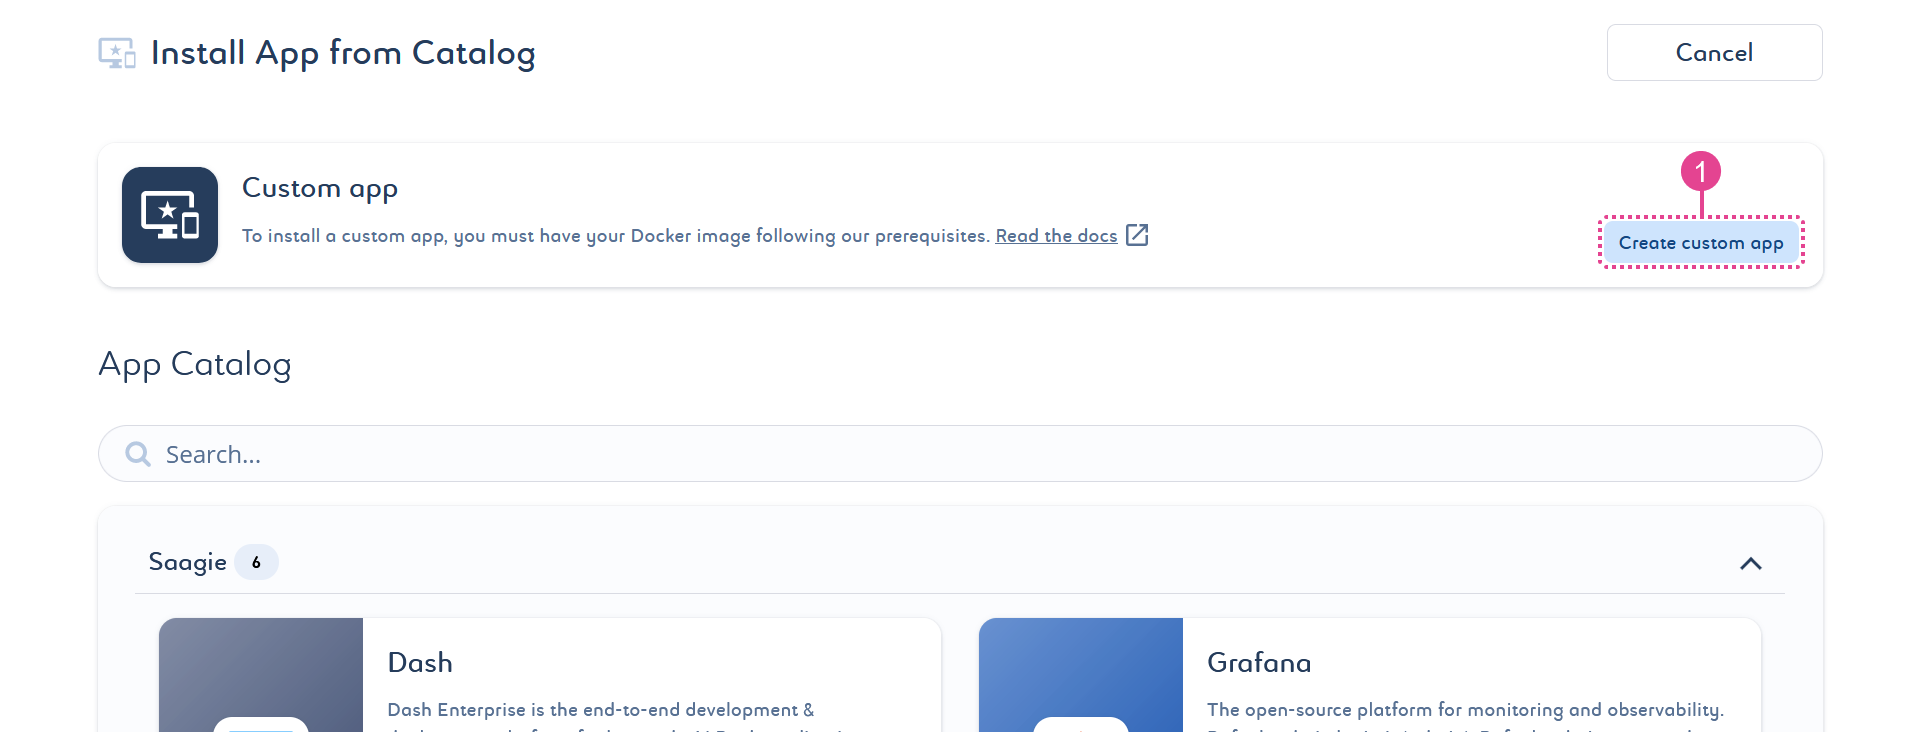
The New custom app page opens.
-
Enter a name and add a description.
-
Click Continue.
-
Specify the Docker image URL of your app.
Click the switch to add Docker credentials. -
Click Continue.
-
Define the HTTP Ports to use for the app.
Only the HTTP protocol is allowed. -
Click Continue.
-
Add an existing storage space or create a new one. For more information, see the Storage Spaces section.
-
Click Continue
-
Configure settings to set your app resources, and send email alerts. You can also add a release note.
Your app’s
Overview page opens, and a message appears telling you that your app has been created.
Your custom app is ready to go!
-
Deleting an App
-
To delete an app, you can either:
-
Click the kebab menu

 Delete from the Overview page of the corresponding app.
 -
Click
Delete app at the bottom of the secondary navigation menu from any other page of the corresponding app.
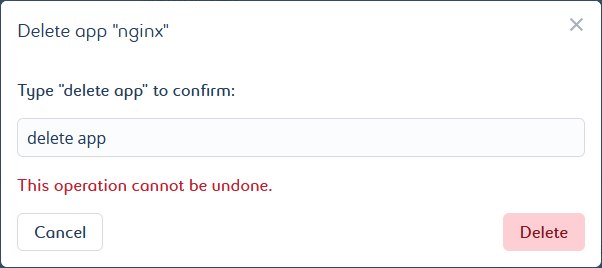
A pop-up window opens. It asks you to manually enter a confirmation message.
-
-
Type in the requested message for confirmation. The message is case sensitive.
-
Click Delete to confirm the deletion.
Running and Stopping Apps
-
Click
Projects from the primary navigation menu.
By default, the All Projects page opens with the list of existing projects. -
Click a project in the list to open it.
By default, the Jobs page opens with the list of existing jobs.
-
Click
Apps from the secondary navigation menu to open the project’s app library. -
Click an app card in the list to access its details.
The app Overview page opens. -
To stop your app, click Stop
 from the Overview page.
Your app is no longer running. The Stop button became a Run button and theStartedbadge became aStoppedbadge. -
To restart your app, click Run
 from the Overview page.
Similarly, as in the previous step, the Run button became a Stop button and theStoppedbadge became aStartedbadge again.You can also access this command at the bottom of the secondary navigation menu from the  History,
  Versions, and
  Storage page.
-
Click the
History page of your app to view the changes that have been made.
Modifying App Settings
After its creation, you can always modify your app settings.
You can access the settings from your app’s ![]() Overview page.
Overview page.
-
Click
Projects from the primary navigation menu.
By default, the All Projects page opens with the list of existing projects. -
Click a project in the list to open it.
By default, the Jobs page opens with the list of existing jobs.
-
Click
Apps from the secondary navigation menu to open the project’s app library. -
Click an app card in the list to access its details.
The app Overview page opens. -
Click the desired setting from the
Overview page to edit it: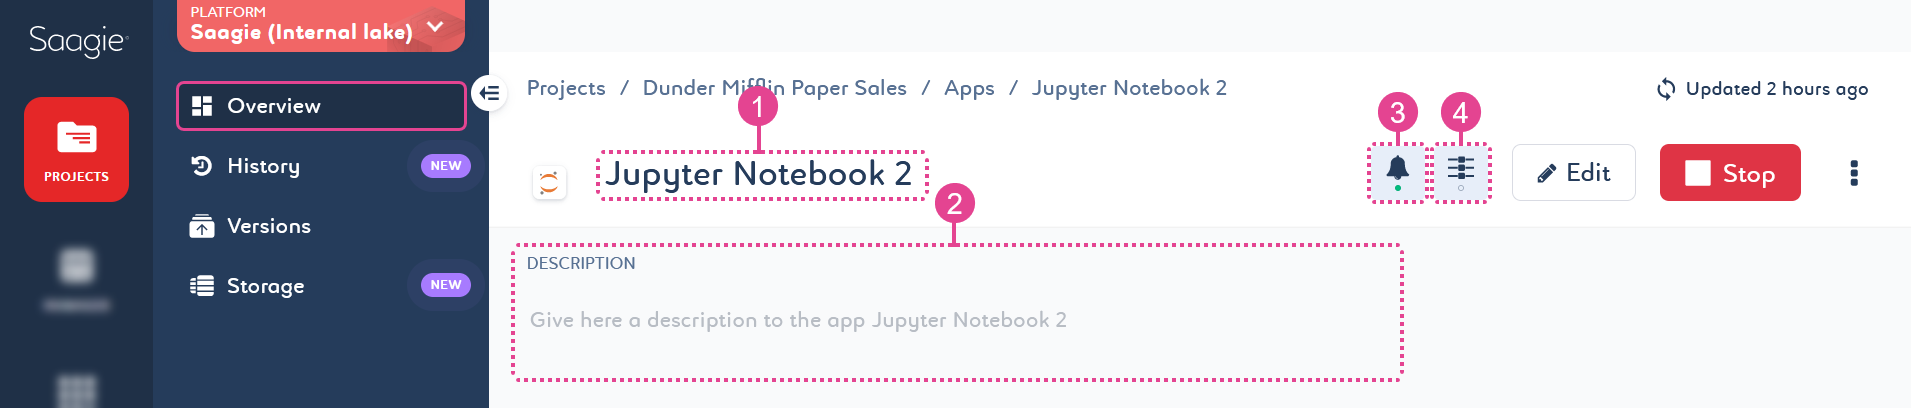
Names are mandatory. They can be up to 255 characters long and must be unique within a project.
Descriptions are optional and not restricted. However, it is a good practice to add them. Keep them short and to the point.
Click the switch in the side panel of the setting to enable or disable it. Alerts are optional and can be set to receive an email when the status of your app changes. They can be sent to multiple email addresses to notify you of the following status changes:
Status Description 
StartingThe app’s run has been requested and is being executed.
StartedThe app is up and running.

Rolling backThe app is rolling back to a requested version.

UpgradingThe application has been updated and is upgrading.

RecoveringThe app has restarted itself and is doing so.
RestartingThe app is restarting.

StoppingThe app is stopping.
StoppedThe app has stopped running.

FailedThe app has crashed.
A failed app can go into an 
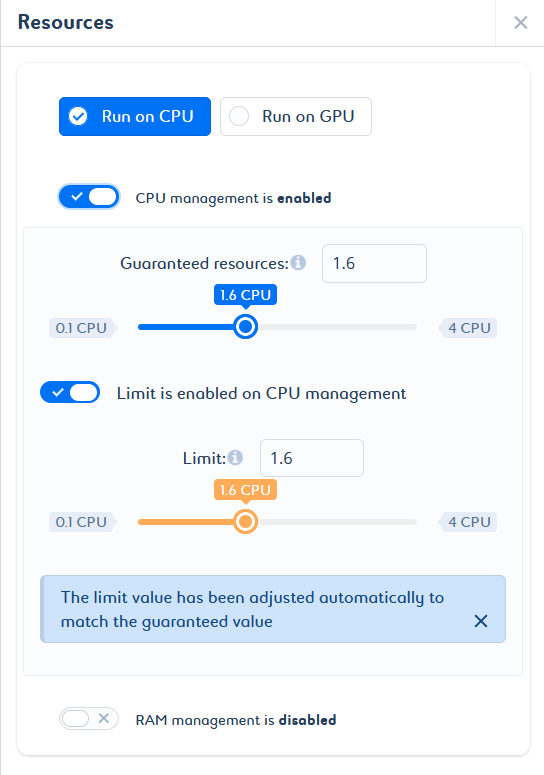
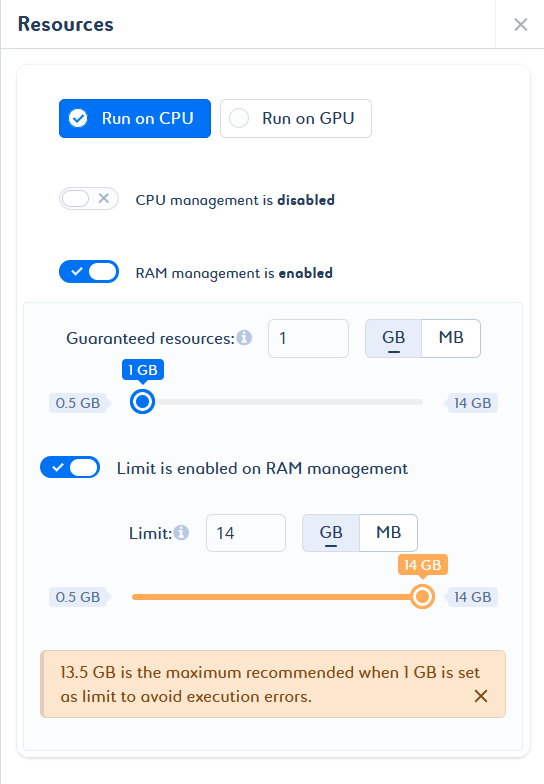
Out Of Memory(OOM) state, which is an extension of theFailedstate. The OOM state can be due to a lack of memory (RAM).Click the switch in the side panel of the setting to enable or disable it. The consumption of your app can be managed by guaranteed resources, that is, the minimum amount of resource requested, and limited resources, that is, the maximum amount of resource that can be consumed.
When you create your app, CPU and RAM resource management is enabled by default with predefined values. In other words, based on the default values defined at technology level, Saagie automatically assigns resource requests and limits to your app. These values can be adjusted to suit your needs.
Default values are already set by Saagie at the technology level. These values are mandatory. They also exist at the technology context level, where they can override the values defined at the technology level. You can configure them when you create your app, or by modifying the Resources  setting of the app.
If the resource capacity is not defined, the defaults that are defined at the technology level will be assigned at the technology context level.
Automatic adjustments can be made to avoid inconsistent configurations. If you try to set a guaranteed value that is greater than the limit value, a note appears to inform you that the guaranteed value has been adjusted. If you try to set a limit value smaller than the guaranteed value, a note appears to inform you that the limit value has been adjusted (a).
In addition, if the guaranteed value and the limit value are not optimal, a message is displayed with the appropriate values for an optimal configuration (b).
-
Saving is automatic. You can just press Enter to validate the app name change, click anywhere nearby to confirm the description change, and close de side panel to validate the email alert, and resource changes.
Upgrading Apps
-
Click
Projects from the primary navigation menu.
By default, the All Projects page opens with the list of existing projects. -
Click a project in the list to open it.
By default, the Jobs page opens with the list of existing jobs.
-
Click
Apps from the secondary navigation menu to open the project’s app library. -
Click an app card in the list to access its details.
The app Overview page opens. -
Click
 Edit from the Overview page.
The Upgrade app page opens. -
Depending on whether it is an app from the Saagie catalog or a custom app, you can:
-
Modify the context of the app. Select the desired context from the list.
We recommend you to upgrade your app with a context that is indicated as Stable  and Recommended
  .
.
-
Modify the access settings for the HTTP ports used for the app.
-
Manage the storage spaces of the app. You can delete, add, and create storage spaces. For more information, see Managing Storage Spaces.
-
Add a release note describing the changes you have made. Select the Add a release note for this app version option and write a few sentences that will be displayed on the app
Overview page.
-
Modify the Docker information of your app.
-
Manage the access settings for the HTTP ports used for the app. You can delete, add, and create HTTP ports.
-
Manage the storage spaces of the app. You can delete, add, and create storage spaces. For more information, see Managing Storage Spaces.
-
Add a release note describing the changes you have made. Select the Add a release note for this app version option and write a few sentences that will be displayed on the app
Overview page.
-
-
Click Save to save your changes and exit the app upgrade settings.
A new version of your app has been created. You are returned to the updated Overview page of your app, which restarts automatically.
Your upgraded app is ready to go!
Backup Application Data
In a cloud environment, the Saagie platform has a replication system across three separate sites. It is entirely possible to restore an entire platform and its data, but this is a global process; a partial restoration is not possible.
An application’s data is persistent and stored in the application’s storage spaces, but there is no native backup system for application data, or these storage spaces, on the Saagie platform.
The default retention period is two days.
However, it is possible to back up application data in several ways: Storage duplication or Software backup.
Storage Duplication
-
Backup: Duplication of the Saagie application’s storage at a given time, backup to an S3 bucket.
-
Restore: Mount the volume to the application
Software backup
Backup: It is possible to perform a software backup (dump, export), stored in the application’s storage space, and, using the same principle, deposit this backup into an S3 bucket.
Restore: Mount the volume to the application, perform a software restore using the backup file.
How to backup storage space?
-
Stop the application for which you want to back up storage
-
Duplicate your storage → How to duplicate storage spaces
-
Install the TTYD application from the Saagie Community catalog
-
Link the duplicated storage to the TTYD application → How to manage Storage spaces
-
In the TTYD application console, compress the directory to create a file that you will upload to the S3 bucket
tar -xzvf <my_file> -C /<target_path> -
Install the s3cmd tool in the TTYD application console
apt-get update -y && apt-get install -y s3cmd && python3.11 -m pip install --upgrade pip && pip install --upgrade s3cmd -
Configure s3cmd to access the S3 bucket
s3cmd --configure -
Enter the connection information:
-
Access Key
-
Secret Key
-
Default Region
-
S3 Endpoint
-
DNS
Leave the default:
-
Encryption password
-
Path to GPG program:
/usr/bin/gpg -
Use HTTPS protocol:
True -
HTTP Proxy server name
-
-
-
Transfer the file to the S3 bucket
s3cmd sync /<SOURCE>/ s3://<DESTINATION>
How to restore from a backup?
-
Install the TTYD application from the Saagie Community catalog
-
Associate a storage space → How to manage Storage spaces
-
Install the s3cmd tool in the TTYD console:
apt-get update -y && apt-get install -y s3cmd && python3.11 -m pip install --upgrade pip && pip install --upgrade s3cmd -
Configure s3cmd to communicate with the S3 bucket:
s3cmd --configure -
Enter the connection information:
-
Access Key
-
Secret Key
-
Default Region
-
S3 Endpoint
-
DNS
Leave the default:
-
Encryption password
-
Path to GPG program:
/usr/bin/gpg -
Use HTTPS protocol:
True -
HTTP Proxy server name
-
-
-
Retrieve the archive from the S3 bucket with TTYD
s3cmd sync s3://<BUCKET_SOURCE> /<DESTINATION>/ -
Unzip the archive
tar -xzvf /<my_file> -C /path/target -
Stop the TTYD application
-
Delete and unlink the storage associated with the TTYD
-
Link this storage to the application
-
Launch the application
-
Verify that the data is present