Starting With the Saagie Project Example
The name of the project is [Sample Project] Sentiment Detection on Movie Reviews.
You can access it from your platform’s project library:
-
Click
Projects from the primary navigation menu.
TheAll Projects page opens with the list of existing projects.
-
From this list, click the project named
[Sample Project] Sentiment Detection on Movie Reviews.
The project opens on its job library.
The project contains a pipeline of five jobs. The jobs are linked to three apps, and some environment variables. All these elements are linked together. Their goal is to learn a model capable to detect feelings on texts related to movie reviews. We will break down this project starting from the pipeline jobs.
| The job technologies used in this pipeline are Python and Bash, but you can use others. |
The first job, named Data preparation, retrieves and stocks external data on an Amazon S3 lake.
| This example is base on a small dataset, that is, about 50,000 texts. |
The second job, named Clean data, is for data preprocessing.
It retrieves the data from the data lake and processes it, by removing all non-text elements that could interfere with the model learning, such as HTML tags. In other words, it cleans the data and saves it in the data lake.
The third job, named Finetune a pretrained model, will learn our model using the cleaned data.
| The model used here is a pretrained model called BERT, whose goal is to understand a broad-based text. |
This job will fine-tune the pretrained model on custom data to predict the polarity of a text.
Everything done during this learning process is stored in an MLFlow app.
You can access the app and the detailed logs of this third job from the project’s app library, by clicking Open on the relevant app card. The MLFlow app opens in a new tab.
Click a row in the table to access the job parameter details of one of the job iterations.
From this job, you will be able to modify many model hyperparameters, such as the learning rate, to improve or not the model. This means that you can run the job multiple times with different job parameters or not to get broader results. Indeed, it is recommended to run this job several times because the model often learns differently with each new hyperparameter settings.
When the learning curve eventually stagnate, compare the learning between two models and choose the one that best meets your needs.
The fourth job, named Model deployment, is in charge of deploying the model in an MLFlask app, used to store the model and exposed it via an API.
It analyzes all the runs stored in MLFlow to retrieve the best model according to the defined validation metric. It can then deploy the model in MLFlask to request it directly, that is, send texts to detect positive or negative feelings.
| You can also run this job with the MLDash app. For more information, see Deploying and Testing Models With the MLDash App. |
The fifth job, name Interface handler, is here to test and verify that the learning model works by sending texts as input parameters to MLFlask, which will retrieve via a POST request the result and return the predictions.
| You can also run this job with the MLDash app. For more information, see Deploying and Testing Models With the MLDash App. |
Project Environment Variables
| Name | Description | Comments | ||
|---|---|---|---|---|
|
The name of the region of your AWS. |
The |
||
|
The AWS bucket for related data backup. |
|||
|
The identification key to access AWS, get on AWS from . |
|||
|
The secret key to access AWS, get on AWS from . |
|||
|
The local SQLite database for the backup of MLFlow data.
|
The |
||
|
The AWS S3 bucket for the backup of MLFlow-trained models and other artifacts.
It is usually a subdirectory of |
|||
|
The URL of MLFlow, get after the creation of the corresponding app. |
These three environment variables are installed after the creation of the MLFlow and MLFlask apps. They are used to store the associated URL of the apps. |
||
|
The URL of MLFlask, get after the creation of the corresponding app. |
|||
|
The name of the MLFlow experiment in this pipeline.
|
| The creation of the jobs, the MLDash app, and the pipeline itself is done after the creation of these environment variables. |
Deploying and Testing Models With the MLDash App
-
Click
Apps from the secondary navigation menu.
The project’s app library opens. -
Click Open
on the MLDash app card.
The app opens in a new tab.Model data is shared between MLDash and MLFlow apps. 
-
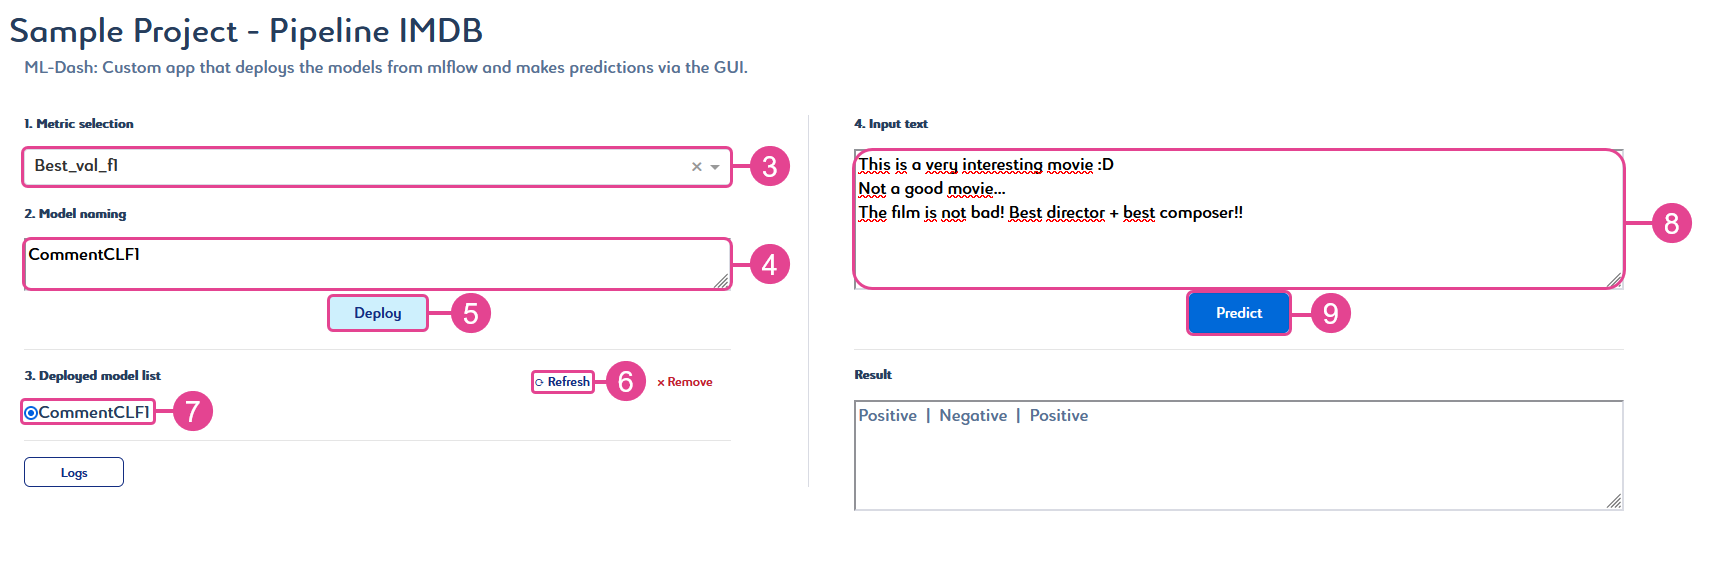
Select a metric from the Metric selection list.
The identifier of the best model for this metric appears in the Model Naming field. -
OPTIONAL: Rename the model identifier with a simpler name.
-
Click Deploy to deploy the model.
-
Click Refresh to update the Deployed model list.
This list shows all deployed models.-
To delete a model from the list, select your model, click Remove, then click Refresh.
-
The history of your actions is temporarily saved. You can access it by clicking Logs.
-
-
Select a model in the Deployed model list.
-
Enter text in the Input text field to test it on your model.
Each line break indicates the beginning of a new sentence, and you can enter up to four sentences at a time. -
Click Predict to get the prediction results.
Your text prediction appears in the Result field.