About Pipelines
The ![]() Pipelines page lets you access the pipeline library of a project.
Pipelines page lets you access the pipeline library of a project.
- What is a pipeline?
-
A pipeline is an end-to-end process that includes multiple jobs that are connected and executed within projects. A pipeline can include advanced orchestration logic, such as conditions or parallel job execution.
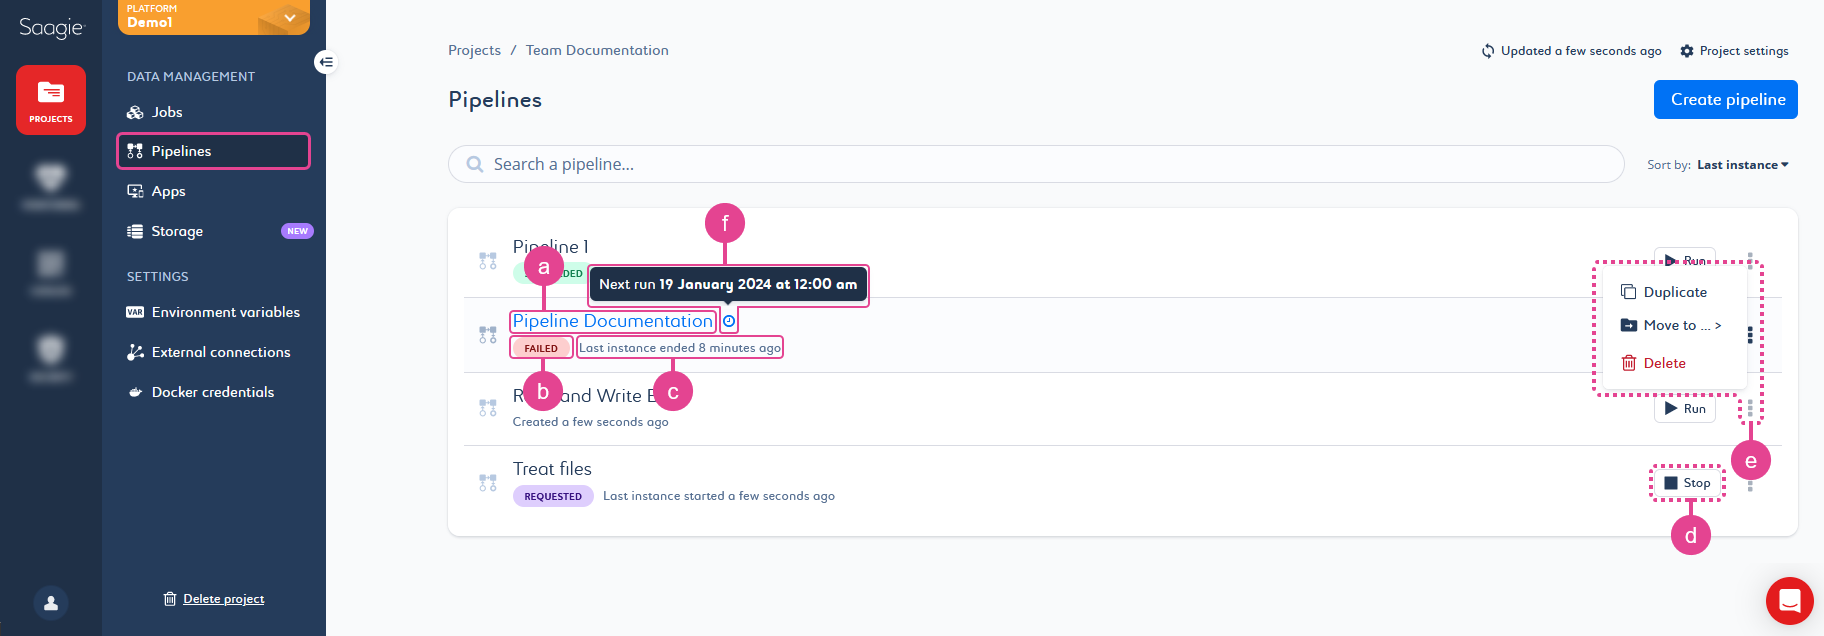
Pipelines are listed with few basic information, such as the name (a), status (b), and last instance executed (c).
From the pipeline library, you can also run a pipeline (d), delete it, move it to another project, or duplicate its Current ![]() version (e).
version (e).
|
A clock |
Click a pipeline to access its:
Overview Page
The ![]() Overview page gives general information on your pipeline.
Overview page gives general information on your pipeline.
By default, the page opens when you click a pipeline in the project’s pipeline library.
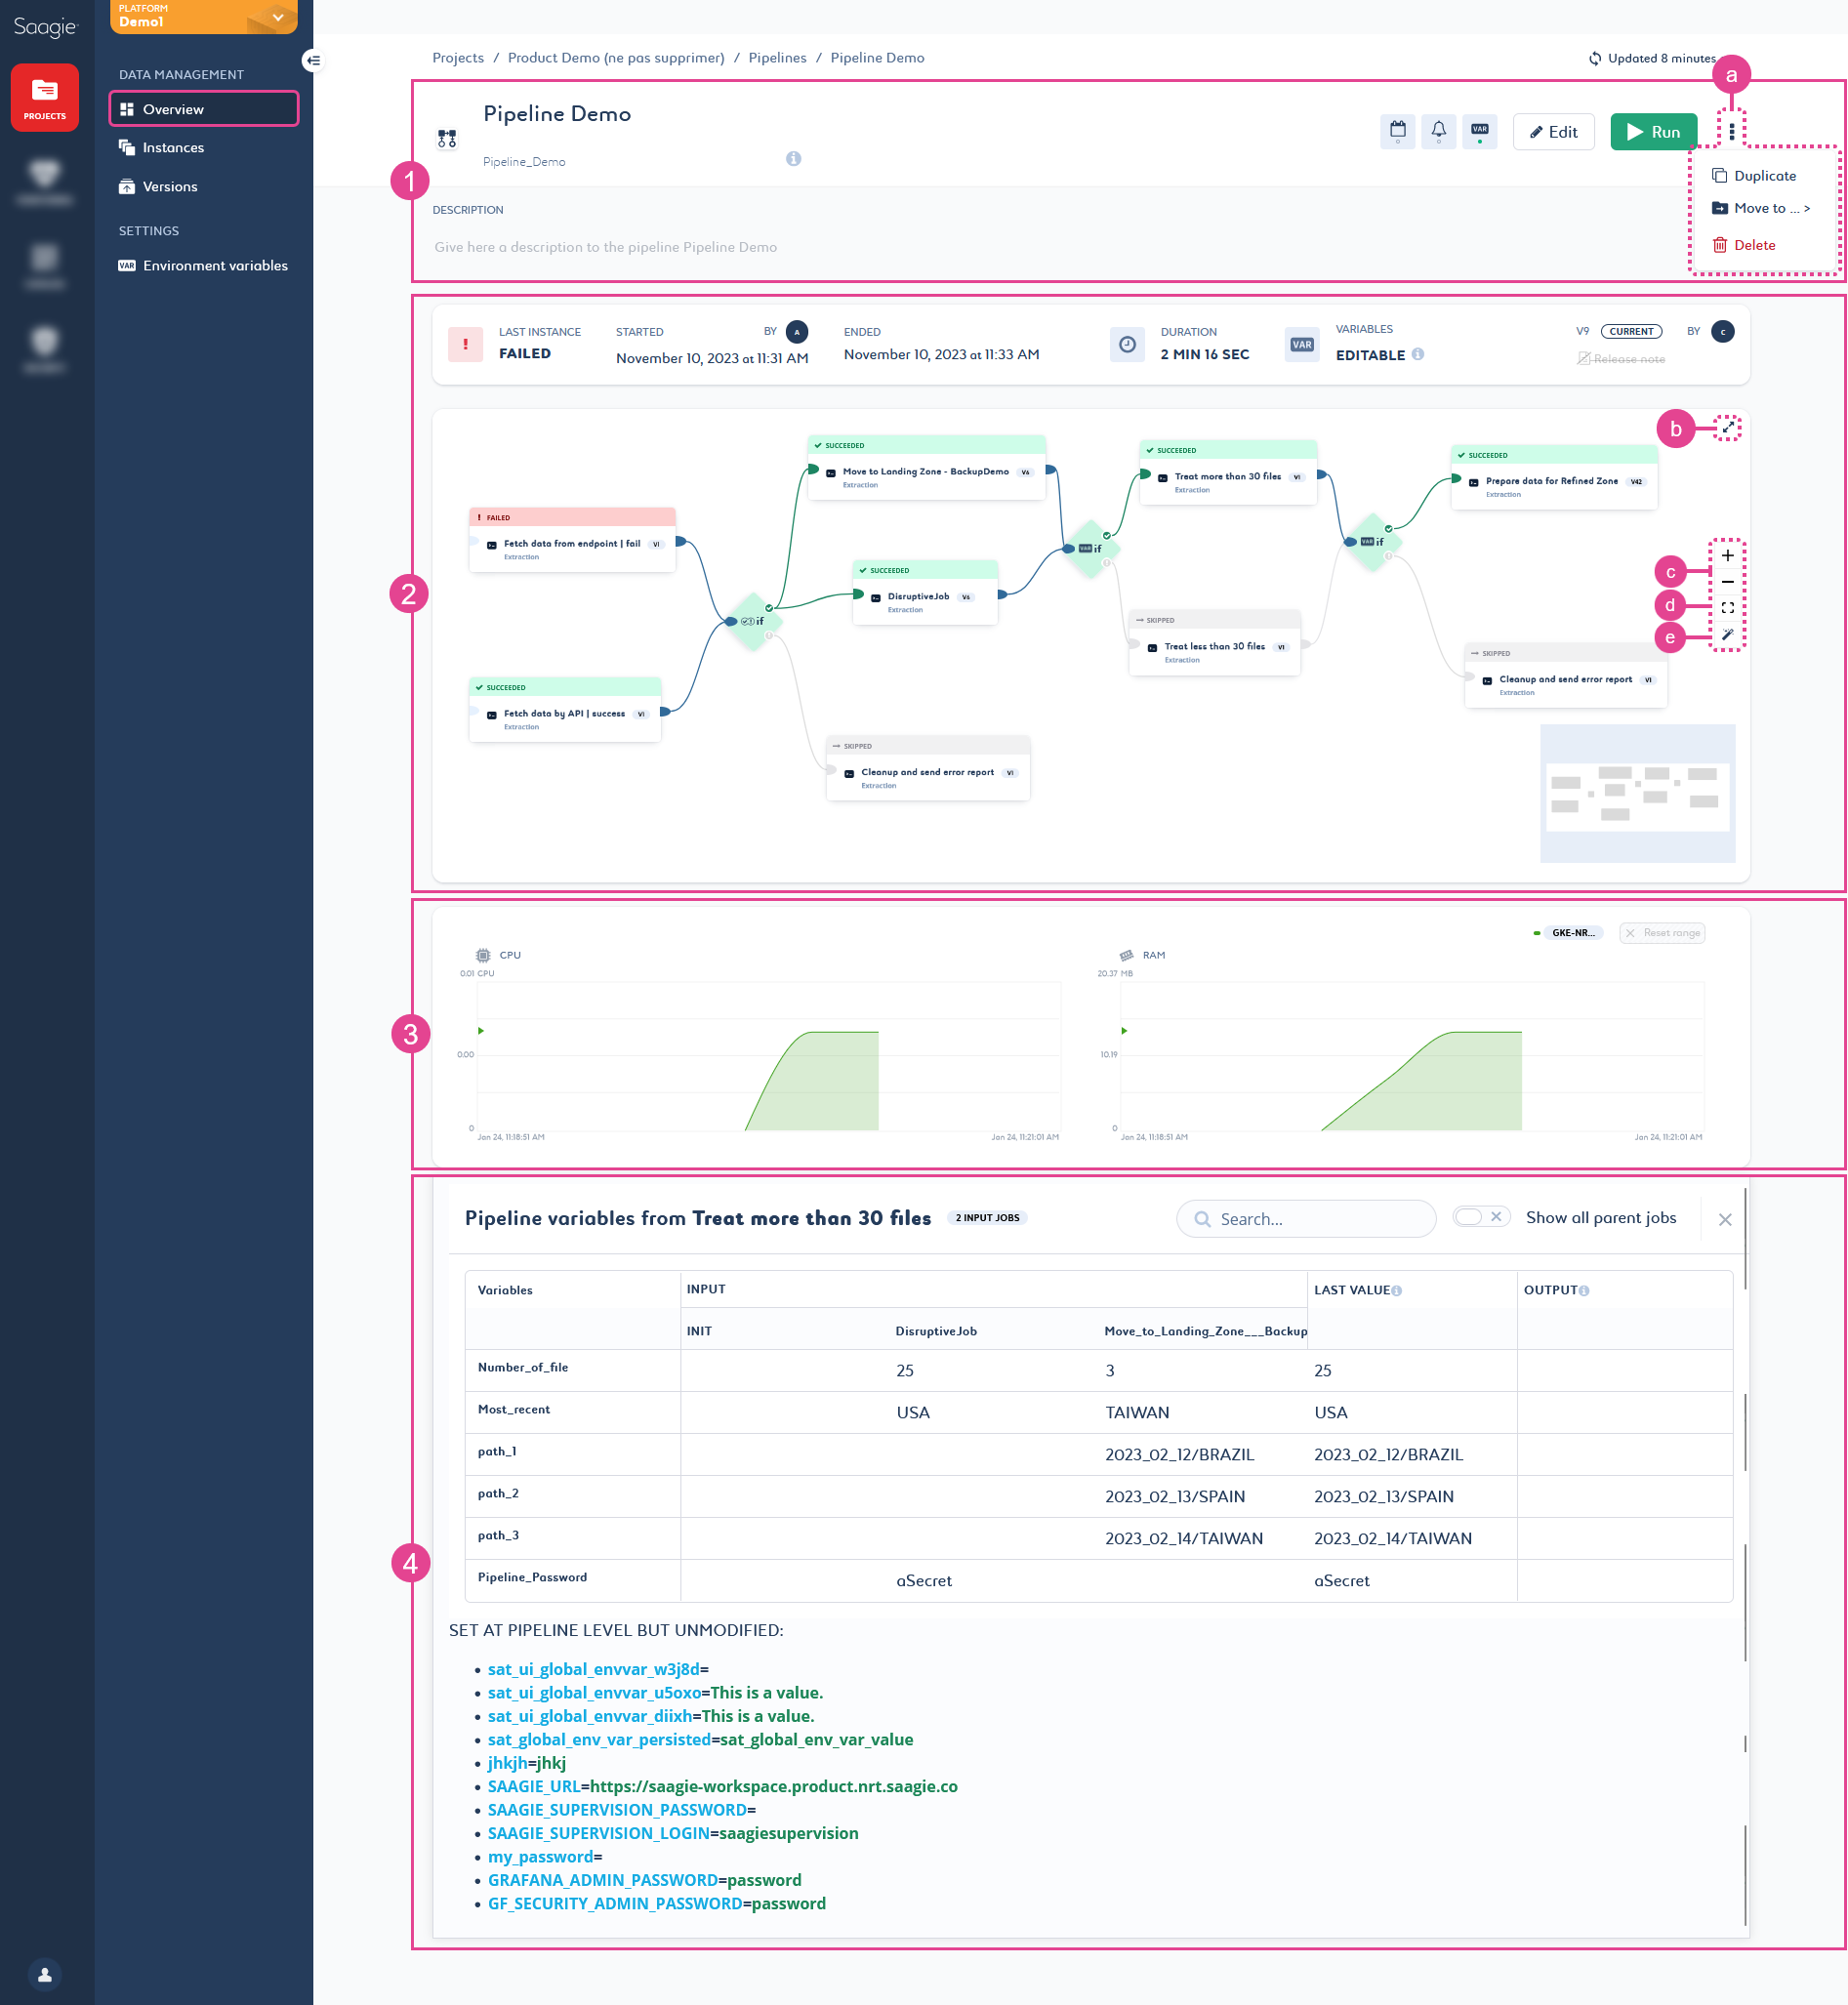
The first part of the page (1) gives general information on the pipeline, such as the name, alias, and description.
It allows you to manage your pipeline settings and upgrade your pipeline to create a new version of it. It also allows you to delete the pipeline, move it to another project, or duplicate its Current ![]() version (a).
version (a).
The second part of the page (2) gives information on the last pipeline instance, such as the status, start and end dates, duration, and whether variables were editable at runtime.
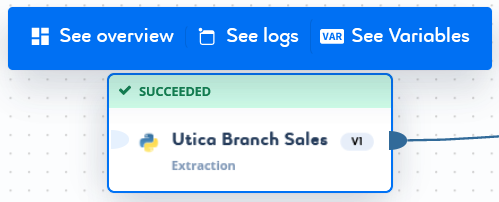
You can also see the progress of a running pipeline in real-time. Click a job to open a context menu and view:
-
The overview page of the selected job by clicking
 See overview.
 -
The log page of the selected job instance by clicking
 See logs.
 -
A summary table of the variables used and modified (5) by clicking
 See variables, if the setting for modifying variables at pipeline execution was enabled.
When a pipeline is running, you can select a job to view its overview by clicking ![]() See overview in the job’s context menu. When a job is finished, click it to open a context menu and view its logs, and a summary table of the variables used and modified (4), if the setting has been enabled at runtime.
See overview in the job’s context menu. When a job is finished, click it to open a context menu and view its logs, and a summary table of the variables used and modified (4), if the setting has been enabled at runtime.
| Use the buttons to adjust the view to your needs. You can display the pipeline in full screen (b), zoom in and out (c), reframe it (d), and realign (e) the graph. |
|
When you push a pipeline via the Saagie CI/CD process, a link to the source code is added to the pipeline’s graph, on the Overview page. 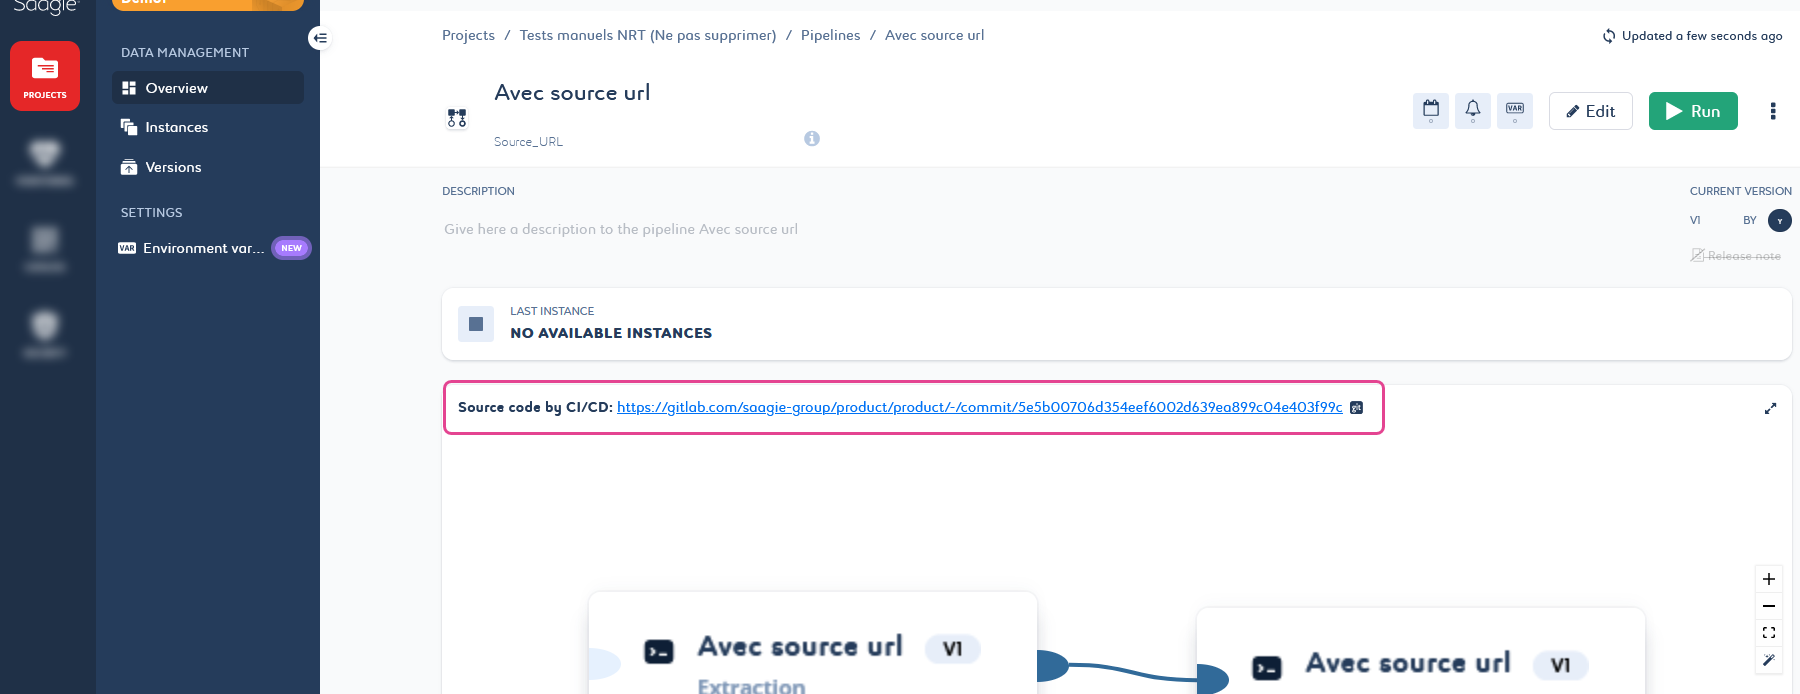
Figure 1. Link to the source code generated by CI/CD on a pipeline.
You cannot change this link by hand. Also, if you create a new version of your pipeline via the Saagie platform, the link to the source code is removed as it is no longer relevant. However, the link remains accessible from the corresponding version of your pipeline. |
The third part of the page (3) gives information on the pipeline consumption through various graphs. You can use these graphs to check your pipeline consumption during its execution.

|
The fourth part of the page (4) gives information on the variables used and modified. It is only available if the setting to modify variables at pipeline runtime was enabled.
Instances Page
The ![]() Instances page gives information on your pipeline instances and allows you to keep track of all executed instances.
Instances page gives information on your pipeline instances and allows you to keep track of all executed instances.
- What is an instance?
-
An instance is a single run of a job or pipeline in a project. Execution information and job logs of all instances are saved on your platform.
Each time you run a pipeline, you create a new instance of it. All instances are saved and remain accessible. They are listed on the right side of the page (1). You can see their information by selecting them in the list. You can also rerun a specific instance or delete instances from this list.
By default, the page opens on the last executed instance of the selected pipeline.
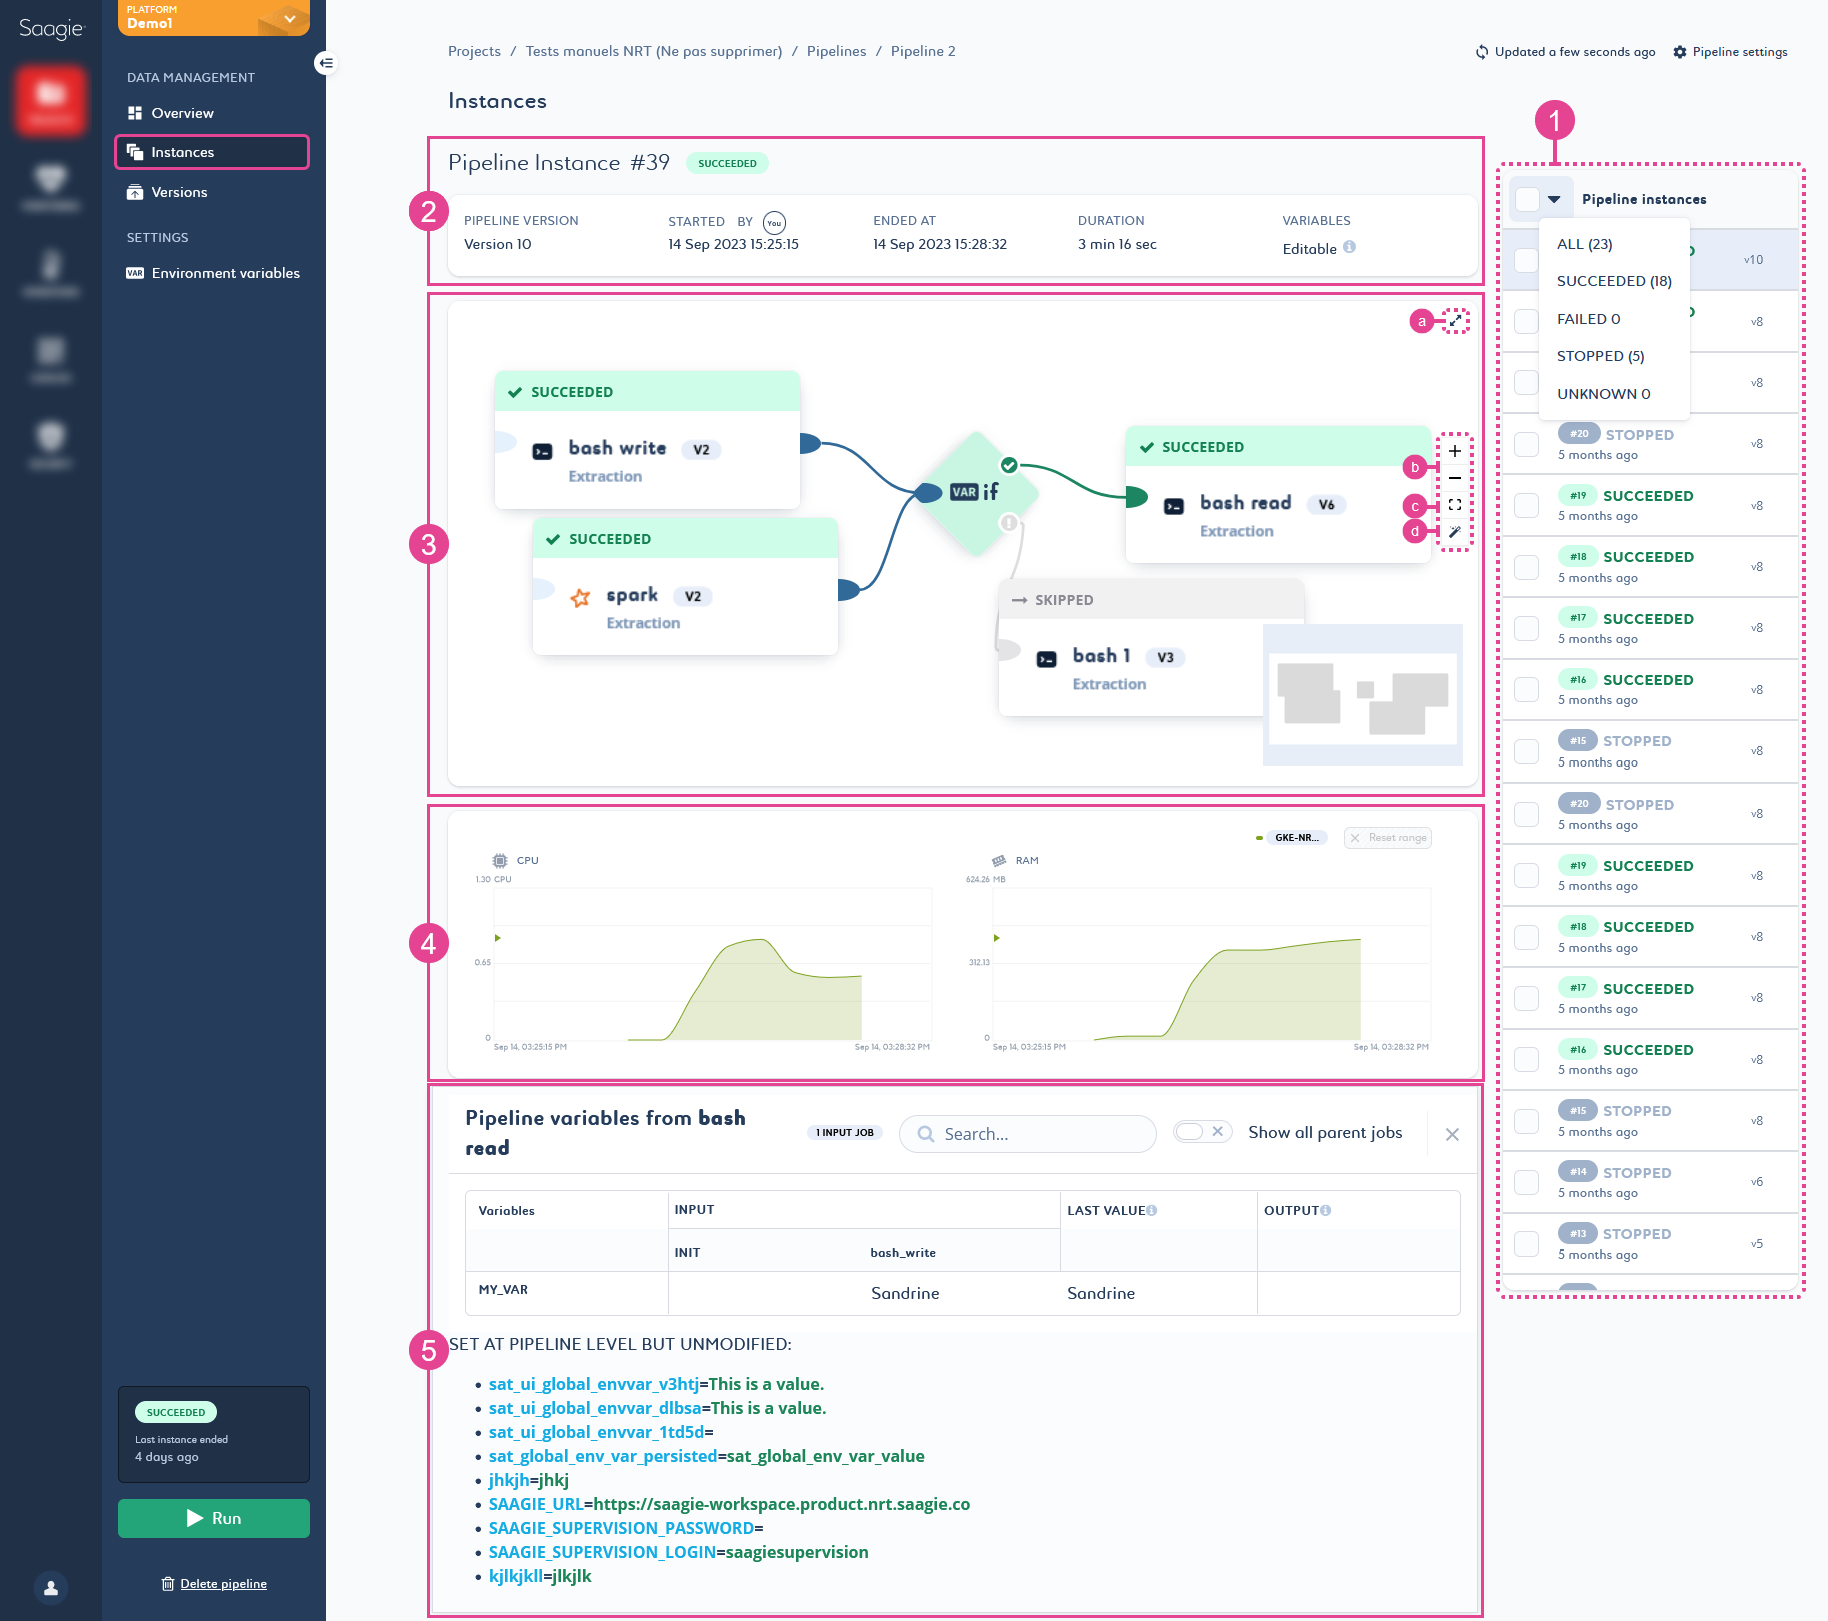
The first part of the page (2) gives general information on the pipeline instance, such as the instance number (specified by #001 in the title), the execution status, the pipeline version used, when and who started the instance, as well as the end time, and whether variables were editable at runtime.
The second part of the page (3) allows you to see the progress of the orchestration for the running pipeline in real-time. Click a job to open a context menu and view:
-
The overview page of the selected job by clicking
See overview. -
The log page of the selected job instance by clicking
See logs. -
A summary table of the variables used and modified (5) by clicking
See variables, if the setting for modifying variables at pipeline execution was enabled.
| Use the buttons to adjust the view to your needs. You can display the pipeline in full screen (a), zoom in and out (b), reframe it (c), and realign (d) the graph. |
The third part of the page (3) gives information on the pipeline consumption through various graphs. You can use these graphs to check your pipeline consumption during its execution.
|
The fourth part of the page (4) gives information on the variables used and modified. It is only available if the setting to modify variables at pipeline runtime was enabled.
Versions Page
The ![]() Versions page gives information on the version of your pipeline. It also keeps track of all previous versions.
Versions page gives information on the version of your pipeline. It also keeps track of all previous versions.
- What is a version?
-
A version is a single iteration of a job, pipeline, or app. Each new upgrade is stored as a version, so you can roll back to previous iterations and keep track of the changes that have been made.
Each time you upgrade a pipeline, you create a new version of it. This version is automatically defined as the Current ![]() version.
version.
All versions are saved and remain accessible. They are listed on the right side of the page (1), and you can see the information of a version by selecting it in the list. You can also delete versions from this list.
You can switch back and forth between versions by selecting a version from the list and clicking Rollback to this version (2). The selected version then becomes the new Current ![]() version.
version.
| You can define a version as major to highlight the most stable pipeline version. Select a version from the list and click Set as major version (3). The version appears with the Major version label and sparks in front of its line. Click Unset as a major version to remove the label from a version. |
By default, the page opens on the version of the pipeline in use, tagged with the Current ![]() badge.
badge.
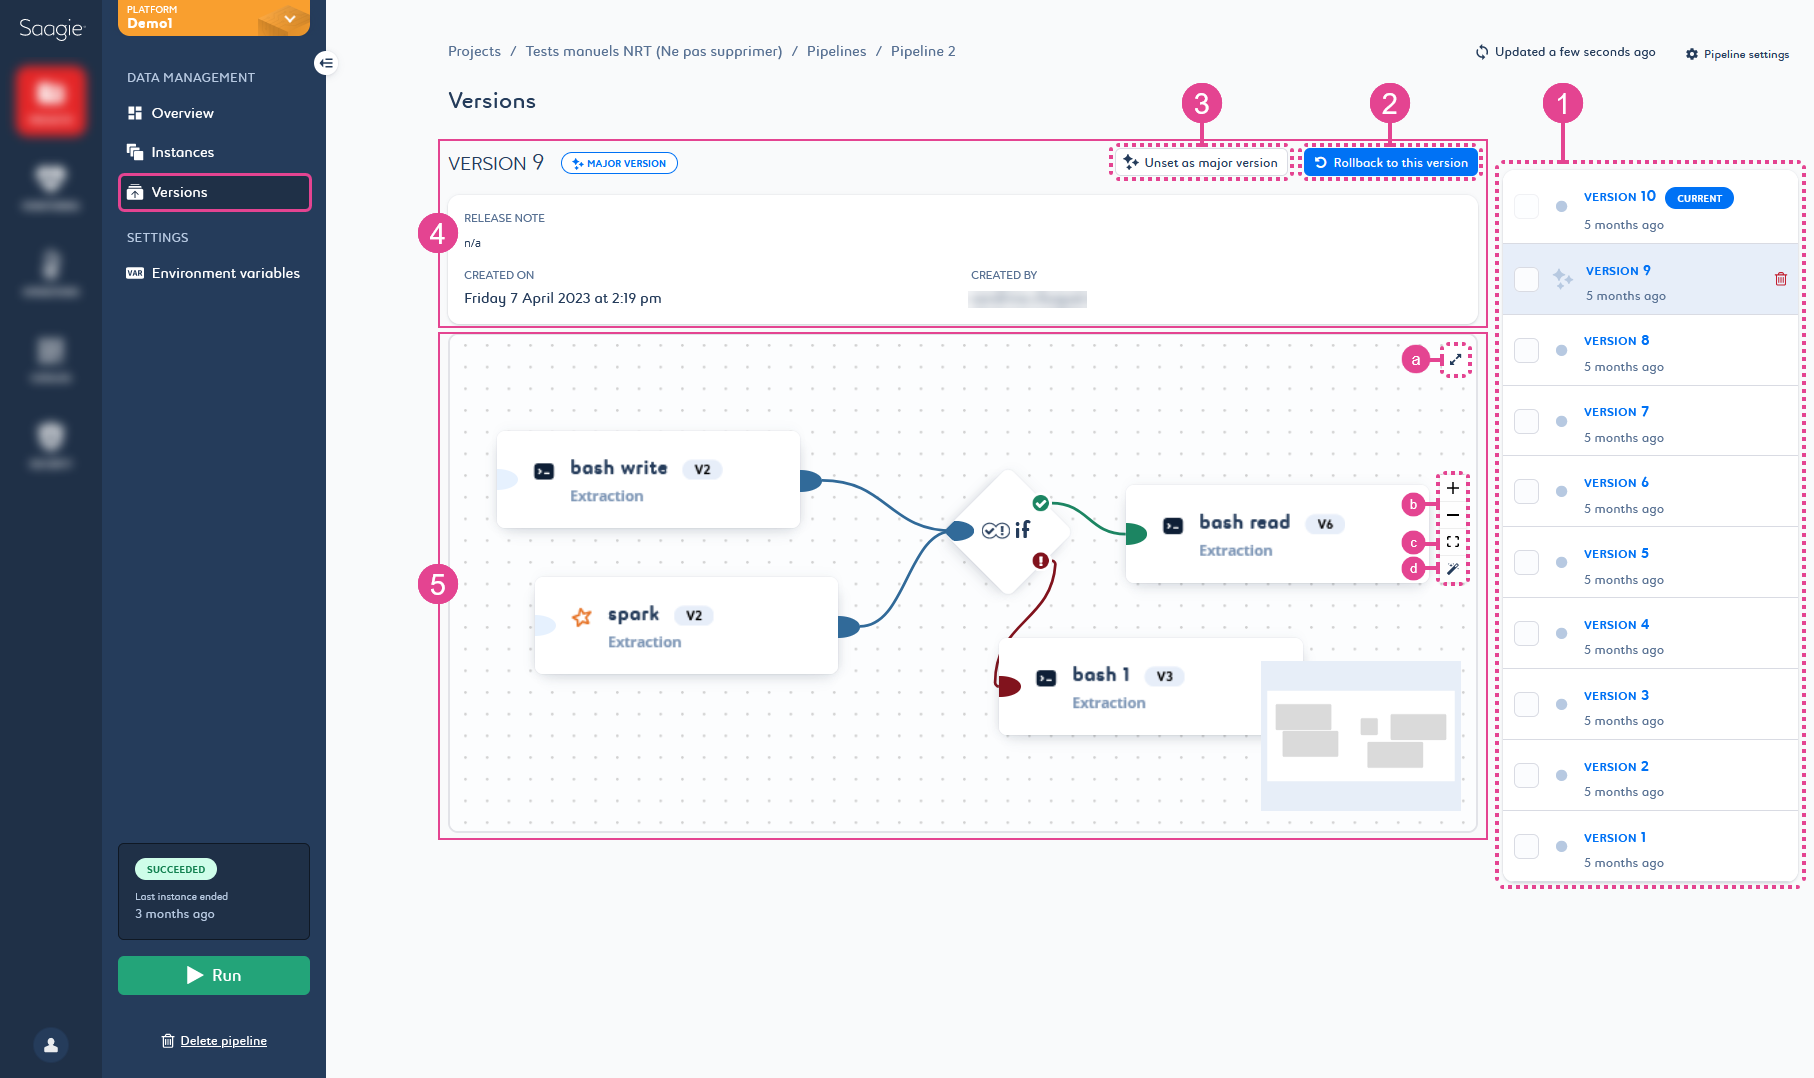
The first part of the page (4) gives general information on the version, such as the version number, release note, creation date and creator.
The second part of the page (5) displays the pipeline version orchestration.
| Use the buttons to adjust the view to your needs. You can display the pipeline in full screen (a), zoom in and out (b), reframe it (c), and realign (d) the graph. |
Environment Variables Page
The ![]() Environment Variables page gives you access to the environment variables of the pipeline.
Environment Variables page gives you access to the environment variables of the pipeline.
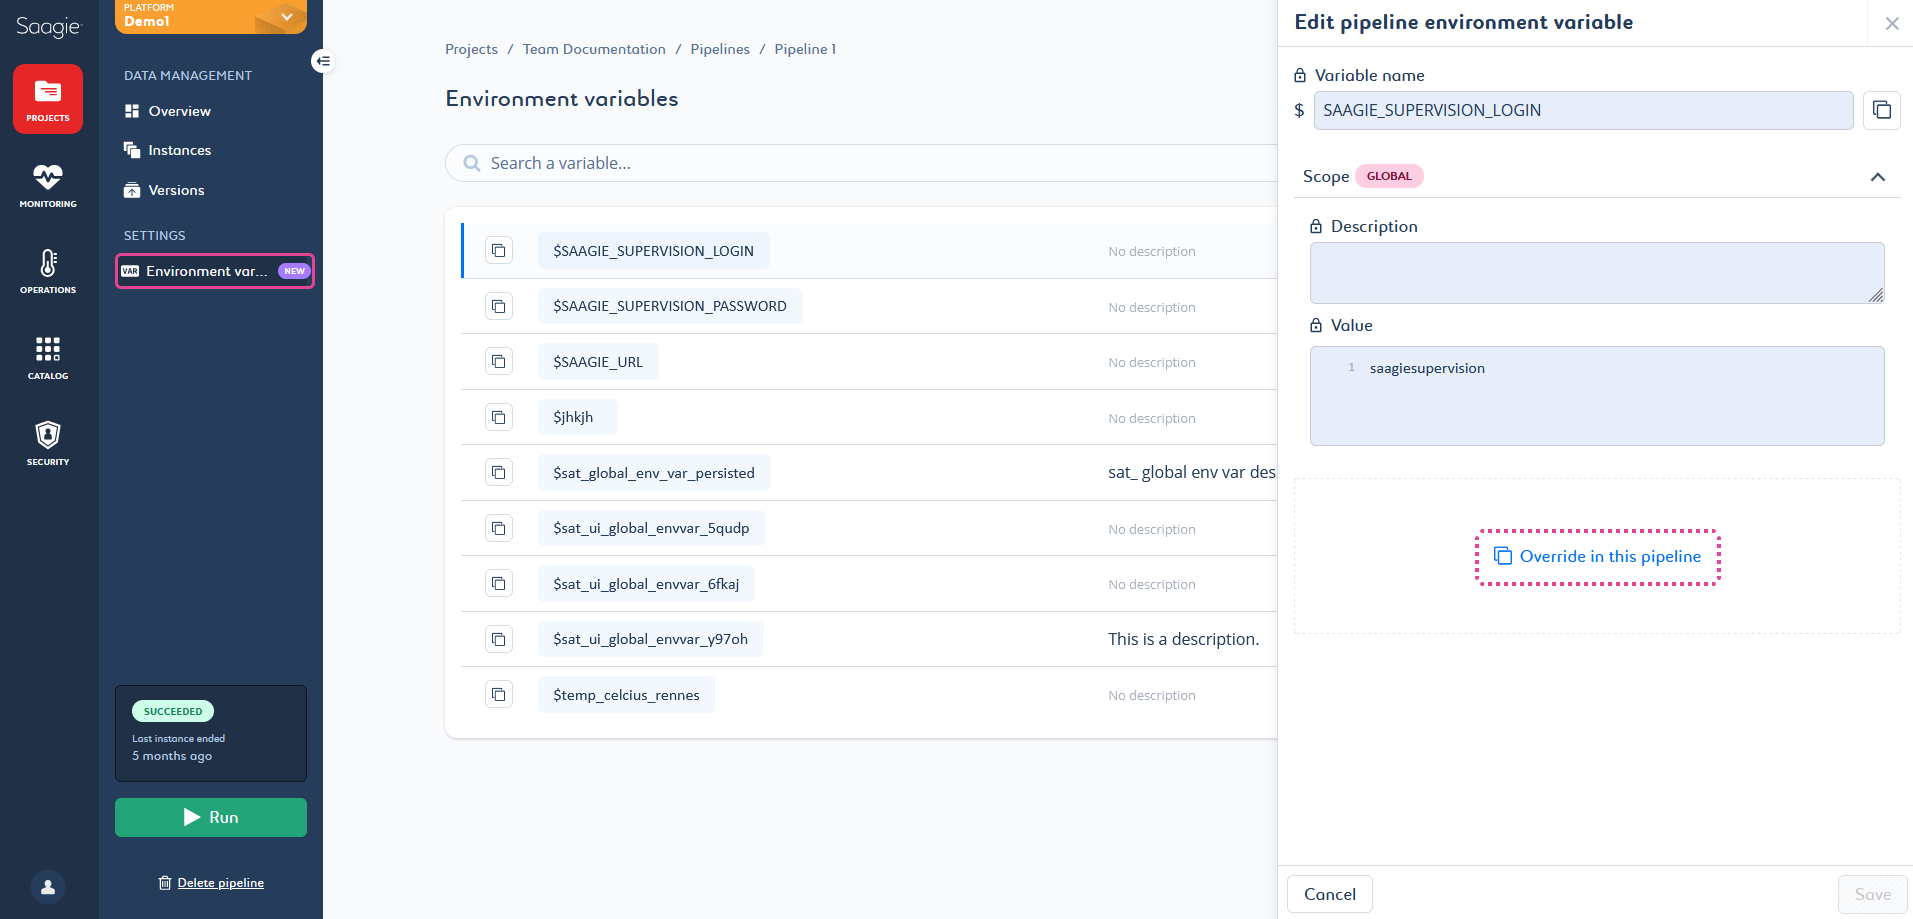
Environment variables are listed with some basic information, such as the name and description. Its application level is also indicated with the Pipeline ![]() label.
label.
At the pipeline level, the ![]() Environment Variables page gives you access to the environment variables defined for the selected pipeline but also to the project and global environment variables. However, you can only create and edit environment variables for the pipeline.
Environment Variables page gives you access to the environment variables defined for the selected pipeline but also to the project and global environment variables. However, you can only create and edit environment variables for the pipeline.
Click the environment variable to view its information. A panel opens. You can edit its information from this panel.
You can create up to 200 environment variables per pipeline. When you reach this limit, the create button becomes unavailable, preventing you from creating new environment variables.
Environment variable can be defined as passwords. Select the option is password if your value is a password and must be hidden.
Environment variables are unique within a scope, but an inferior level can override a higher level. For more information, see Overriding Environment Variables.
To access this page click ![]() Projects
Projects ![]() All Projects My Project
All Projects My Project ![]() Pipelines My Pipeline
Pipelines My Pipeline ![]() Environment Variables.
Environment Variables.
|
Environment variables can be created at the platform, project, pipeline, and app level, allowing you to have values dedicated to a specific scope without impacting the others. Therefore, you will find an Environment Variables page for each scope.
|