Managing Jobs
Creating Jobs
You can create jobs to perform tasks and launch them individually or as part of a data pipeline.
|
For production environment, upgrade your job with our CI/CD process. When you push a job via the CI/CD process, a link to the source code is added to the package of the job, on the |
Before creating the job, you must create your code file with the actions you want your job to perform. In this tutorial, we will use Python technology and create a file called hello-scranton.py.
-
Open a new file in your preferred text editor.
-
Copy and paste the following code into your file:
print("Hello, Scranton Branch!") -
Save the file as
hello-scranton.py.
-
Click
 Projects from the primary navigation menu.
By default, the All Projects page opens with the list of existing projects. -
Click a project in the list to open it.
By default, the Jobs page opens with the list of existing jobs.
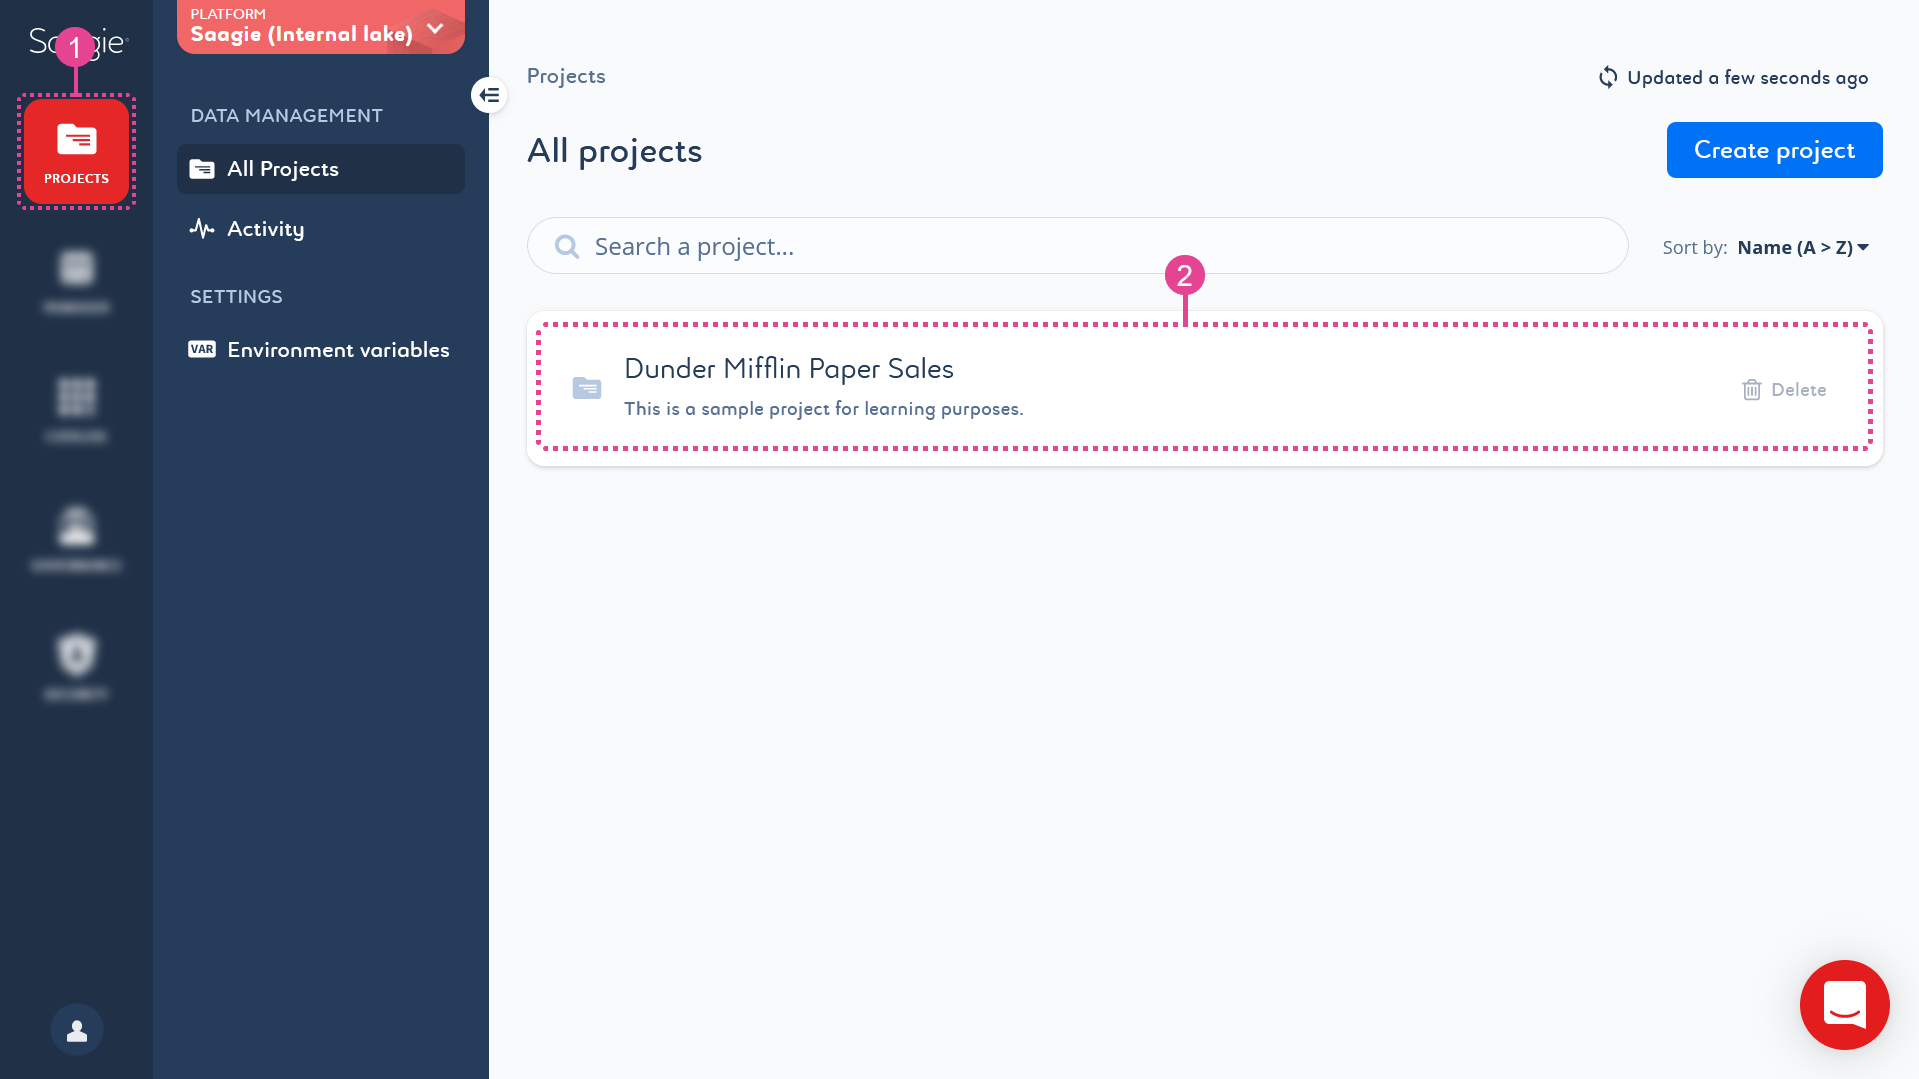
-
Click Create job from the
Jobs page to create a new job.
The Create job page opens. -
Fill in the creation form with the required information and click Continue between each step.
-
Enter a name, define an alias, and add a description.
-
Select your job technology.
-
Choose the technology context, upload your code file, and enter your shell command.
-
-
Configure settings to schedule your job run, send email alerts, and set your job resources. You can also add a release note.
-
Click Create job to confirm the creation.
The Overview page of your job opens with a message saying that your job has been created.
-
=== Deleting a Job
-
To delete a job, you can either:
-
Click
 Delete at the end of the corresponding job row from the Jobs page.
 -
Click the kebab menu
 Delete from the Overview page of the corresponding job.
 -
Click
Delete job at the bottom of the secondary navigation menu from any other page of the corresponding job.
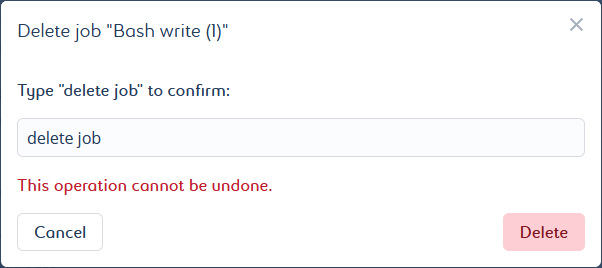
A pop-up window opens. It asks you to manually enter a confirmation message.
-
-
Type in the requested message for confirmation. The message is case sensitive.
-
Click Delete to confirm the deletion.
| You cannot delete a job that is part of a pipeline. |
== Generating a Job Description With ChatGPT
-
Click
Projects from the primary navigation menu.
By default, the All Projects page opens with the list of existing projects. -
Click a project in the list to open it.
By default, the Jobs page opens with the list of existing jobs.
-
Click a job in the list to open it and access its details.
The job Overview page opens. -
Click Generate with ChatGPT above the description field from the
Overview page to send your request to ChatGPT.It only works with .py,.sh,.r, and.bashfiles and command lines, and it does not work with archive files.A pop-up message appears to inform you that the code will be sent to OpenAI and thus will not be secured anymore by Saagie.
-
Click Generate description to confirm and generate your job description with ChatGPT.
The description is displayed in the Description field. A check mark appears in front of the text Generated with ChatGPT to indicate that the description is from ChatGPT.
Once a description has been generated, you cannot regenerate it. Unless you modify it manually or upgrade your job. When you manually modify the description, it is no longer consider as generated by ChatGPT. The checkmark disappears, and you can regenerate the job description with ChatGPT. When you upgrade your job, you can update its description by clicking ![]() Update.
Update.

== Running and Stopping Jobs
-
Click
Projects from the primary navigation menu.
By default, the All Projects page opens with the list of existing projects. -
Click a project in the list to open it.
By default, the Jobs page opens with the list of existing jobs.
-
You can either:
-
Click Run
 or Stop
  in front of the desired job from the library.
 -
Open the job details and start or stop the run from its
Overview page. Click either Run  or Stop
  depending of the current status of your pipeline.
You can also access this command at the bottom of the secondary navigation menu from the  Instances and
  Versions page.
The job status changes depending on the outcome.
-
== Modifying Job Settings
You can change your job settings at any time after creating it. You can access the settings from the ![]() Overview page of the job.
Overview page of the job.
-
Click
Projects from the primary navigation menu.
By default, the All Projects page opens with the list of existing projects. -
Click a project in the list to open it.
By default, the Jobs page opens with the list of existing jobs.
-
Click a job in the list to open it and access its details.
The job Overview page opens. -
Click the desired setting from the
Overview page to edit it.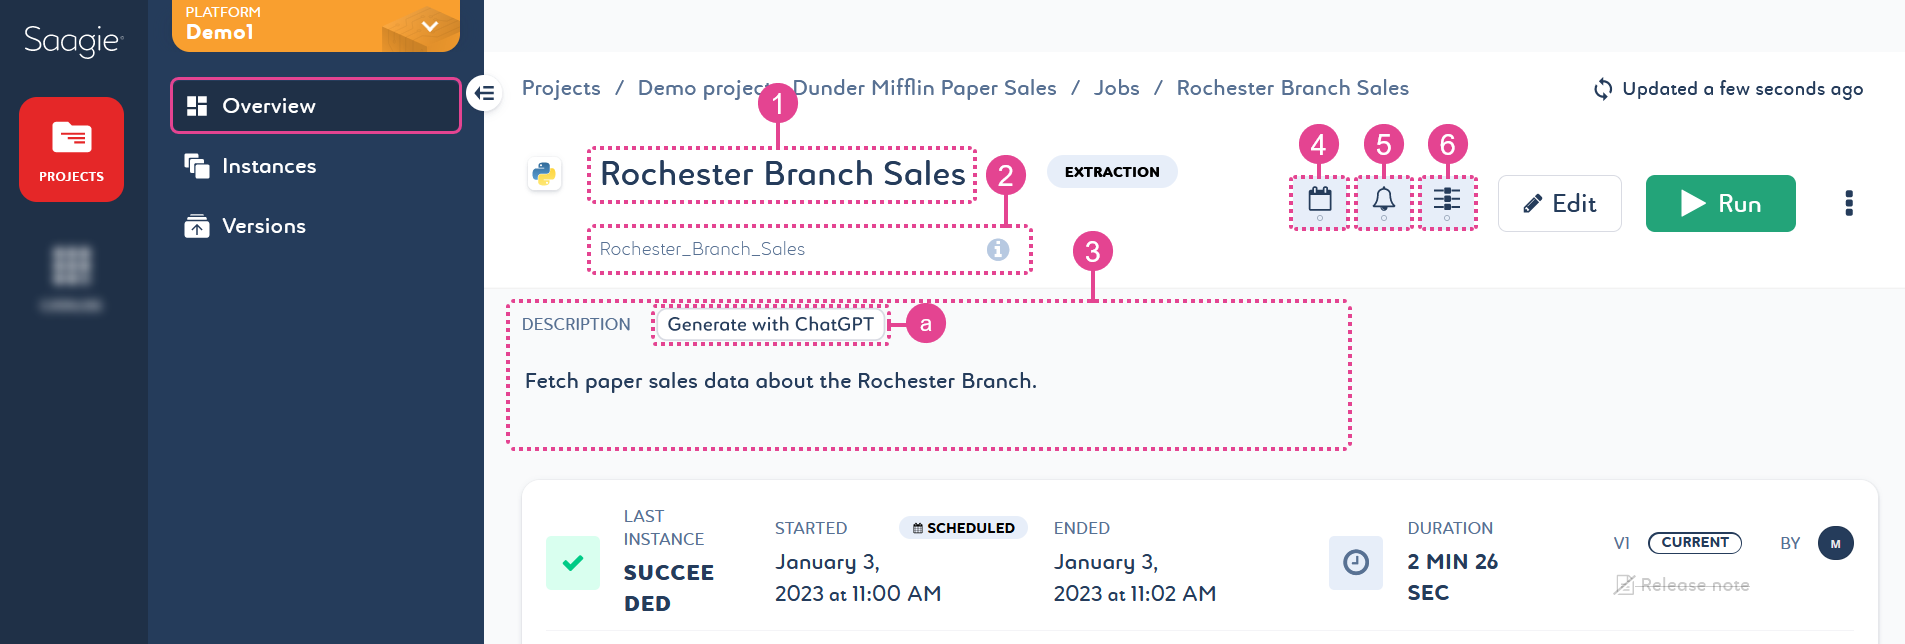
- 1 – Name
-
Names are mandatory. They can be up to 255 characters long and must be unique within a project.
- 2 – Alias
-
The job alias is unique to each job in a project. It allows you to reference a job within another job and can be used to pass information between jobs during pipeline execution. However, to make this work, the
 Variables setting must be enabled.
 - 3 – Description
-
Descriptions are optional and not restricted. However, it is a good practice to add them. Keep them short and to the point.
You can also use ChatGPT to generate your job description by clicking Generate with ChatGPT (a). For more information, see Generating a Job Description With ChatGPT.
This feature is only available for Spark with a Python context, Bash, R, and Python job technologies. It works with .py,.sh,.r, and.bashfiles and command lines, but it does not work with archive files. - 4 – Scheduled Run
-
Click the switch in the side panel of the setting to enable or disable it. There are two types of execution:
-
The manual run, which requires you to click Run
to start the job. -
The scheduled run, which launches the job according to the schedule you choose. It has three schedule modes: Simple, Shortcut, and Expert.
A scheduled job can always be run manually. -
In Simple mode, you can easily specify variables through the user interface. There are many possibilities.
-
In Shortcut mode, you can choose the recurrence of your run on an hourly, daily, weekly, monthly, or annual basis. All other settings are automatic.
-
In Expert mode, you can specify variables using the Cron format. The Cron time string consists of five values separated by spaces:
[minute] [hour] [day of the month] [month] [day of the week].
Once you have finished scheduling your run, you will see the summary of your choice written below and the time of the next run.
-
By default, instances can run at the same time. To prevent this, select the Forbid overlapping scheduled instances option. This means that if your job is still running when the next scheduled run is due, it will be skipped.
-
- 5 – Email Alerts
-
Click the switch in the side panel of the setting to enable or disable it. Alerts are optional and can be set to receive an email when the status of your job changes. They can be sent to multiple email addresses to notify you of the following status changes:
Status Description 
RequestedThe job’s run has been requested and is being executed.
QueuedThe job is waiting for the necessary resources to be executed.

RunningThe job is up and running.

FailedThe job has crashed.
A failed job can go into an 
Out Of Memory(OOM) state, which is an extension of theFailedstate. The OOM state can be due to a lack of memory (RAM).
StoppingThe job is stopping.
StoppedThe job has stopped running.

SucceededThe job has been successfully executed.

UnknownThe job no longer runs because an error has occurred.
- 6 – Resources
-
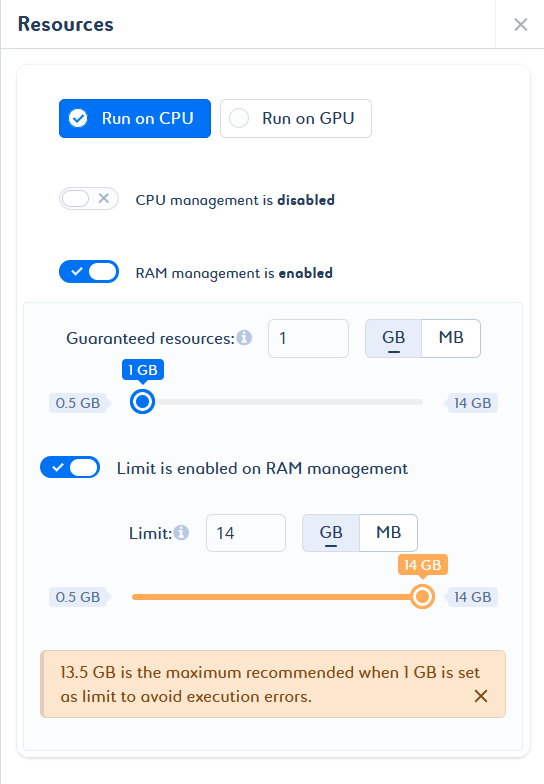
Click the switch in the side panel of the setting to enable or disable it. CPU, RAM, and GPU resources are optional, but are recommended. They can be specified for optimal execution.
The consumption of your job can be managed by guaranteed resources, that is, the minimum amount of resource requested, and limited resources, that is, the maximum amount of resource that can be consumed.
When you create your job, CPU and RAM resource management is enabled by default with predefined values. In other words, based on the default values defined at technology level, Saagie automatically assigns resource requests and limits to your job. These values can be adjusted to suit your needs.
Default values are already set by Saagie at the technology level. These values are mandatory. They also exist at the technology context level, where they can override the values defined at the technology level. You can configure them when you create your job, or by modifying the Resources  setting of the job.
If the resource capacity is not defined, the defaults that are defined at the technology level will be assigned at the technology context level.
Automatic adjustments can be made to avoid inconsistent configurations. If you try to set a guaranteed value that is greater than the limit value, a note appears to inform you that the guaranteed value has been adjusted. If you try to set a limit value smaller than the guaranteed value, a note appears to inform you that the limit value has been adjusted (a).
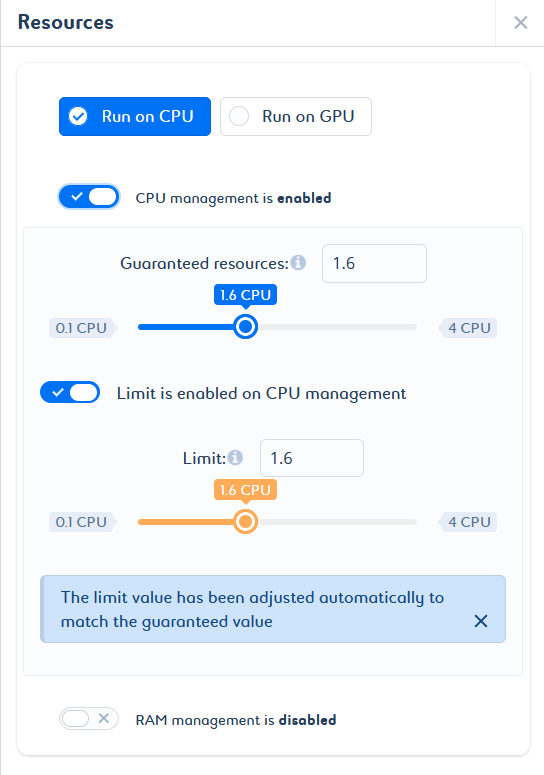
In addition, if the guaranteed value and the limit value are not optimal, a message is displayed with the appropriate values for an optimal configuration (b).
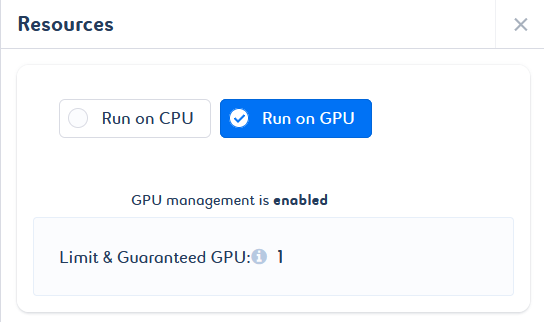
To enable GPU management on your job, select the Run on GPU option. You do not need to configure it, as a default value is set for both limited and guaranteed resources. This value cannot be changed.
When you change the CPU, RAM, and GPU resources, your job is automatically restarted.
-
Saving is automatic. You can just press Enter to validate the job name change, click anywhere nearby to confirm the job alias and description change, and close the side panel to validate the scheduled run, email alert, and resource changes.
== Upgrading Jobs
You can upgrade your jobs to always get the most out of them. By upgrading your job, you create a new version of it.
|
For production environment, upgrade your job with our CI/CD process. When you push a job via the CI/CD process, a link to the source code is added to the package of the job, on the |
You must update your code file or create a new one.
-
Open your file in your preferred text editor.
-
Copy and paste the following code into your file:
print("Hi there, Scranton Branch!") -
Save the file as
hi-scranton.py.
-
Click
Projects from the primary navigation menu.
By default, the All Projects page opens with the list of existing projects. -
Click a project in the list to open it.
By default, the Jobs page opens with the list of existing jobs.
-
Click a job in the list to open it and access its details.
The job Overview page opens displaying information on the last update, such as when it took place, by whom, the technology and execution context used, the package, and the job logs. -
Click
 Edit from the Overview page.
The Upgrade job page opens. -
Enter the information you want to change and click Continue between each step. You can:
-
Choose the technology context, upload your code file, and enter your shell command.
-
-
Add a release note to briefly explain your changes.
-
Click Save job to save your changes and exit the job upgrade settings.
Your job has been upgraded. You should see that a new version of it has been created.
-
Duplicating Jobs
You can duplicate only the Current ![]() version of your job. The duplicated job will include a copy of the technology, package, and resource limits. The copy excludes alerts, scheduling, links to associated pipelines, observability data, versions, instances, and logs.
version of your job. The duplicated job will include a copy of the technology, package, and resource limits. The copy excludes alerts, scheduling, links to associated pipelines, observability data, versions, instances, and logs.
-
Click
Projects from the primary navigation menu.
By default, the All Projects page opens with the list of existing projects. -
Click a project in the list to open it.
By default, the Jobs page opens with the list of existing jobs.
-
You can click the kebab menu
 Duplicate at the end of the relevant job row from the Jobs page, or from the Overview page of a job.
-
You cannot duplicate an invalid job.
-
You cannot select multiple job versions at the same time and duplicate them.
Depending on whether you duplicated from the
Jobs page or from the job Overview page, you are returned to either the job library, or the Overview page of the duplicated job, respectively. In addition, a message appears saying that your job has been successfully duplicated.The name and alias of your duplicated job will be
<original job name> (ID starting by X)and<original job alias> (ID starting by X). WhereXis an incremental number by 1.For example, you duplicate the job
Albany Branch Sales. The name of the duplicated job will beAlbany Branch Sales (1). If you duplicate the jobAlbany Branch Salesa second time, the name of this second duplicated job will beAlbany Branch Sales (2), and so on. If the duplicated job name and its alias exceed the 255-character limit, we truncate the last 13 characters. The incremental number is kept. -
Deleting Job Instances and Job Versions
-
Click
Projects from the primary navigation menu.
By default, the All Projects page opens with the list of existing projects. -
Click a project in the list to open it.
By default, the Jobs page opens with the list of existing jobs.
-
Click a job in the list to open it and access its details.
The job Overview page opens. -
Click either:
-
Instances to access your job’s instances page and delete instances with the logs from the list.
-
You cannot delete instances that are part of existing pipeline instances.
-
You cannot delete unfinished instances, that is, instances whose status is
Requested,Queued,Running,Stopping. Wait for the end of the executions and try again. -
You cannot delete an instance that has not yet been cleaned from the orchestrator. Wait a moment and try again.
-
-
Versions to access your job’s versions page and delete versions from the list.
-
Deleting a job version deletes the job instances linked to it, as well as all its dependencies.
-
You cannot delete a version in which a job instance is linked to a pipeline instance.
-
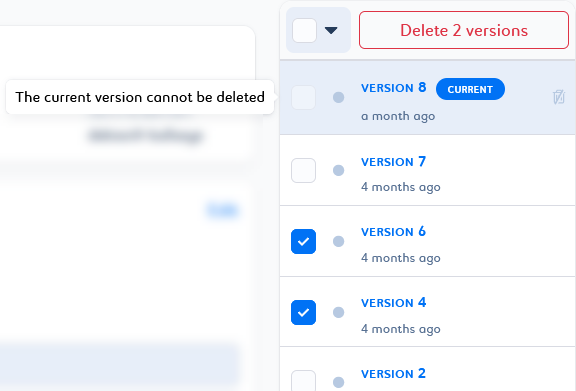
You cannot delete the version tagged as
Current . You can revert to another version of the job to change the current one and delete it.
 -
You cannot delete a version that is linked to unfinished instances. Wait for the end of the executions and try again.
-
You cannot delete a version whose instances have not yet been cleaned from the orchestrator. Wait a moment and try again.
-
-
-
You can delete either instances or versions of your job.
You can delete a single job instance or version by clicking the trash can
that appears on the line when you hover over the desired element.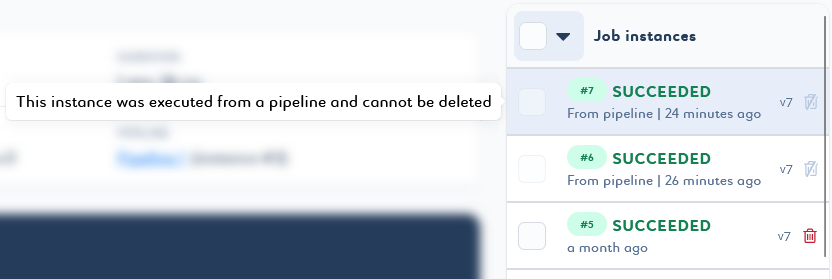
You can delete a selection of job instances or versions by selecting them in the list and clicking Delete n instances/versions at the top of the list.
You will then be able to play with the selector by adding or removing elements with different states. 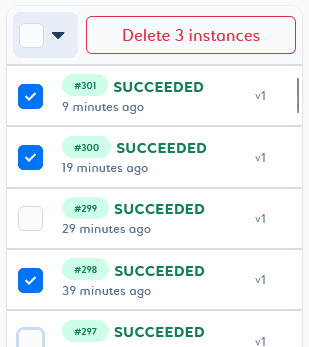
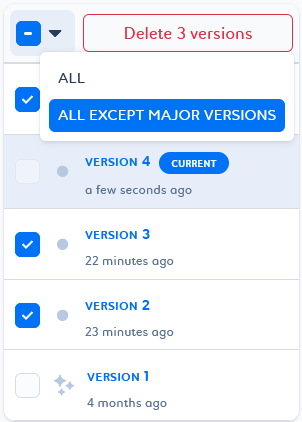
You can delete a selection of job instances based on status criteria, or a selection of job versions based on tag criteria. To do this, select the desired filter and click Delete n instances/versions at the top of the list.
You will then be able to play with the selector by adding or removing elements with different states. 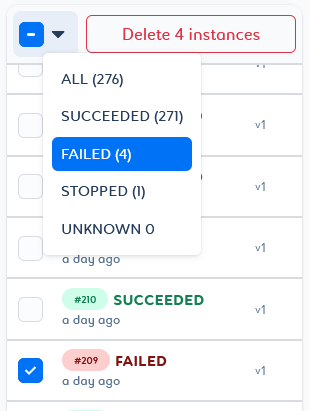
You can delete job instances by date criteria with the All instances older than
 filter. It will delete all instances and associated logs prior to the selected date.
-
Select the All instances older than
filter.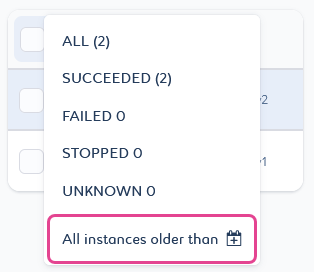
A pop-up window opens with a date picker.
-
Select a date.
-
Click Select instances to confirm your choice.
The corresponding instances are selected in the list.You will then be able to play with the selector by adding or removing elements. -
Click Delete n instances at the top of the list.
-
-
Confirm the pop-up message and the permanent deletion by clicking Delete.
Moving a Job to Another Project
You can move a job from one project to another and on a different platform from the job library or the job ![]() Overview page. Packages, versions, instances, logs, alerts, and resource settings are all included in the moved job.
Overview page. Packages, versions, instances, logs, alerts, and resource settings are all included in the moved job.
|
-
Click
Projects from the primary navigation menu.
By default, the All Projects page opens with the list of existing projects. -
Click a project in the list to open it.
By default, the Jobs page opens with the list of existing jobs.
-
You can click the kebab menu
 Move to… at the end of the relevant job row from the Jobs page, or from the Overview page of a job.
-
The job technology must be available in the target project. If it does not, select another project or modify the settings of the target project.
-
You cannot move a job that is or was part of a pipeline. You can duplicate your job and move the duplicated job.
-
You cannot move a running and scheduled job. Wait for the end of the execution(s) and/or try to remove the scheduling settings. Then try again.
-
You cannot move a job whose instances have not yet been cleaned from the orchestrator. Wait a moment and try again.
A pop-up window opens.
-
-
Select the target platform and target project from the list.
By default, it will search for the available categories:-
If one of them is available, it assigns it. It can be changed if others are available.
-
If no category is available, you will be asked to change the target project or edit the selected project settings. You can click edit the technologies’ settings for this project to access and change the project settings directly.

-
-
Click Move to confirm the move.
You will see a message saying that your job has been successfully moved. You can click Go to target project below the success message to be redirected to the job library of the target project. Packages, versions, instances, logs, alerts, and resource settings are all included in the moved job. There is no obfuscation of the data. If there is sensitive data, it will be visible in the target project.