Managing Pipelines
Creating Pipelines
You can create pipelines to perform an end-to-end process that includes multiple jobs that are linked to each other.
|
For production environment, upgrade your pipeline with our CI/CD process. When you push a pipeline via the CI/CD process, a link to the source code is added to the pipeline’s graph, on the |
A pipeline requires at least two jobs. To create jobs, see Creating Jobs.
-
Click
 Projects from the primary navigation menu.
By default, the All Projects page opens with the list of existing projects. -
Click a project in the list to open it.
By default, the Jobs page opens with the list of existing jobs.
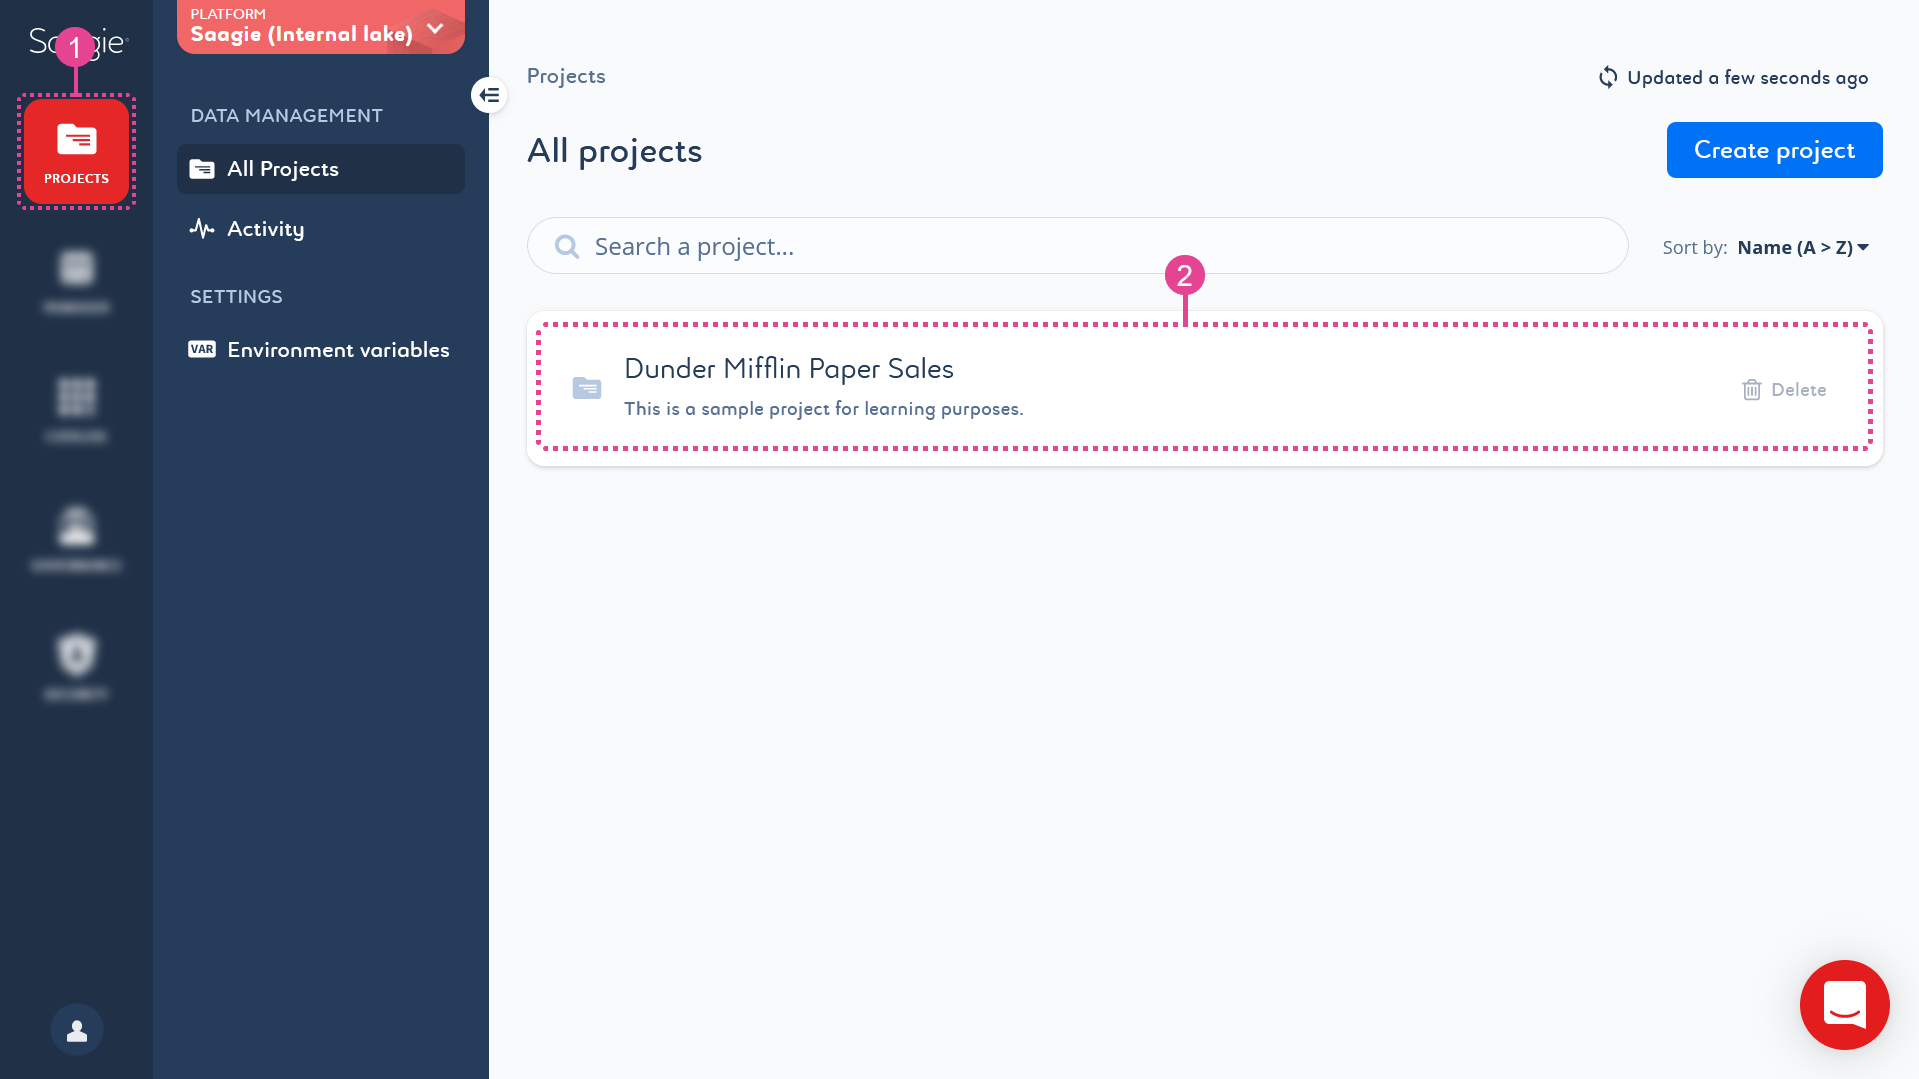
-
Click
 Pipelines from the secondary navigation menu to open the project’s pipeline library.
 -
Click Create pipeline to create a new pipeline.
A page to create your pipeline opens.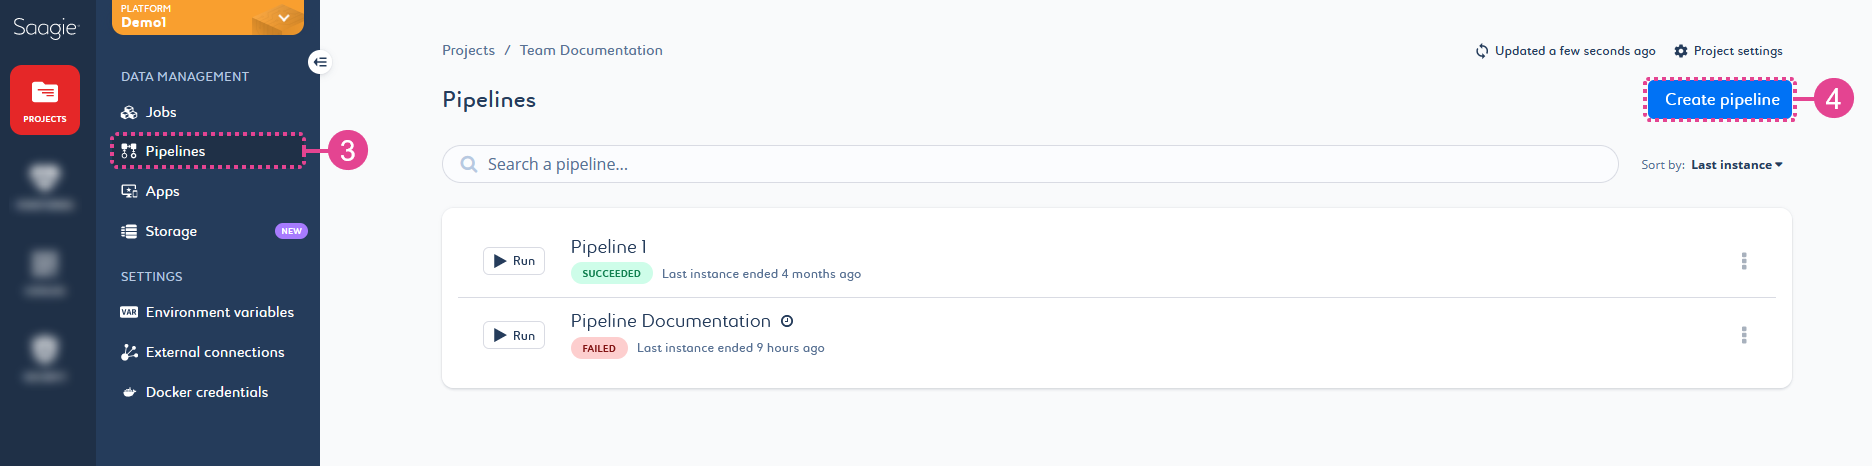
-
Enter a name, alias, and description for your pipeline.
-
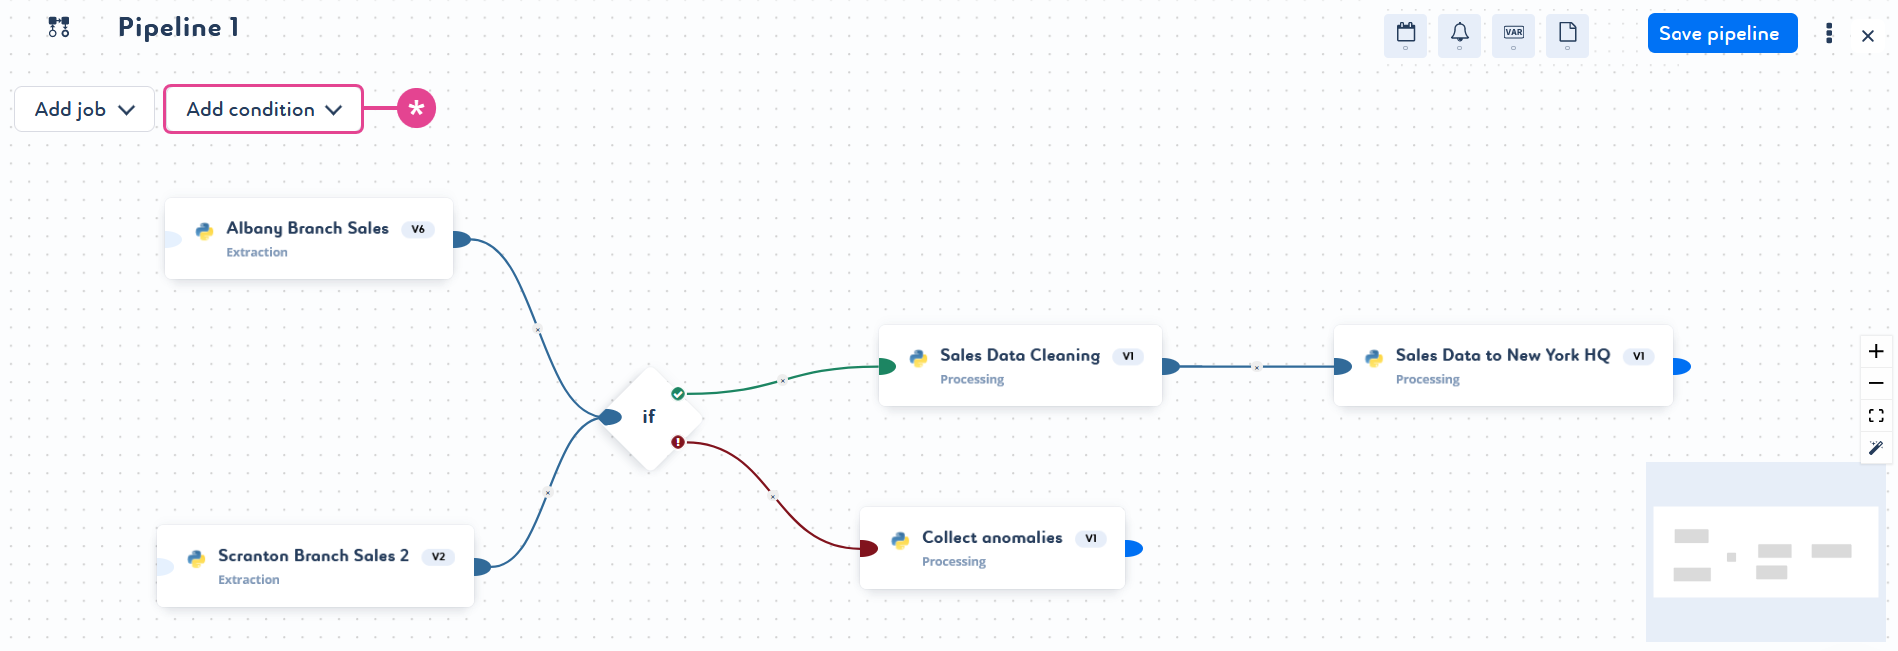
Construct your pipeline by adding at least two jobs.
-
Select Add job and chose a job from the list.
A card containing basic information, such as name, technology, and job category, appears in the graph. -
Select Add job again and chose another job from the list.
Another job card appears in the graph. -
Link the two jobs.

-
Repeat these steps as many times as required. You can also add one or more conditions to build more relevant pipelines. To add conditions, click Add condition when editing your pipeline and link it to your jobs. Remember that a condition must have at least one parent and one child.
-
-
Configure settings to schedule your pipeline run, send email alerts, and set environment variables. You can also add a release note.
-
Click either:
-
Save pipeline to save your changes.
-
The kebab menu
 Save & run to save your changes and automatically run your pipeline.
 -
The cross
 to exit the creation mode without saving your pipeline.
A pop-up window appears with a progress bar. You can click the cross to exit faster or click Continue edition to cancel your cancellation.
to exit the creation mode without saving your pipeline.
A pop-up window appears with a progress bar. You can click the cross to exit faster or click Continue edition to cancel your cancellation.
-
Deleting a Pipeline
-
To delete a pipeline, you can either:
-
Click
 Delete job in the secondary navigation menu from any other page of your job.
 -
Click
Delete at the end of the corresponding pipeline row from the Pipelines page. -
Click the kebab menu
Delete from the  Overview page of the corresponding pipeline.
 -
Click
Delete pipeline at the bottom of the secondary navigation menu from any other page of the corresponding pipeline.
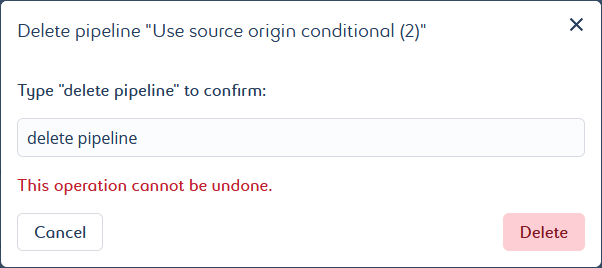
A pop-up window opens. It asks you to manually enter a confirmation message.
-
-
Type in the requested message for confirmation. The message is case sensitive.
-
Click Delete to confirm the deletion.
Running and Stopping Pipelines
-
Click
Projects from the primary navigation menu.
By default, the All Projects page opens with the list of existing projects. -
Click a project in the list to open it.
By default, the Jobs page opens with the list of existing jobs.
-
Click
Pipelines from the secondary navigation menu to open the project’s pipeline library. -
You can either:
-
Click Run
 or Stop
  in front of the desired pipeline from the library.
 -
Open the pipeline details and start or stop the run from its
Overview page. Click either Run  or Stop
  depending of the current status of your pipeline.
You can also access this command at the bottom of the secondary navigation menu from the
 Instances and
  Versions page.
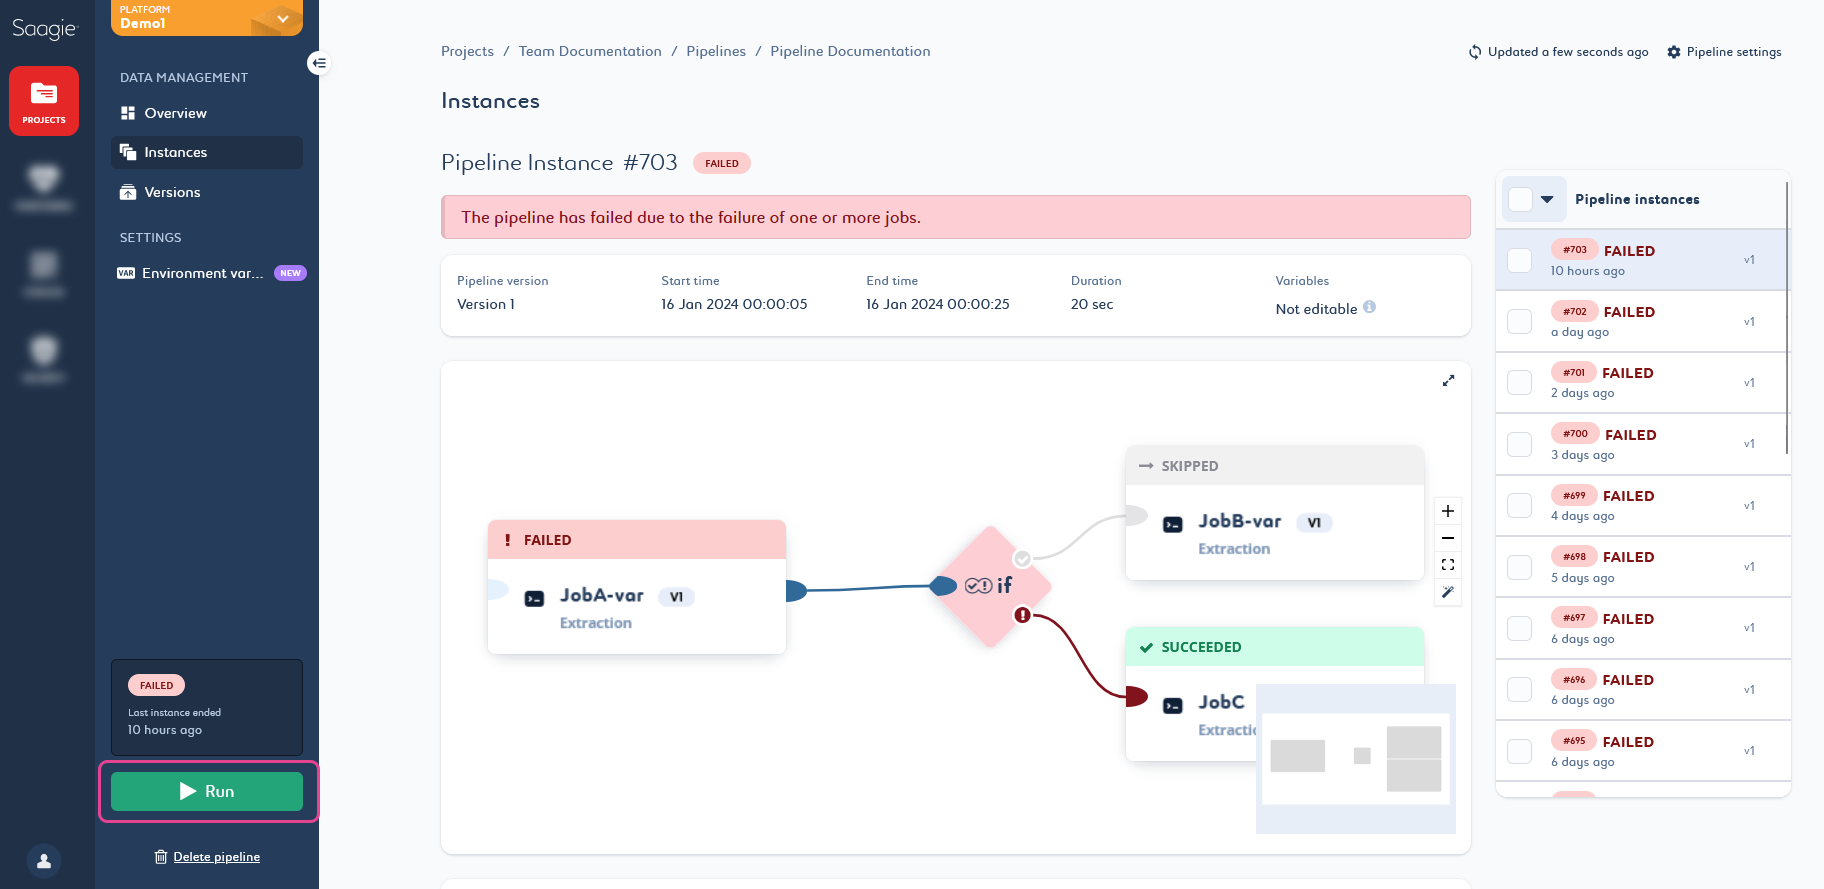
The pipeline status changes depending on the outcome.
-
A pipeline is
Succeededwhen all its jobs have been successfully executed or skipped. -
A pipeline is
Failedas soon as one or more of its jobs has failed. -
Jobs that follow a failed job are always
Skipped.
-
Rerunning a Pipeline Instance
You can rerun a previous pipeline instance from the ![]() Instances page of your pipeline.
Instances page of your pipeline.
-
Click
Projects from the primary navigation menu.
By default, the All Projects page opens with the list of existing projects. -
Click a project in the list to open it.
By default, the Jobs page opens with the list of existing jobs.
-
Click
Pipelines from the secondary navigation menu to open the project’s pipeline library. -
Click a pipeline in the list to open it and access its details.
The pipeline Overview page opens.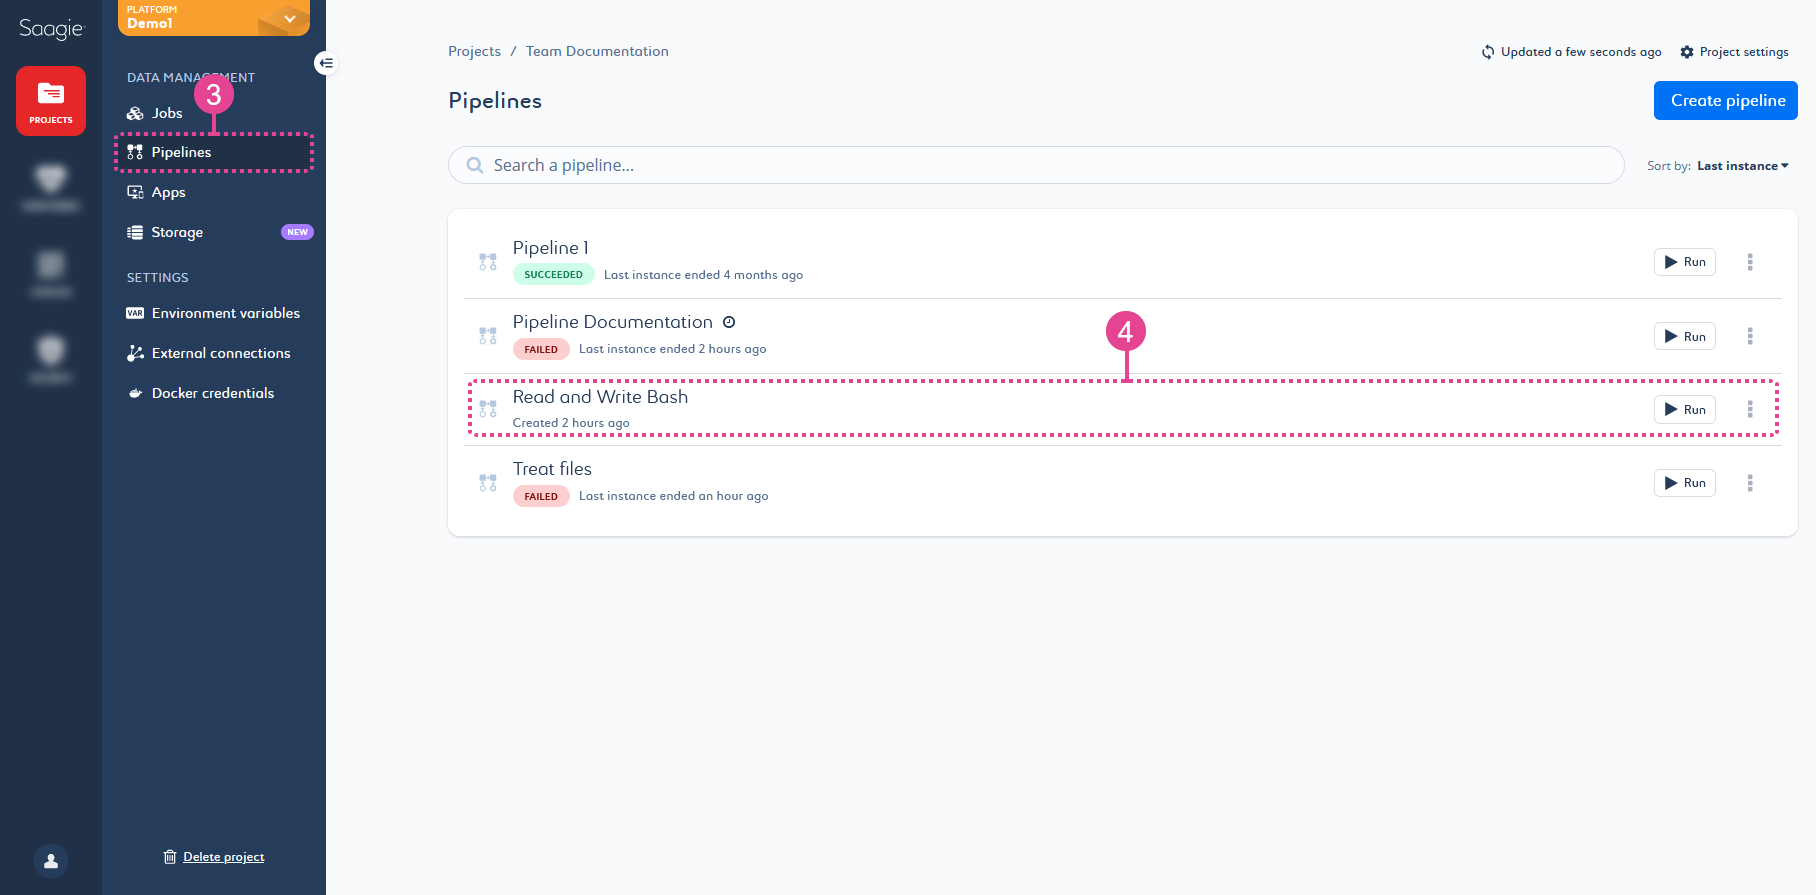
-
Click
Instances from the secondary navigation menu. -
From the list, select the pipeline instance you want to rerun.
You cannot rerun multiple pipeline instances at once. As with normal run, if the technology is disabled, the action button is also disabled, and a warning message is displayed telling you to change the technology. -
Click the arrow next to the Rerun button to open a context menu, and select the desired run option. You can rerun your pipeline instance with the current environment variable values by selecting Updated, or with its initial environment variable values, by selecting Original.
If you want to save your environment variables, you must enable the  Environment variables option.
-
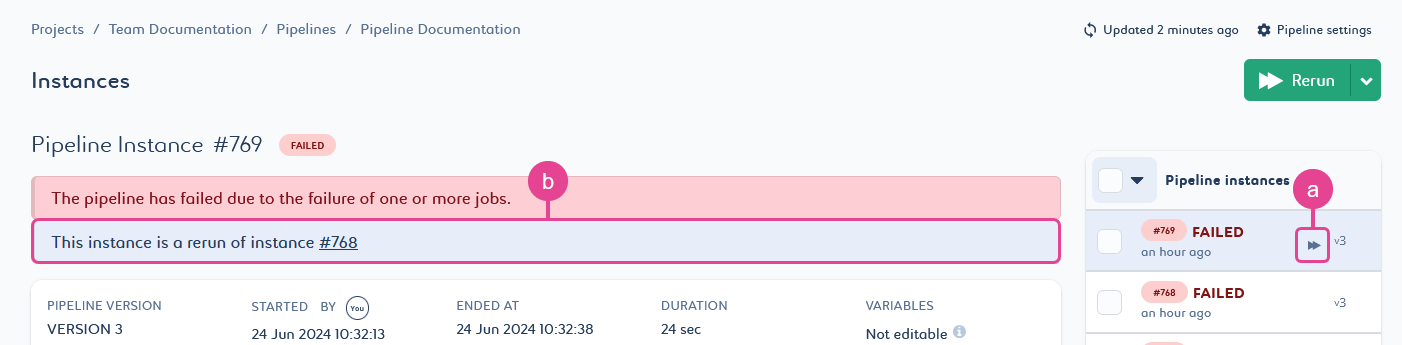
Then click Rerun to run the selected instance again.
Your rerun instance appears in the list with a double arrow (a). In addition, a message at the top of the page indicates the instance number from which it originates (b).
Modifying Pipeline Settings
After its creation, you can always modify your pipeline settings. You can access the settings from the pipeline ![]() Overview page or from its edit mode.
Overview page or from its edit mode.
-
Click
Projects from the primary navigation menu.
By default, the All Projects page opens with the list of existing projects. -
Click a project in the list to open it.
By default, the Jobs page opens with the list of existing jobs.
-
Click
Pipelines from the secondary navigation menu to open the project’s pipeline library. -
Click a pipeline in the list to open it and access its details.
The pipeline Overview page opens.
-
Click the desired setting from the
Overview page (a) or in  Edit mode (b) to edit it:
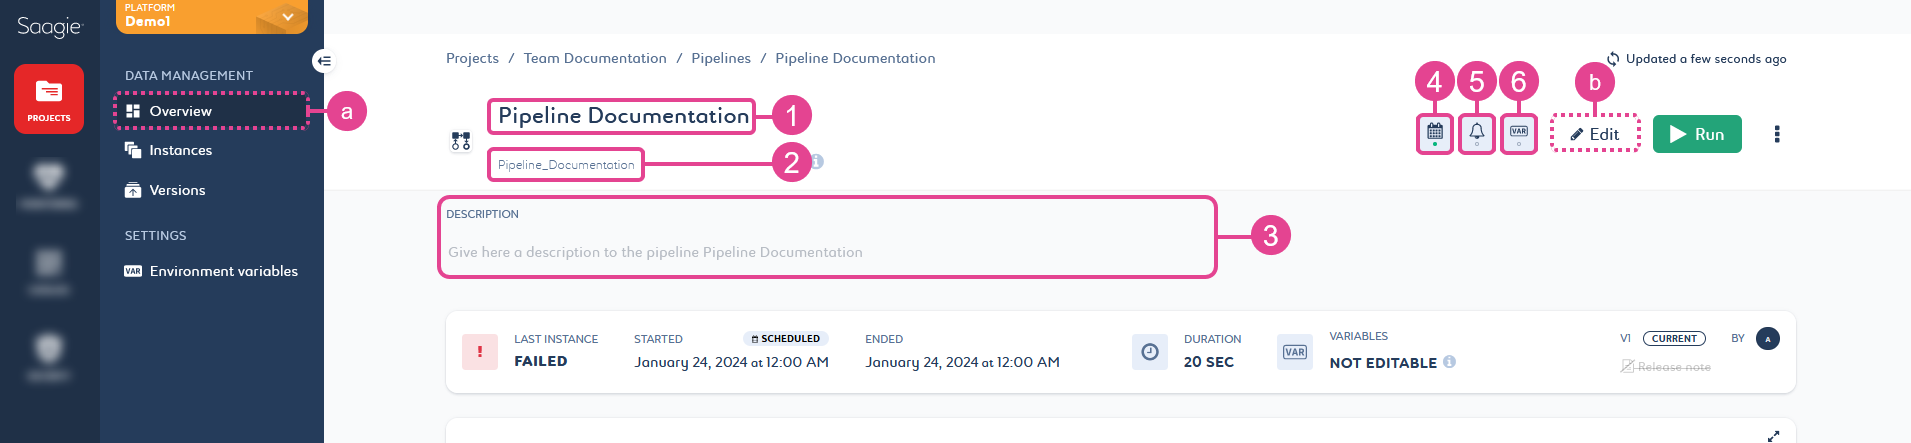 Figure 1. Pipeline Settings from the Overview Page
 Figure 2. Pipeline Settings in the Edit Mode
Names are mandatory. They can be up to 255 characters long and must be unique within a project.
The pipeline alias is unique to each pipeline in a project. It allows you to reference a pipeline in your code with a constant key.
The Description field is only available on the Overview page.
Descriptions are optional and not restricted. However, it is a good practice to add them. Keep them short and to the point.
Click the switch in the side panel of the setting to enable or disable it. There are two types of execution:
-
The manual run, which requires you to click Run
to start the pipeline. -
The scheduled run, which launches the pipeline according to the schedule you choose. It has three schedule modes: Simple, Shortcut, and Expert.
A scheduled pipeline can always be run manually. -
In Simple mode, you can easily specify variables through the user interface. There are many possibilities.
-
In Shortcut mode, you can choose the recurrence of your run on an hourly, daily, weekly, monthly, or annual basis. All other settings are automatic.
-
In Expert mode, you can specify variables using the Cron format. The Cron time string consists of five values separated by spaces:
[minute] [hour] [day of the month] [month] [day of the week].
Once you have finished scheduling your run, you will see the summary of your choice written below and the time of the next run.
-
By default, instances can run at the same time. To prevent this, select the Forbid overlapping scheduled instances option. This means that if your pipeline is still running when the next scheduled run is due, it will be skipped.
Click the switch in the side panel of the setting to enable or disable it. Alerts are optional and can be set to receive an email when the status of your pipeline changes. They can be sent to multiple email addresses to notify you of the following status changes:
Status Description 
RequestedThe pipeline’s run has been requested and is being executed.
QueuedThe pipeline is waiting for the necessary resources to be executed.

RunningThe pipeline is up and running.

FailedThe pipeline has crashed.

StoppingThe pipeline is stopping.
StoppedThe pipeline has stopped running.

SucceededThe pipeline has been successfully executed.

UnknownThe pipeline no longer runs because an error has occurred.
Click the switch in the side panel of the setting to enable or disable it. This setting can be used to:
-
Manage Environment Variables on the Fly
You can create, modify, and delete pipeline environment variables on the fly from the Variables side panel. Changes made from this panel will update the pipeline
Environment variables page accordingly.You do not have to enable the setting for this to work. For more information, see Managing Pipeline Environment Variables on the Fly.
-
Transfer Variables Between Jobs During Pipeline Execution
-
When enabled
, it allows you to transfer modified and created variables between jobs during pipeline execution. In addition, you can view a summary table of used, modified, and unchanged variables for each job in the pipeline Overview and Instances pages.This feature relies on advanced mechanisms that require more resources. These resources would be wasted if not used efficiently. Thus, to have correct optimization, we recommend to disable this option if it has no real use during the execution of the pipeline. -
When disabled
 , modification and transfer of variables between jobs during pipeline execution is not allowed. You can still read global, project, and pipeline environment variables, but not modify them.
-
The second part of the
Overview page indicates whether the setting is enabled or not. -
Each pipeline instance indicates whether it was executed with the setting enabled or not.
-
For more information, see Creating and Modifying Variables in a Job Output in a Pipeline.
-
-
-
Saving is automatic. You can just press Enter to confirm the pipeline name change, click anywhere nearby to confirm the pipeline alias and description change, and close the side panel to confirm the scheduled run, email alert, and environment variable changes.
Managing Pipeline Environment Variables on the Fly
You can create, modify, and delete pipeline environment variables on the fly using the ![]() Variables side panel.
Variables side panel.
| The setting does not need to be activated for this to work. |
-
Click
Projects from the primary navigation menu.
By default, the All Projects page opens with the list of existing projects. -
Click a project in the list to open it.
By default, the Jobs page opens with the list of existing jobs.
-
Click
Pipelines from the secondary navigation menu to open the project’s pipeline library. -
Click a pipeline in the list to open it and access its details.
The pipeline Overview page opens.
-
Click the
Variables setting in your pipeline from the pipeline Overview page or from its Edit mode.
A panel opens with the existing variables in a code block. -
In the code block, add, modify, or delete variables.
How to set pipeline environment variables?-
A pipeline environment variable includes a key (name), an equal sign, and a value.
-
The name is mandatory. It must begin with a letter and can be up to 128 characters, including alphanumeric characters (a-z) (A-Z) (0-9) and underscores (_).
-
Values can be up to 2,048 characters.
-
A line is equal to an environment variable.
-
A line that begins with a hash sign (#) is a comment line. This content will be ignored.
-
If the same key is defined several times, only the value of the last occurrence of this key will be saved.
-
Environment variables defined as passwords are not listed here, nor can they be defined as such.
⇒ Read the embedded help for more information.
-
These changes will update the pipeline ![]() Environment variables page accordingly.
Environment variables page accordingly.
Upgrading Pipelines
You can upgrade your pipelines to always get the most out of them. It allows you to modify the name and description, the settings, add and delete jobs and conditions. By upgrading your pipeline, you create a new version of it.
|
For production environment, upgrade your pipeline with our CI/CD process. When you push a pipeline via the CI/CD process, a link to the source code is added to the pipeline’s graph, on the |
-
Click
Projects from the primary navigation menu.
By default, the All Projects page opens with the list of existing projects. -
Click a project in the list to open it.
By default, the Jobs page opens with the list of existing jobs.
-
Click
Pipelines from the secondary navigation menu to open the project’s pipeline library. -
Click a pipeline in the list to open it and access its details.
The pipeline Overview page opens.
-
Click
Edit from the Overview page.
The page for editing your pipeline opens. -
You can change your pipeline through the Design tab and Code tab. The two tabs are linked and changes made in one will be reflected in the other. Synchronization takes place as soon as you switch from one tab to the other.
-
Design your pipeline:
Move jobs and conditions anywhere on the design grid. -
Add or remove jobs and conditions:
-
Click Add job or Add condition and select an item from the list to add a job or a condition to the pipeline.
-
Click the job or condition card and select
Remove to remove it from the pipeline.
-
-
Add or remove links:
-
Link the connectors of a job or condition to create connections between them.
-
Click the small grey cross
in the middle of a link to remove the link between jobs or conditions.
-
Upload your code file in
.yamlor.ymlformat by clicking Import a YAML file.
The Code tab displays your code in read-only mode. The imported file cannot be edited directly on the platform.
-
You cannot import a file that contains syntax errors. If your file has errors, a pop-up message appears to indicate you the error line(s). In this case, the file is not imported. The pipeline keeps the current pipeline design. Try to correct the errors and upload your file again.
-
Only existing jobs of your project can be referenced in the code file.
-
You can download your pipeline code file by clicking
 Export pipeline as a YAML file.
 -
Click Copy the YAML result to clipboard
 to copy the code to your clipboard and paste it into your text editor.
 -
You can also import
.xmlor.jsonfiles. However, once imported into the platform, it will be automatically converted to YAML.
Deploy to see an example explaining the YAML code file for a pipeline
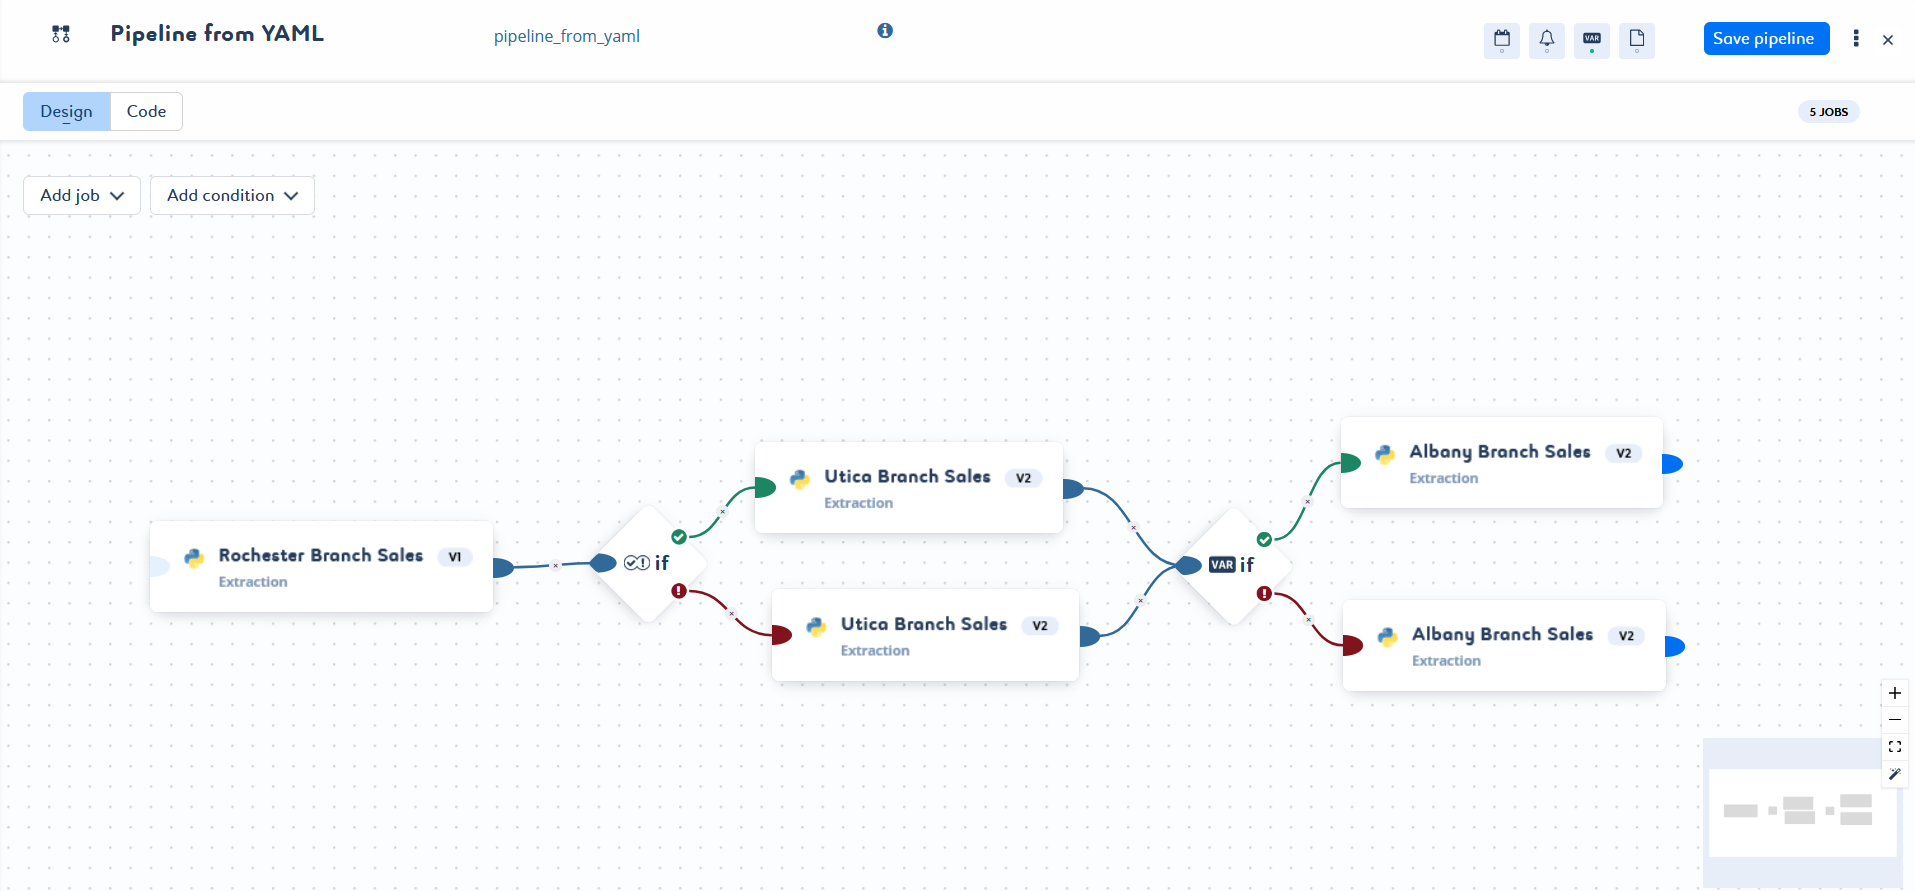
Here is an example of what your pipeline code file should look like:
schema: "1.0"
pipeline:
  name: Pipeline from YAML
  alias: pipeline_from_yaml
  executionVariables: true
  nodes:
    - job:
        alias: Utica_Branch_Sales
        node: node001
        position:
          x: 588
          y: -30
        nextNodes:
          - node007
    - conditionStatus:
        trigger: AllSuccessOrSkipped
        node: node006
        position:
          x: 470
          y: 48
        nextNodesSuccess:
          - node001
        nextNodesFailure:
          - node004
    - conditionExpression:
        expression: true != false
        node: node007
        position:
          x: 930
          y: 50
        nextNodesSuccess:
          - node002
        nextNodesFailure:
          - node005
    - job:
        alias: Albany_Branch_Sales
        node: node002
        position:
          x: 1048
          y: -49.5
        nextNodes: []
    - job:
        alias: Rochester_Branch_Sales
        node: node003
        position:
          x: 112
          y: 32
        nextNodes:
          - node006
    - job:
        alias: Utica_Branch_Sales
        node: node004
        position:
          x: 601
          y: 86
        nextNodes:
          - node007
    - job:
        alias: Albany_Branch_Sales
        node: node005
        position:
          x: 1050
          y: 94
        nextNodes: []
Where:
-
schemais the version of the internal schema of the document. This line is automatically added when you import your code file in Saagie. -
pipelineis the instanciation of the pipeline object as a whole. It has no value of its own, but has related sub-attributes.-
nameis the name of your pipeline. -
aliasis the alias of your pipeline. -
executionVariablesis to define the option to modify environment variables at runtime. For more information, see Transfer Variables Between Jobs During Pipeline Execution. -
nodesis to instanciate the list of job(s) and condition(s) to add to your pipeline. It has no value of its own, but has related sub-attributes.-
jobis to add a job to your pipeline. It has no value of its own, but has related sub-attributes.-
aliasis the alias of an existing job in your project. -
nodeis a temporary identifier for your job. It allows you to reference your job in the code file. You can reference it as the next element to run after another job or a condition. -
positionis to define your job position in the graph. Wherexis for the horizontal axis andyis for the vertical axis. -
nextNodesis to define the next job(s) and condition(s) to run after this job. Its value(s) are thenodevalue of the desired job(s) and condition(s).
-
-
conditionStatusis to add conditions on the status of the jobs.-
triggeris to define the behavior expected by your condition. It can beAllSuccessOrSkipped,AllSuccess, orAtLeastOneSuccess. For more information, see Conditions on Statuses. -
nodeis a temporary identifier for your condition. It allows you to reference your condition in the code file. You can reference it in thenextNodesattribute of a job to make it the next element to run after that job. -
nextNodesSuccessis to define the element(s) to run if the condition succeeds. Its value(s) are thenodevalue of the desired job(s). -
nextNodesFailureis to define the element(s) to run if the condition fails. Its value(s) are thenodevalue of the desired job(s).
-
-
conditionExpressionis to add a condition on environment variables.-
expressionis to define the behavior expected by your condition. For more information, see Conditions on Environment Variables. -
nodeis a temporary identifier for your condition. It allows you to reference your condition in the code file. You can reference it in thenextNodesattribute of a job to make it the next element to run after that job. -
nextNodesSuccessis to define the element(s) to run if the condition succeeds. Its value(s) are thenodevalue of the desired job(s). -
nextNodesFailureis to define the element(s) to run if the condition fails. Its value(s) are thenodevalue of the desired job(s).
-
-
-
Here is the graphic representation of the pipeline code above:
You can also modify the pipeline settings, and add a release note.
Changes made only to metadata such as name, alias, scheduled run, email alerts, and environment variables do not trigger the creation of a new pipeline version. -
-
Click either:
-
Save pipeline to save your changes.
-
The kebab menu
Save & run to save your changes and automatically run your pipeline. -
The cross
to exit the creation mode without saving your pipeline.
A pop-up window appears with a progress bar. You can click the cross to exit faster or click Continue edition to cancel your cancellation.
-
Your pipeline has been upgraded, and you should see that a new version of it has been created.
Duplicating Pipelines
You can only duplicate the Current ![]() version of your pipeline. There are two duplication levels. Shallow and deep duplication. Both options exclude alerts, scheduling, other pipeline versions, instances, logs, and observability data.
version of your pipeline. There are two duplication levels. Shallow and deep duplication. Both options exclude alerts, scheduling, other pipeline versions, instances, logs, and observability data.
-
Click
Projects from the primary navigation menu.
By default, the All Projects page opens with the list of existing projects. -
Click a project in the list to open it.
By default, the Jobs page opens with the list of existing jobs.
-
Click
Pipelines from the secondary navigation menu to open the project’s pipeline library. -
You can click the kebab menu
Duplicate at the end of the relevant row from the Pipeline page, or from the Overview page of a pipeline.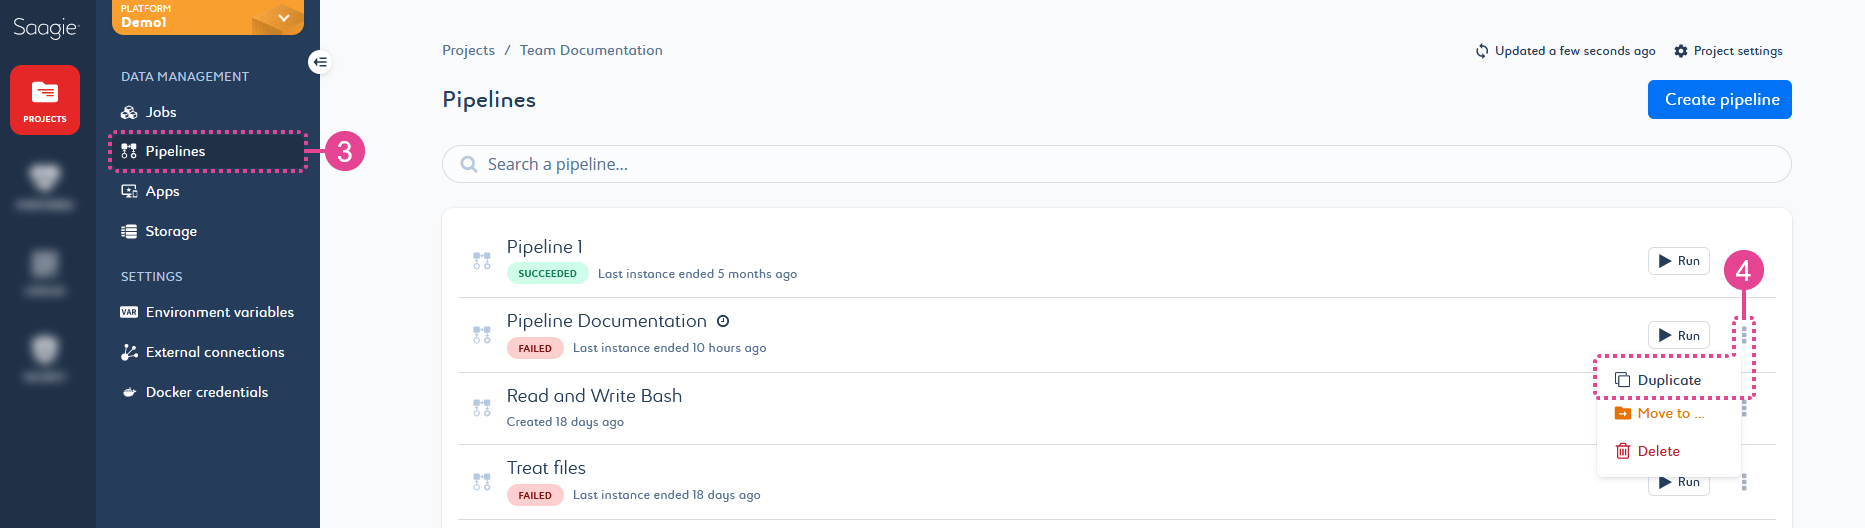 Figure 3. Duplicate your pipeline from the Pipeline page
-
You cannot duplicate an invalid pipeline.
-
You cannot select multiple pipeline versions at the same time and duplicate them.
A window opens.
-
-
Select either:
-
Shallow duplication: This option includes a copy of the conditions and environment variables at pipeline level, and a reference to the original jobs and their relationship to the pipeline.
-
Deep duplication: This option includes a copy of the conditions, of the environment variables at pipeline level, and of the original jobs and their relationship to the pipeline.
-
-
Click Duplicate to confirm the duplication.
Depending on whether you duplicated from the Pipeline page or from the pipeline Overview page, you are returned to either the pipeline library, or the Overview page of the duplicated pipeline, respectively. In addition, a message appears saying that your pipeline has been successfully duplicated.The name and alias of your duplicated pipeline will be
<original pipeline name> (ID starting by X)and<original pipeline alias> (ID starting by X). WhereXis an incremental number starting by 1.For example, you duplicate the pipeline
Clean Data. The name of the duplicated pipeline will beClean Data (1). If you duplicate the pipelineClean Dataa second time, the name of this second duplicated pipeline will beClean Data (2), and so on. If the duplicated pipeline name exceed the 255-character limit, we truncate the last 13 characters. The incremental number is kept.
Deleting Pipeline Instances and Pipeline Versions
-
Click
Projects from the primary navigation menu.
By default, the All Projects page opens with the list of existing projects. -
Click a project in the list to open it.
By default, the Jobs page opens with the list of existing jobs.
-
Click
Pipelines from the secondary navigation menu to open the project’s pipeline library. -
Click a pipeline in the list to open it and access its details.
The pipeline Overview page opens.
-
Click either:
-
Instances to access your pipeline’s instances page and delete instances with their logs from the list.
-
Deleting a pipeline instance deletes all the job instances linked to it, as well as all associated logs.
-
You cannot delete unfinished instances, that is, instances whose status is
Requested,Queued,Running,Stopping. Wait for the end of the executions and try again. -
You cannot delete an instance that has not yet been cleaned from the orchestrator. Wait a moment and try again.
-
-
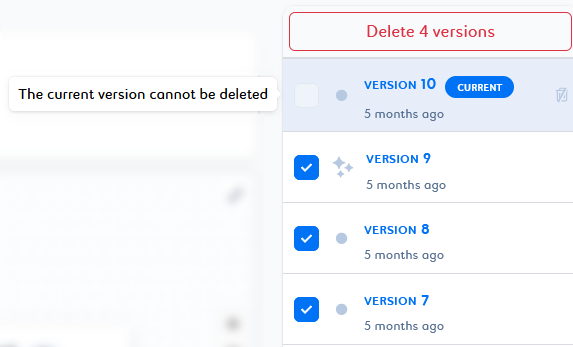
Versions to access your pipeline’s versions page and delete versions from the list.
-
Deleting a pipeline version deletes the pipeline and job instances linked to it, as well as all its dependencies, such as logs and conditions.
-
You cannot delete the version tagged as
Current . You can revert to another version of the pipeline to change the current one and delete it.
 -
You cannot delete a version that is linked to unfinished instances. Wait for the end of the executions and try again.
-
You cannot delete a version whose instances have not yet been cleaned from the orchestrator. Wait a moment and try again.
-
-
-
You can delete either instances or versions of your pipeline.
You can delete a single pipeline instance or version by clicking the trash can
that appears on the line when you hover over the desired element.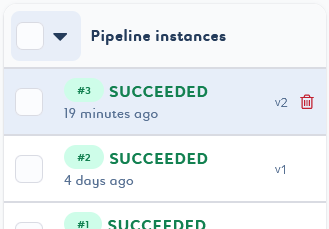
You can delete a selection of pipeline instances or versions by selecting them in the list and clicking Delete n instances/versions at the top of the list.
You will then be able to play with the selector by adding or removing elements with different states. 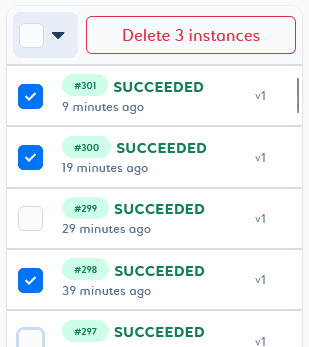
You can delete a selection of pipeline instances based on status criteria. To do this, select the desired filter and click Delete n instances at the top of the list.
You will then be able to play with the selector by adding or removing elements with different states. 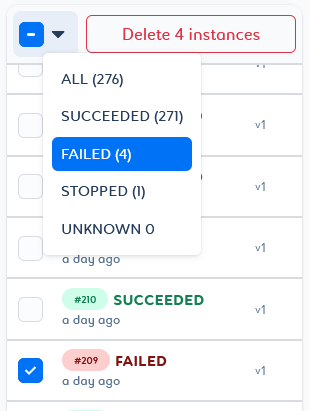
You can delete pipeline instances by date criteria with the All instances older than
 filter. It will delete all instances and associated logs prior to the selected date.
-
Select the All instances older than
filter.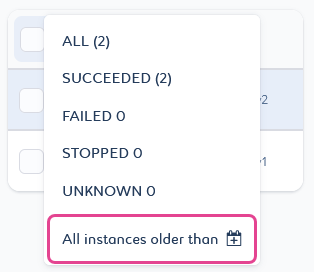
A pop-up window opens with a date picker.
-
Select a date.
-
Click Select instances to confirm your choice.
The corresponding instances are selected in the list.You will then be able to play with the selector by adding or removing elements. -
Click Delete n instances at the top of the list.
-
-
The deletion process is slightly different depending on whether you are deleting instances or versions of the pipeline.
-
To delete instances, you must confirm the pop-up message and the permanent deletion by clicking Delete.
-
To delete versions, you must type in the requested message that appears in the pop-up window before you can click Delete to confirm the deletion. The message is case sensitive.
-
Moving a Pipeline to Another Project
You can move a pipeline from one project to another and on a different platform from the pipeline library or the pipeline ![]() Overview page. Jobs, conditions, pipeline environment variables, versions, instances, logs, alerts, and resource settings are all included in the moved pipeline.
Overview page. Jobs, conditions, pipeline environment variables, versions, instances, logs, alerts, and resource settings are all included in the moved pipeline.
|
-
Click
Projects from the primary navigation menu.
By default, the All Projects page opens with the list of existing projects. -
Click a project in the list to open it.
By default, the Jobs page opens with the list of existing jobs.
-
Click
Pipelines from the secondary navigation menu to open the project’s pipeline library. -
You can click the kebab menu
 Move to… at the end of the relevant pipeline row from the Pipelines page, or from the Overview page of a pipeline.
 Figure 4. Move a pipeline from the Pipeline page
In Figure 4, the
Move to… action is in orange. This means that some issue(s) are preventing your pipeline from being moved. You can still click on it; It will display a panel that lists the errors.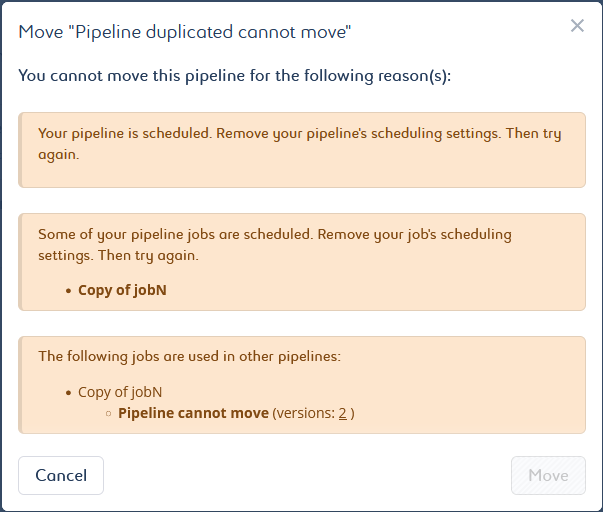
The possible issues can be as follows:
-
You cannot move a pipeline that has one or more jobs in use in another pipeline. It can be a job that is used in a different version than the current version of another pipeline. Make a deep duplication of your pipeline and move the duplicated pipeline to bypass this issue.
-
You cannot move a pipeline whose instances have not yet been cleaned from the orchestrator. Wait a moment and try again.
-
You cannot move a running and scheduled pipeline, as well as a pipeline containing running and scheduled jobs. Wait for the end of the execution(s) and try to remove the scheduling settings. Then try again.
-
The job technology that is used in the pipeline must be available in the target project. If it does not, select another project or modify the settings of the target project.
A pop-up window opens.
-
-
Select the target platform and target project from the list.
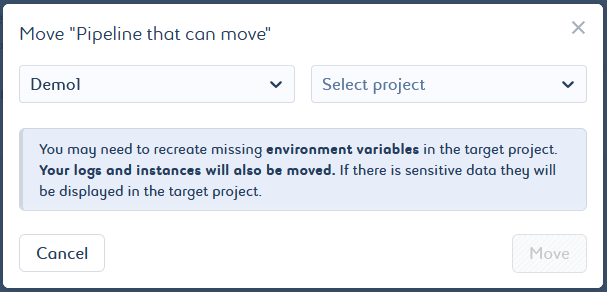
-
Click Move to confirm the move.
You will see a message saying that your pipeline has been successfully moved. You can click Go to target project below the success message to be redirected to the pipeline library of the target project. Jobs, conditions, pipeline environment variables, versions, instances, logs, alerts, and resource settings are all included in the moved pipeline. There is no obfuscation of the data. If there is sensitive data, it will be visible in the target project.