Managing Projects
Creating Projects
-
Click
 Projects from the primary navigation menu.
By default, the All Projects page opens with the list of existing projects, if any. -
Click Create project from your project library to create a new project.
-
Fill in the creation form with the required information and click Continue between each step.
Names are mandatory. They can be up to 255 characters long and must be unique within a project.
Descriptions are optional and not restricted. However, it is a good practice to add them. Keep them short and to the point.
You can select one or more job technologies from the desired repositories for each job category. Technologies that are not selected will not be available in the project but can still be added by changing the project settings.
-
The repositories appear in all job categories. Make sure to select your technologies from the correct repository.
-
Click the information icon
 to view a description and the available contexts of a technology.
 -
The job technologies available to choose for your project are determined by the Technology Catalog.
You can select one or more app technologies from the desired repositories. Technologies that are not selected will not be available in the project but can still be added by changing the project settings.
-
An app technology can appear in multiple repositories. Make sure to select your technologies from the correct repository.
-
Click the information icon
to view a description and the available contexts of a technology. -
The app technologies available to choose for your project are determined by the Technology Catalog.
Define access rights to this project. You can add one or more groups with a specific role to access this project.
-
If you click wrong, click the minus sign
 at the end of the row to remove the group from the list of additions.
 -
You can see that you have the list of the groups that can access all projects. You can change these permissions in the
 Security module, Managing Groups.
-
-
Click Create project to confirm the creation.
Creating the project may take a few minutes.
Deleting a Project
-
To delete a job, you can either:
-
Click
 Delete at the end of the corresponding project row from the All Projects page.
 -
Click
Delete project in the secondary navigation menu from any page of your project.
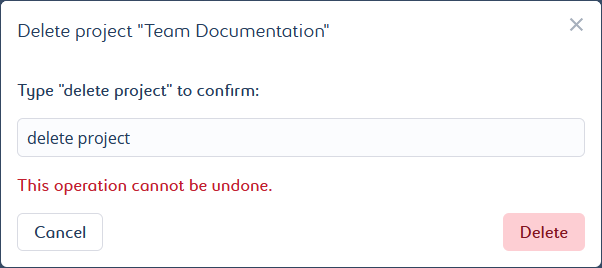
A pop-up window opens. It asks you to manually enter a confirmation message.
-
-
Type in the requested message for confirmation. The message is case sensitive.
-
Click Delete to confirm the deletion.
Modifying Projects Settings
-
Click
Projects from the primary navigation menu.
By default, the All Projects page opens with the list of existing projects. -
Click the project you want to change in the list.
By default, the Jobs page opens with the list of existing jobs, if any.
 -
Click
 Project settings from any page that appears in the secondary navigation menu.
 -
Modify the desired settings:
Names are mandatory. They can be up to 255 characters long and must be unique within a project.
Descriptions are optional and not restricted. However, it is a good practice to add them. Keep them short and to the point.
Add or remove job technologies from the desired repositories for each job category. Technologies used by existing jobs cannot be removed.
-
The repositories appear in all job categories. Make sure to select your technologies from the correct repository.
-
Click the information icon
to view a description and the available contexts of a technology. -
The job technologies available to choose for your project are determined by the Technology Catalog.
Add or remove app technologies from the desired repositories. Technologies used by existing apps cannot be removed.
-
An app technology can appear in multiple repositories. Make sure to select your technologies from the correct repository.
-
Click the information icon
to view a description and the available contexts of a technology. -
The app technologies available to choose for your project are determined by the Technology Catalog.
Change project access rights by adding or deleting groups. Change also the access role of a group.
-
If you click wrong, click the minus sign
at the end of the row to remove the group from the list of additions. -
The access rights to a project can also be changed through the
 Groups page.
 -
You can see that you have the list of the groups that can access all projects. You can change these permissions in the
Security module, Managing Groups.
-
-
Click Save settings to save your changes.