Read, Write, and List Files From HDFS With Talend
To follow this procedure, you must have a Repository containing the information of the Saagie platform. To this end, create a context group and define the contexts and variables required.
In this case, define the following context variables:
| Name | Type | Value |
|---|---|---|
|
String |
Your HDFS IP address |
|
String |
Your HDFS port |
|
String |
The folder to be selected in the HDFS |
|
String |
The file name to be selected from HDFS |
|
Directory |
The local directory to store the files get from HDFS |
|
File |
The local file |
|
String |
The name for the retrieve file |
|
String |
The name of local file |
|
String |
The HDFS user authentication name |
Once your context group is created and stored in the Repository, you can apply the Repository context variables to your jobs.
| For more information, read the whole section on Using contexts and variables on Talend Studio User Guide. |
Without Kerberos
Read Files
-
Create a new job in Talend.
-
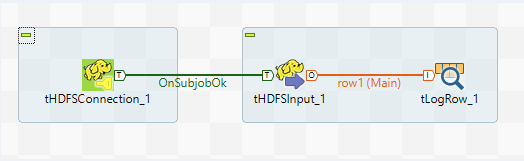
Add the following components:
-
tHDFSConnection, to establish an HDFS connection to be reused by other HDFS components in your job. -
tHDFSInput, to extract data in an HDFS file for other components to process it. -
tLogRow, to display the result.
-
-
Link these components as follows:
-
Link
tHDFSConnectionandtHDFSInputwith theOnSubjobOkconnection. -
Link
tHDFSInputandtLogRowwith theMainconnection.
-
-
Double-click each component and configure their settings as follows:
In the Basic settings tab:
-
From the Property type list, select Built-in so that no property data is stored centrally.
-
From the Distribution list, select the Cloudera cluster.
-
From the Version list, select the latest version of Cloudera.
-
In the NameNode URI field, enter the URI of the Hadoop NameNode, the master node of a Hadoop system. It must respect the following pattern:
hdfs://ip_hdfs:port_hdfs. Use context variables if possible:"hdfs://"+context.IP_HDFS+":"+context.Port_HDFS+"/" -
In the Username field, enter the HDFS user authentication name.
-
Enter the following Hadoop properties:
Property Value "dfs.nameservices""nameservice1""dfs.ha.namenodes.cluster""nn1,nn2""dfs.client.failover.proxy.provider.cluster""org.apache.hadoop.hdfs.server.namenode.ha.ConfiguredFailoverProxyProvider""dfs.namenode.rpc-address.cluster.nn1""nn1:8020""dfs.namenode.rpc-address.cluster.nn2""nn2:8020" -
Disable the Use datanode hostname option.
For more information, you can refer to Talend’s documentation on the tHDFSConnectioncomponent.In the Basic settings tab:
-
From the Property type list, select Built-in so that no property data is stored centrally.
-
From the Schema list, select Built-In to create and store the schema locally for this component only.
-
Click Edit schema to make changes to the schema, and add a
flowvariable. -
Select the Use an existing connection option.
-
From the Component List list, select the connection component
tHDFSConnectionto reuse the connection details already defined. -
In the File Name field, browse to, or enter the path pointing to the data to be used in the file system.
-
From the Type list, select the type of the file to be processed.
-
In the Row separator field, you can identify the end of a row.
-
In the Field separator field, you can enter a character, a string, or a regular expression to separate fields for the transferred data.
-
In the Header field, you can set values to ignore the header of the transferred data.
For more information, you can refer to Talend’s documentation on the tHDFSInputcomponent.For more information, you can refer to Talend’s documentation on the tLogRowcomponent. -
-
Run the job.
Write Files
-
Create a new job in Talend.
-
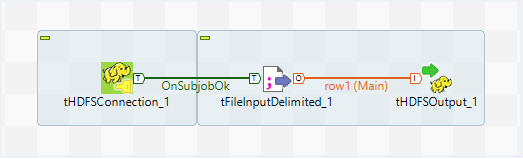
Add the following components:
-
tHDFSConnection, to establish an HDFS connection to be reused by other HDFS components in your job. -
tFileInputDelimited, to read a delimited file row by row to split them up into fields and then send the fields as defined in the schema to the next component. -
tHDFSOutput, to write data into a given HDFS.
-
-
Link these components as follows:
-
Link
tHDFSConnectionandtFileInputDelimitedwith theOnSubjobOkconnection. -
Link
tFileInputDelimitedandtHDFSOutputwith theMainconnection.
-
-
Double-click each component and configure their settings as follows:
In the Basic settings tab:
-
From the Property type list, select Built-in so that no property data is stored centrally.
-
From the Distribution list, select the Cloudera cluster.
-
From the Version list, select the latest version of Cloudera.
-
In the NameNode URI field, enter the URI of the Hadoop NameNode, the master node of a Hadoop system. It must respect the following pattern:
hdfs://ip_hdfs:port_hdfs. Use context variables if possible:"hdfs://"+context.IP_HDFS+":"+context.Port_HDFS+"/" -
In the Username field, enter the HDFS user authentication name.
-
Enter the following Hadoop properties:
Property Value "dfs.nameservices""nameservice1""dfs.ha.namenodes.cluster""nn1,nn2""dfs.client.failover.proxy.provider.cluster""org.apache.hadoop.hdfs.server.namenode.ha.ConfiguredFailoverProxyProvider""dfs.namenode.rpc-address.cluster.nn1""nn1:8020""dfs.namenode.rpc-address.cluster.nn2""nn2:8020" -
Disable the Use datanode hostname option.
For more information, you can refer to Talend’s documentation on the tHDFSConnectioncomponent.In the Basic settings tab:
-
From the Property type list, select Built-in so that no property data is stored centrally.
-
In the File Name/Stream field, enter the name and path of the file to be processed.
-
In the Row separator field, you can identify the end of a row.
-
In the Field separator field, you can enter a character, a string, or a regular expression to separate fields for the transferred data.
-
You can select the CSV options option and define your options.
-
In the Header field, enter the number of rows to be skipped in the beginning of file.
-
In the Footer field, enter the number of rows to be skipped at the end of the file.
-
In the Limit field, enter the maximum number of rows to be processed.
-
From the Schema list, select Built-In to create and store the schema locally for this component only.
-
Select the Skip empty rows option.
For more information, you can refer to Talend’s documentation on the tFileInputDelimitedcomponent.In the Basic settings tab:
-
From the Property type list, select Built-in so that no property data is stored centrally.
-
From the Schema list, select Built-In to create and store the schema locally for this component only.
-
Click Edit schema to make changes to the schema, and add a
flowvariable as Input and Output. -
Select the Use an existing connection option.
-
From the Component List list, select the connection component
tHDFSConnectionto reuse the connection details already defined. -
In the File name field, browse to, or enter the location of the file which you write data to.
This file is created automatically if it does not exist. -
From the Type list, select the type of the file to be processed.
-
From the Action list, select the action that you want to perform on the file.
-
In the Row separator field, you can identify the end of a row.
-
In the Field separator field, you can enter a character, a string, or a regular expression to separate fields for the transferred data.
For more information, you can refer to Talend’s documentation on the tHDFSOutputcomponent. -
-
Run the job.
List Files
-
Create a new job in Talend.
-
Add the following components:
-
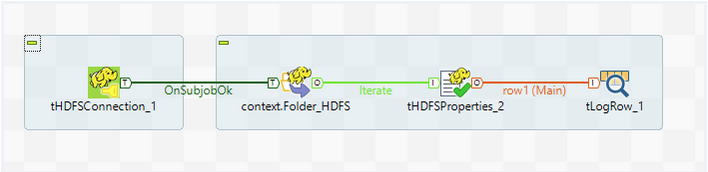
tHDFSConnection, to establish an HDFS connection reusable by other HDFS components. -
tHDFSList, to retrieve a list of files or folders in a local directory. -
tHDFSProperties, to create a single row flow that displays the properties of a file processed in HDFS. -
tLogRow, to display the result.
-
-
Link these components as follows:
-
Link
tHDFSConnectionandtHDFSListwith theOnSubjobOkconnection. -
Link
tHDFSListandtHDFSPropertieswith theIterateconnection. -
Link
tHDFSPropertiesandtLogRowwith theMainconnection.
-
-
Double-click each component and configure their settings as follows:
In the Basic settings tab:
-
From the Property type list, select Built-in so that no property data is stored centrally.
-
From the Distribution list, select the Cloudera cluster.
-
From the Version list, select the latest version of Cloudera.
-
In the NameNode URI field, enter the URI of the Hadoop NameNode, the master node of a Hadoop system. It must respect the following pattern:
hdfs://ip_hdfs:port_hdfs. Use context variables if possible:"hdfs://"+context.IP_HDFS+":"+context.Port_HDFS+"/" -
In the Username field, enter the HDFS user authentication name.
-
Enter the following Hadoop properties:
Property Value "dfs.nameservices""nameservice1""dfs.ha.namenodes.cluster""nn1,nn2""dfs.client.failover.proxy.provider.cluster""org.apache.hadoop.hdfs.server.namenode.ha.ConfiguredFailoverProxyProvider""dfs.namenode.rpc-address.cluster.nn1""nn1:8020""dfs.namenode.rpc-address.cluster.nn2""nn2:8020" -
Select the Use datanode hostname option.
For more information, you can refer to Talend’s documentation on the tHDFSConnectioncomponent.In the Basic settings tab:
-
From the Property type list, select Built-in so that no property data is stored centrally.
-
Select the Use an existing connection option.
-
From the Component List list, select the connection component
tHDFSConnectionto reuse the connection details already defined. -
In the HDFS directory field, browse to, or enter the path pointing to the data to be used in the file system.
-
From the FileList Type list, select the type of input you want to iterate on from the list.
-
Select the Use Glob Expressions as Filemask option.
-
In the Files field, add as many File mask as required.
-
You can use the Order by and Order action features to sort your data.
For more information, you can refer to Talend’s documentation on the tHDFSListcomponent.In the Basic settings tab:
-
From the Property type list, select Built-in so that no property data is stored centrally.
-
Select the Use an existing connection option.
-
From the Component List list, select the connection component
tHDFSConnectionto reuse the connection details already defined. -
From the Schema list, select Built-In to create and store the schema locally for this component only.
-
In the File field, browse to, or enter the path pointing to the data to be used in the file system.
For more information, you can refer to Talend’s documentation on the tHDFSPropertiescomponent.For more information, you can refer to Talend’s documentation on the tLogRowcomponent. -
-
Run the job.
With Kerberos
To follow this procedure, you must have a Repository containing the information of the Saagie platform. To this end, create a context group and define the contexts and variables required.
In this case, define the following context variables:
| Name | Type | Value |
|---|---|---|
|
String |
The Kerberos user authentication name |
|
String |
The Kerberos user account password |
|
String |
The Kerberos principal name |
|
String |
URI to store file in HDFS |
Once your context group is created and stored in the Repository, you can apply the Repository context variables to your jobs.
| For more information, read the whole section on Using contexts and variables on Talend Studio User Guide. |
Read Files With a Kerberized Cluster
-
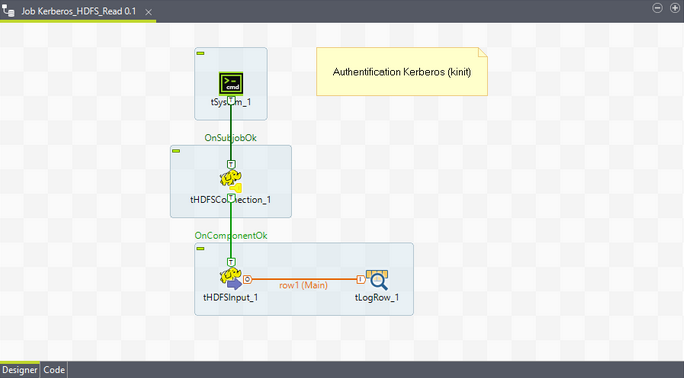
Create a new job in Talend.
-
Add the following components:
-
tSystem, to establish the Kerberos connection. -
tHDFSConnection, to establish a connection to an HDFS database to be reused by other HDFS components in your job. -
tHDFSInput, to extract data in an HDFS file for other components to process it. -
tLogRow, to display the result.
-
-
Link these components as follows:
-
Link
tSystemandtHDFSConnectionwith theOnSubjobOkconnection. -
Link
tHDFSConnectionandtHDFSInputwith theOnComponentOkconnection. -
Link
tHDFSInputandtLogRowwith theMainconnection.
-
-
Double-click each component and configure their settings as follows:
In the Basic settings tab:
-
Select the Use Array Command option.
It will activate its Command field. -
In this Command field, enter the following system command in array, one parameter per line.
"/bin/bash"
"-c"
"echo '"+context.kerberos_pwd+"' | kinit "+context.kerberos_login
-
From the Standard Output and Error Output list, select the type of output for the processed data to be transferred to.
-
From the Schema list, select Built-In to create and store the schema locally for this component only.
For more information, you can refer to Talend’s documentation on the tSystemcomponent.In the Basic settings tab:
-
From the Property type list, select Built-in so that no property data is stored centrally.
-
From the Distribution list, select the Cloudera cluster.
-
From the Version list, select the latest version of Cloudera.
-
In the NameNode URI field, enter the URI of the Hadoop NameNode, the master node of a Hadoop system. It must respect the following pattern:
hdfs://ip_hdfs:port_hdfs. Use context variables if possible:"hdfs://"+context.IP_HDFS+":"+context.Port_HDFS+"/" -
Select the Use kerberos authentication option, and then enter the relevant parameters in the fields that appear.
-
Disable the Use datanode hostname option.
For more information, you can refer to Talend’s documentation on the tHDFSConnectioncomponent.In the Basic settings tab:
-
From the Property type list, select Built-in so that no property data is stored centrally.
-
From the Schema list, select Built-In to create and store the schema locally for this component only.
-
Select the Use an existing connection option.
-
From the Component List list, select the connection component
tHDFSConnectionto reuse the connection details already defined. -
In the File Name field, browse to, or enter the path pointing to the data to be used in the file system.
-
From the Type list, select the type of the file to be processed.
-
In the Row separator field, you can identify the end of a row.
-
In the Field separator field, you can enter a character, a string, or a regular expression to separate fields for the transferred data.
-
In the Header field, you can set values to ignore the header of the transferred data.
For more information, you can refer to Talend’s documentation on the tHDFSInputcomponent.For more information, you can refer to Talend’s documentation on the tLogRowcomponent. -
-
Run the job.
Write Files With a Kerberized Cluster
-
Create a new job in Talend.
-
Add the following components:
-
tSystem, to establish the Kerberos connection. -
tHDFSConnection, to establish an HDFS connection to be reused by other HDFS components in your job. -
tRowGenerator, to read a delimited file row by row to split them up into fields and then send the fields as defined in the schema to the next component. -
tHDFSOutput, to write data into a given HDFS.
-
-
Link these components as follows:
-
Link
tSystemandtHDFSConnectionwith theOnSubjobOkconnection. -
Link
tHDFSConnectionandtRowGeneratorwith theOnComponentOkconnection. -
Link
tRowGeneratorandtHDFSOutputwith theMainconnection.
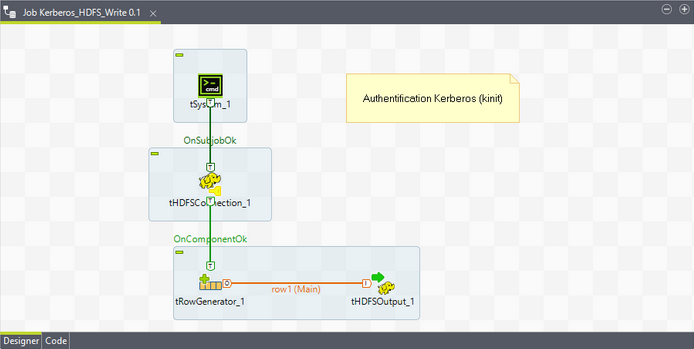
-
-
Double-click each component and configure their settings as follows:
In the Basic settings tab:
-
Select the Use Array Command option.
It will activate its Command field. -
In this Command field, enter the following system command in array, one parameter per line.
"/bin/bash"
"-c"
"echo '"+context.kerberos_pwd+"' | kinit "+context.kerberos_login
-
From the Standard Output and Error Output list, select the type of output for the processed data to be transferred to.
-
From the Schema list, select Built-In to create and store the schema locally for this component only.
For more information, you can refer to Talend’s documentation on the tSystemcomponent.In the Basic settings tab:
-
From the Property type list, select Built-in so that no property data is stored centrally.
-
From the Distribution list, select the Cloudera cluster.
-
From the Version list, select the latest version of Cloudera.
-
In the NameNode URI field, enter the URI of the Hadoop NameNode, the master node of a Hadoop system. It must respect the following pattern:
hdfs://ip_hdfs:port_hdfs. Use context variables if possible:"hdfs://"+context.IP_HDFS+":"+context.Port_HDFS+"/" -
Select the Use kerberos authentication option, and then enter the relevant parameters in the fields that appear.
-
Disable the Use datanode hostname option.
For more information, you can refer to Talend’s documentation on the tHDFSConnectioncomponent.For more information, you can refer to Talend’s documentation on the tRowGeneratorcomponent.In the Basic settings tab:
-
From the Property type list, select Built-in so that no property data is stored centrally.
-
From the Schema list, select Built-In to create and store the schema locally for this component only.
-
Click Edit schema to make changes to the schema, if needed.
-
Select the Use an existing connection option.
-
From the Component List list, select the connection component
tHDFSConnectionto reuse the connection details already defined. -
In the File name field, browse to, or enter the location of the file, which you write data to.
This file is created automatically if it does not exist. -
From the Type list, select the type of the file to be processed.
-
From the Action list, select the action that you want to perform on the file.
-
In the Row separator field, you can identify the end of a row.
-
In the Field separator field, you can enter a character, a string, or a regular expression to separate fields for the transferred data.
For more information, you can refer to Talend’s documentation on the tHDFSOutputcomponent. -
-
Run the job.
List Files With a Kerberized Cluster
-
Create a new job in Talend.
-
Add the following components:
-
tSystem, to establish the Kerberos connection. -
tHDFSConnection, to establish an HDFS connection reusable by other HDFS components. -
tHDFSList, to retrieve a list of files or folders in a local directory. -
tRowGenerator, to generate data. -
tLogRow, to display the result.
-
-
Link these components as follows:
-
Link
tSystemandtHDFSConnectionwith theOnSubjobOkconnection. -
Link
tHDFSConnectionandtHDFSListwith theOnSubjobOkconnection. -
Link
tHDFSListandtRowGeneratorwith theIterateconnection. -
Link
tRowGeneratorandtLogRowwith theMainconnection.
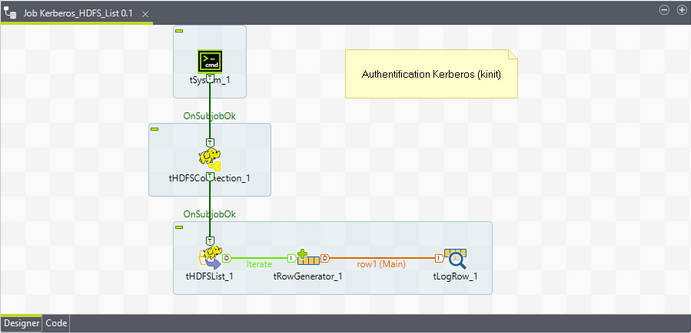
-
-
Double-click each component and configure their settings as follows:
In the Basic settings tab:
-
Select the Use Array Command option.
It will activate its Command field. -
In this Command field, enter the following system command in array, one parameter per line.
"/bin/bash"
"-c"
"echo '"+context.kerberos_pwd+"' | kinit "+context.kerberos_login
-
From the Standard Output and Error Output list, select the type of output for the processed data to be transferred to.
-
From the Schema list, select Built-In to create and store the schema locally for this component only.
For more information, you can refer to Talend’s documentation on the tSystemcomponent.In the Basic settings tab:
-
From the Property type list, select Built-in so that no property data is stored centrally.
-
From the Distribution list, select the Cloudera cluster.
-
From the Version list, select the latest version of Cloudera.
-
In the NameNode URI field, enter the URI of the Hadoop NameNode, the master node of a Hadoop system. It must respect the following pattern:
hdfs://ip_hdfs:port_hdfs. Use context variables if possible:"hdfs://"+context.IP_HDFS+":"+context.Port_HDFS+"/" -
Select the Use kerberos authentication option, and then enter the relevant parameters in the fields that appear.
-
Disable the Use datanode hostname option.
For more information, you can refer to Talend’s documentation on the tHDFSConnectioncomponent.In the Basic settings tab:
-
From the Property type list, select Built-in so that no property data is stored centrally.
-
Select the Use an existing connection option.
-
From the Component List list, select the connection component
tHDFSConnectionto reuse the connection details already defined. -
In the HDFS directory field, browse to, or enter the path pointing to the data to be used in the file system.
-
From the FileList Type list, select the type of input you want to iterate on from the list.
-
Select the Use Glob Expressions as Filemask option.
-
In the Files field, add as many File mask as required.
-
You can use the Order by and Order action features to sort your data.
For more information, you can refer to Talend’s documentation on the tHDFSListcomponent.Define the structure of data to be generated as follows:
-
Add a column by clicking the plus (+) button.
-
Define the nature of the data in the Type column by selecting a value from the list.
-
Set the environment variable.
-
In the Number of Rows for RowGenerator field, enter the number of rows to generate.
For more information, you can refer to Talend’s documentation on the tRowGeneratorcomponent.For more information, you can refer to Talend’s documentation on the tLogRowcomponent. -
-
Run the job.
-
Code example to read, write, and list files from HDFS with Talend (GitHub page)
-
Code example to read, write, and list files from HDFS with Kerberos with Talend (GitHub page)