Read and Write Tables From Impala With Talend
Without Kerberos
To follow this procedure, you must have a Repository containing the information of the Saagie platform. To this end, create a context group and define the contexts and variables required.
In this case, define the following context variables:
| Name | Type | Value |
|---|---|---|
|
String |
Your Impala IP address |
|
String |
Your Impala port |
|
String |
The Impala source table |
|
String |
The Impala working database |
|
String |
The Impala user authentication name |
|
String |
The Impala target table |
|
Password |
The Impala user account password |
Once your context group is created and stored in the Repository, you can apply the Repository context variables to your jobs.
| For more information, read the whole section on Using contexts and variables on Talend Studio User Guide. |
Read Tables
-
Create a new job in Talend.
-
Add the following components:
-
tImpalaConnection, to establish a connection to an Impala database to be reused by other Impala components in your job. -
tImpalaInput, to execute the select queries to extract data from Impala and send the data to the following component. -
tLogRow, to display the result.
-
-
Link these components as follows:
-
Link
tImpalaConnectionandtImpalaInputwith theOnSubjobOkconnection. -
Link
tImpalaInputandtLogRowwith theMainconnection.
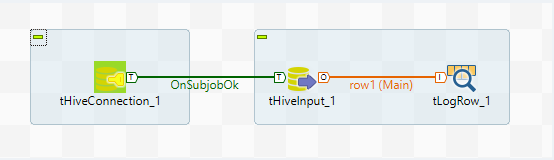 The above example is with Hive components.
 -
-
Double-click each component and configure their settings as follows:
In the Basic settings tab:
-
From the Property type list, select Built-in so that no property data is stored centrally.
-
From the Distribution list, select the Cloudera cluster.
-
From the Version list, select the latest version of Cloudera.
-
In the Host field, enter the database server IP address.
-
In the Port field, enter the listening port number of the database server.
-
In the Database field, enter the name of the database.
-
In the Username and Password fields, enter the authentication information of the user.
-
In the Additional JDBC Settings field, you can specify additional connection properties for the database connection you are creating.
For more information, you can refer to Talend’s documentation on the tImpalaConnectioncomponent.In the Basic settings tab:
-
From the Property type list, select Built-in so that no property data is stored centrally.
-
Select the Use an existing connection option.
-
From the Component List list, select the connection component
tImpalaConnectionto reuse the connection details already defined. -
From the Schema list, select Built-In to create and store the schema locally for this component only.
-
In the Table name field, enter the name of the table.
-
From the Query type field, select Built-In to fill in manually the query statement or build it graphically using SQLBuilder.
-
In the Query field, enter your database query as follows:
"SELECT COUNT(*) FROM "+context.Table_Impala+"".
For more information, you can refer to Talend’s documentation on the tImpalaInputcomponent.For more information, you can refer to Talend’s documentation on the tLogRowcomponent. -
-
Run the job.
Write Tables
-
Create a new job in Talend.
-
Add the following components:
-
tImpalaConnection, to establish a connection to an Impala database to be reused by other Impala components in your job. -
tImpalaRow, to execute a SQL query at each iteration of the Talend flow.
-
-
Link these components with the
OnSubjobOkconnection.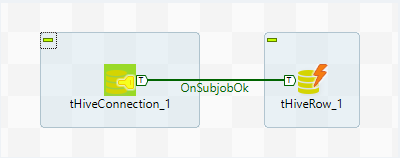 The above example is with Hive components.
 -
Double-click each component and configure their settings as follows:
In the Basic settings tab:
-
From the Property type list, select Built-in so that no property data is stored centrally.
-
From the Distribution list, select the Cloudera cluster.
-
From the Version list, select the latest version of Cloudera.
-
In the Host field, enter the database server IP address.
-
In the Port field, enter the listening port number of the database server.
-
In the Database field, enter the name of the database.
-
In the Username and Password fields, enter the authentication information of the user.
-
In the Additional JDBC Settings field, you can specify additional connection properties for the database connection you are creating.
For more information, you can refer to Talend’s documentation on the tImpalaConnectioncomponent.In the Basic settings tab:
-
From the Property type list, select Built-in so that no property data is stored centrally.
-
Select the Use an existing connection option.
-
From the Component List list, select the connection component
tImpalaConnectionto reuse the connection details already defined. -
From the Schema list, select Built-In to create and store the schema locally for this component only.
-
In the Table name field, enter the name of the table.
-
From the Query type field, select Built-In to fill in manually the query statement or build it graphically using SQLBuilder.
-
In the Query field, enter your database query as follows:
"CREATE TABLE "+context.New_Table_Impala+" AS SELECT * FROM "+context.Table_Impala+" LIMIT 10".
For more information, you can refer to Talend’s documentation on the tImpalaRowcomponent. -
-
Run the job.
With Kerberos
To follow this procedure, you must have a Repository containing the information of the Saagie platform. To this end, create a context group and define the contexts and variables required.
In this case, define the following context variables:
| Name | Type | Value |
|---|---|---|
|
String |
The Kerberos user authentication name |
|
String |
The Kerberos user account password |
|
String |
The Kerberos principal name |
|
String |
Your Impala IP address |
|
int | Integer |
Your Impala port |
Once your context group is created and stored in the Repository, you can apply the Repository context variables to your jobs.
| For more information, read the whole section on Using contexts and variables on Talend Studio User Guide. |
Read Tables With a Kerberized Cluster
-
Create a new job in Talend.
-
Add the following components:
-
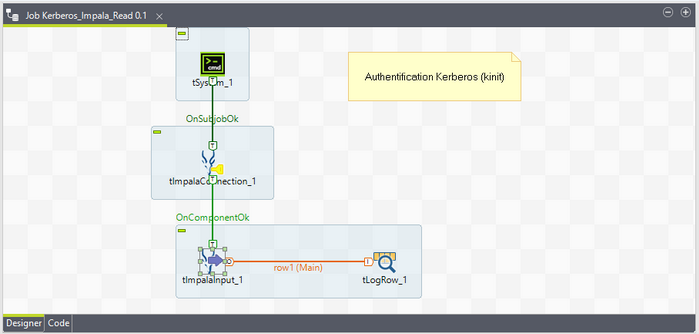
tSystem, to establish the Kerberos connection. -
tImpalaConnection, to establish a connection to an Impala database to be reused by other Impala components in your job. -
tImpalaInput, to execute the select queries to extract data from Impala and send the data to the following component. -
tLogRow, to display the result.
-
-
Link these components as follows:
-
Link
tSystemandtImpalaConnectionwith theOnSubjobOkconnection. -
Link
tImpalaConnectionandtImpalaInputwith theOnComponentOkconnection. -
Link
tImpalaInputandtLogRowwith theMainconnection.
-
-
Double-click each component and configure their settings as follows:
In the Basic settings tab:
-
Select the Use Array Command option.
It will activate its Command field. -
In this Command field, enter the following system command in array, one parameter per line.
"/bin/bash"
"-c"
"echo '"+context.kerberos_pwd+"' | kinit "+context.kerberos_login
-
From the Standard Output and Error Output list, select the type of output for the processed data to be transferred to.
-
From the Schema list, select Built-In to create and store the schema locally for this component only.
For more information, you can refer to Talend’s documentation on the tSystemcomponent.In the Basic settings tab:
-
From the Property type list, select Built-in so that no property data is stored centrally.
-
From the Distribution list, select the Cloudera cluster.
-
From the Version list, select the latest version of Cloudera.
-
In the Host field, enter the database server IP address.
-
In the Port field, enter the listening port number of the database server.
-
In the Username and Password fields, enter the authentication information of the user.
-
Select the Use Kerberos authentication option to access your Impala system using Kerberos security, and enter the Kerberos principal of your Impala system.
For more information, you can refer to Talend’s documentation on the tImpalaConnectioncomponent.In the Basic settings tab:
-
From the Property type list, select Built-in so that no property data is stored centrally.
-
Select the Use an existing connection option.
-
From the Component List list, select the connection component
tImpalaConnectionto reuse the connection details already defined. -
From the Schema list, select Built-In to create and store the schema locally for this component only.
-
In the Table name field, enter the name of the table.
-
From the Query type field, select Built-In to fill in manually the query statement or build it graphically using SQLBuilder.
-
In the Query field, enter your database query.
For more information, you can refer to Talend’s documentation on the tImpalaInputcomponent.For more information, you can refer to Talend’s documentation on the tLogRowcomponent. -
-
Run the job.
Write Tables With a Kerberized Cluster
-
Create a new job in Talend.
-
Add the following components:
-
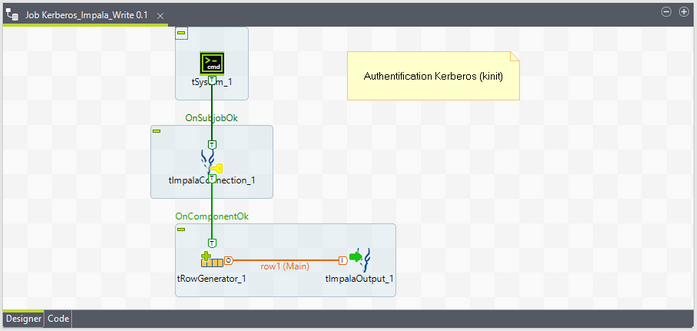
tSystem, to establish the Kerberos connection. -
tImpalaConnection, to establish a connection to an Impala database to be reused by other Impala components in your job. -
tRowGenerator, to generate data. -
tImpalaOutput, to connect to an Impala database and write data in an Impala table.
-
-
Link these components as follows:
-
Link
tSystemandtImpalaConnectionwith theOnSubjobOkconnection. -
Link
tImpalaConnectionandtRowGeneratorwith theOnComponentOkconnection. -
Link
tRowGeneratorandtImpalaOutputwith theMainconnection.
-
-
Double-click each component and configure their settings as follows:
In the Basic settings tab:
-
Select the Use Array Command option.
It will activate its Command field. -
In this Command field, enter the following system command in array, one parameter per line.
"/bin/bash"
"-c"
"echo '"+context.kerberos_pwd+"' | kinit "+context.kerberos_login
-
From the Standard Output and Error Output list, select the type of output for the processed data to be transferred to.
-
From the Schema list, select Built-In to create and store the schema locally for this component only.
For more information, you can refer to Talend’s documentation on the tSystemcomponent.In the Basic settings tab:
-
From the Property type list, select Built-in so that no property data is stored centrally.
-
From the Distribution list, select the Cloudera cluster.
-
From the Version list, select the latest version of Cloudera.
-
In the Host field, enter the database server IP address.
-
In the Port field, enter the listening port number of the database server.
-
In the Username and Password fields, enter the authentication information of the user.
-
Select the Use Kerberos authentication option to access your Impala system using Kerberos security, and enter the Kerberos principal of your Impala system.
For more information, you can refer to Talend’s documentation on the tImpalaConnectioncomponent.For more information, you can refer to Talend’s documentation on the tRowGeneratorcomponent.In the Basic settings tab:
-
From the Property type list, select Built-in so that no property data is stored centrally.
-
Select the Use an existing connection option.
-
From the Component List list, select the connection component
tImpalaConnectionto reuse the connection details already defined. -
From the Schema list, select Built-In to create and store the schema locally for this component only.
-
In the Table name field, enter the name of the table.
-
From the Action list, select whether you want to OVERWRITE the old data already existing in the destination or only APPEND the new data to the existing one.
-
Select the Extended insert option to combine multiple rows of data into one single INSERT action. This can speed up the insert operation.
For more information, you can refer to Talend’s documentation on the tImpalaOutputcomponent. -
-
Run the job.